Connecting to a Smartphone
 Flow of connecting a smartphone
Connecting to a Smartphone (Bluetooth Connection)
Connecting to a Smartphone ([Wi-Fi connection])
Connect with a smartphone which has the “Panasonic LUMIX Sync” (below: “LUMIX Sync”) smartphone app installed.
Use “LUMIX Sync” for remote recording and image transfers.
Flow of connecting a smartphone
-
Install “LUMIX Sync” on your smartphone. (
 Installing “LUMIX Sync”)
-
Connect to a smartphone.
Using a smartphone that supports Bluetooth Low Energy
(Connecting to a Smartphone (Bluetooth Connection))
Using a smartphone that does not support Bluetooth Low Energy
(Connecting to a Smartphone ([Wi-Fi connection]))
-
Operate the camera using the smartphone. (
Operating the Camera with a Smartphone)
 You can also use the camera to transfer images to a smartphone. (Sending Images from the Camera)
Installing “LUMIX Sync”
“LUMIX Sync” is an application for smartphones provided by Panasonic.
|
Supported OS Android™: Android 7 or higher iOS: iOS 12 or higher |
-
Connect the smartphone to a network.
-
(Android) Select “Google Play™ Store”.
(iOS) Select “App Store”.
-
Enter “LUMIX” or “panasonic lumix sync” into the search box.
-
Select and install the “Panasonic LUMIX Sync”
 .
.
|
For information on the “LUMIX Sync”, refer to the following support site: https://panasonic.jp/support/global/cs/dsc/ (English only) |
Connecting to a Smartphone (Bluetooth Connection)
Follow a simple connection setup procedure (pairing) to connect to a smartphone that supports Bluetooth Low Energy.
When pairing is set up, the Wi-Fi connection will be established automatically by just operating “LUMIX Sync”.
For the first-time connection, pairing settings are required.
For information about connecting for the second and subsequent times (Connecting to a Paired Smartphone)
|
Android™: Android 7 or higher with Bluetooth 4.0 or higher (excluding those that do not support Bluetooth Low Energy) iOS: iOS 12 or higher
|
-
On the smartphone, start up “LUMIX Sync”.
A message regarding device (camera) registration is displayed. Select [Next].
If you have closed the message, select [![]() ], then register the camera using [Camera registration (pairing)].
], then register the camera using [Camera registration (pairing)].


-
Check the content in the displayed guide and select [Next] until the screen to register the camera is displayed.
Operating the camera in accordance with the smartphone guide.
-
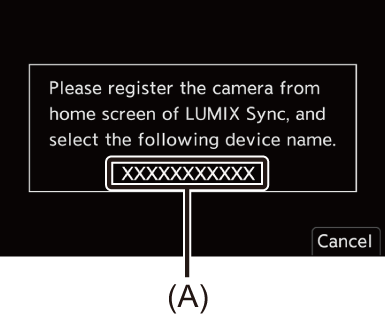
Set the camera to Bluetooth pairing standby state.

![]() [
[![]() ]
] ![]() [
[![]() ]
] ![]() [Bluetooth]
[Bluetooth] ![]() [Bluetooth]
[Bluetooth] ![]() [SET]
[SET] ![]() [Pairing]
[Pairing]
The camera enters pairing standby state and the device name (A) is displayed.
-
On the smartphone, select the camera’s device name.
(iOS devices) When a message to confirm the change of destination is displayed, select [Join].

-
When a message indicating that device registration is complete, select [OK].
A Bluetooth connection between the camera and the smartphone will be made.

|
When the Bluetooth function is enabled, but a connection is not established with the smartphone, [
If you try to register more than 16 smartphones, the registration information will be deleted from the oldest first. |
 Wi-Fi connection with a Bluetooth connected smartphone
You can establish Wi-Fi connection by operating “LUMIX Sync”.
-
Select [
 ] ([Remote shooting]) or [
 ] ([Import images]) in the “LUMIX Sync” home screen.
End Bluetooth Connection
To terminate the Bluetooth connection, turn off the Bluetooth function of the camera.
![]() [
[![]() ]
] ![]() [
[![]() ]
] ![]() [Bluetooth]
[Bluetooth] ![]() [Bluetooth]
[Bluetooth] ![]() Select [OFF]
Select [OFF]
|
|
Connecting to a Paired Smartphone
Connect paired smartphones using the following procedure.
-
Enable the Bluetooth function of the camera.
![]() [
[![]() ]
] ![]() [
[![]() ]
] ![]() [Bluetooth]
[Bluetooth] ![]() [Bluetooth]
[Bluetooth] ![]() [ON]
[ON]
-
On the smartphone, start up “LUMIX Sync”.
If a message is displayed indicating that the smartphone is searching for cameras, close the message.
-
Select [
 ].
].

-
Select [Bluetooth Setup].
-
Turn Bluetooth ON.

-
From [Camera registered] items, select the camera’s device name.
|
|
Canceling Pairing
-
Cancel the pairing setting of the camera.
![]() [
[![]() ]
] ![]() [
[![]() ]
] ![]() [Bluetooth]
[Bluetooth] ![]() [Bluetooth]
[Bluetooth] ![]() [SET]
[SET] ![]() [Delete]
[Delete]
-
Select the smartphone for which to cancel the pairing.
|
|
Connecting to a Smartphone ([Wi-Fi connection])
Use Wi-Fi to connect the camera and a smartphone.
With default settings, simple connection with smartphones is possible without entering a password.
You can also use password authentication for enhanced connection security.
-
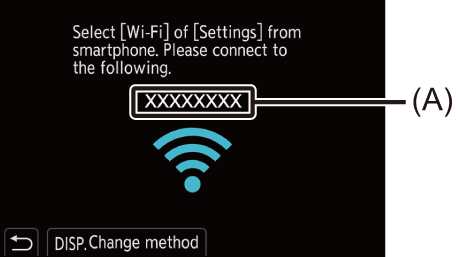
Set the camera to Wi-Fi connection standby status.
![]() [
[![]() ]
] ![]() [
[![]() ]
] ![]() [Wi-Fi]
[Wi-Fi] ![]() [Wi-Fi Function]
[Wi-Fi Function] ![]() [New Connection]
[New Connection] ![]() [Control With Smartphone]
[Control With Smartphone]
The SSID (A) of the camera is displayed on the screen.
You can also perform the same operation by pressing the Fn button assigned with [Wi-Fi].
-
In the setting menu of the smartphone, turn the Wi-Fi function ON.
-
Select the SSID displayed on the camera.

-
On the smartphone, start up “LUMIX Sync”.
-
(At the first connection) Confirm the device name displayed on the camera and then select [Yes].

|
If there are other Wi-Fi connection devices nearby, we recommend using either QR code or manual password input to connect with password authentication. (
– [Streaming Function] – [Auto Transfer] |
Using Password Authentication to Connect
You can enhance Wi-Fi connection security by using password authentication through either QR code or manual input.
Scanning QR code to connect
-
Set [Wi-Fi Password] on the camera to [ON].
![]() [
[![]() ]
] ![]() [
[![]() ]
] ![]() [Wi-Fi]
[Wi-Fi] ![]() [Wi-Fi Setup]
[Wi-Fi Setup] ![]() [Wi-Fi Password]
[Wi-Fi Password] ![]() [ON]
[ON]
-
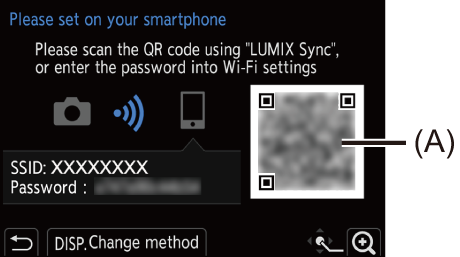
Display the QR code (A).
![]() [
[![]() ]
] ![]() [
[![]() ]
] ![]() [Wi-Fi]
[Wi-Fi] ![]() [Wi-Fi Function]
[Wi-Fi Function] ![]() [New Connection]
[New Connection] ![]() [Control With Smartphone]
[Control With Smartphone]
You can also perform the same operation by pressing the Fn button assigned with [Wi-Fi]. (Fn Buttons)
Press or  to enlarge the QR code.
-
On the smartphone, start up “LUMIX Sync”.
If a message is displayed indicating that the smartphone is searching for cameras, close the message.
-
Select [
].
-
Select [Wi-Fi connection].
-
Select [QR code].
-
Scan the QR code displayed on the screen of the camera using “LUMIX Sync”.
(iOS devices) When a message to confirm the change of destination is displayed, select [Join].
-
(At the first connection) Confirm the device name displayed on the screen of the camera and then select [Yes].
Manually entering a password to connect
-
Display the screen in Step 2 (
Scanning QR code to connect).
-
In the setting menu of the smartphone, turn the Wi-Fi function ON.
-
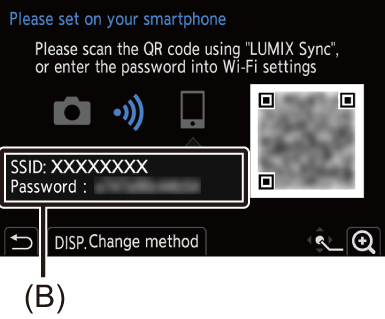
On the Wi-Fi setup screen, select the SSID (B) displayed on the camera.
-
(At the first connection) Enter the password (B) displayed on the camera.
-
On the smartphone, start up “LUMIX Sync”.
-
(At the first connection) Confirm the device name displayed on the screen of the camera and then select [Yes].
Connection Methods Other Than the Default Settings
When connecting with [Via Network], or [WPS Connection] in [Direct], follow the steps below:
-
Display the connection method setting screen for the camera.
![]() [
[![]() ]
] ![]() [
[![]() ]
] ![]() [Wi-Fi]
[Wi-Fi] ![]() [Wi-Fi Function]
[Wi-Fi Function] ![]() [New Connection]
[New Connection] ![]() [Control With Smartphone]
[Control With Smartphone]
-
Press [DISP.].
Connecting via network
-
Select [Via Network] and then press
or .
Connect the camera to a wireless access point. ([Via Network])
-
In the setting menu of the smartphone, turn the Wi-Fi function ON.
-
Connect the smartphone to the wireless access point that the camera is connected to.
-
On the smartphone, start up “LUMIX Sync”.
Connecting directly
-
Select [Direct] and then press
or .
Select [WPS Connection] to connect the camera to a smartphone. ([Direct])
-
On the smartphone, start up “LUMIX Sync”.
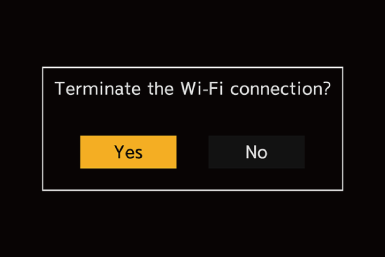
Terminating the Wi-Fi Connection
To end the Wi-Fi connection between the camera and smartphone, follow the steps below.
-
Press the shutter button halfway to put the camera in recording mode.
-
Terminate the Wi-Fi connection.
![]() [
[![]() ]
] ![]() [
[![]() ]
] ![]() [Wi-Fi]
[Wi-Fi] ![]() [Wi-Fi Function]
[Wi-Fi Function] ![]() [Yes]
[Yes]
You can also perform the same operation by pressing the Fn button assigned with [Wi-Fi]. (Fn Button Assigned with [Wi-Fi])
-
On the smartphone, close the “LUMIX Sync”.