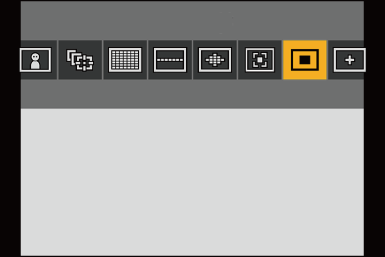
Selecting the AF Mode
 [Human Detect AF]/[Human/Animal Detect AF]
[Zone (Vert./ Horz.)]/[Zone (Square)]/[Zone (Oval)]
![]()
![]()
![]()
![]()
![]()
![]()
![]()
![]()
Select the focusing method to match the position and number of subjects.
-
Press [
 ].
].
The AF mode selection screen appears.

-
Select the AF mode.
Press 
 to select an item and then press
  or
or  .
.
Selection is also possible by pressing [].
![]() [Human Detect AF]/
[Human Detect AF]/![]() [Human/Animal Detect AF]
[Human/Animal Detect AF]
( [Human Detect AF]/[Human/Animal Detect AF])
![]() [Tracking]
[Tracking]
![]() [225-Area]
[225-Area]
![]() [Zone (Vert./ Horz.)]
[Zone (Vert./ Horz.)]
![]() [Zone (Square)]
[Zone (Square)] 1
1
![]() [Zone (Oval)]
[Zone (Oval)]
![]() [1-Area+]
[1-Area+]
![]() [1-Area]
[1-Area]
([1-Area])
![]() [Pinpoint]
[Pinpoint]
![]() [Custom1]1/
[Custom1]1/![]() [Custom2]1/
[Custom2]1/![]() [Custom3]1
[Custom3]1
-
This is not displayed with the default settings. From [Show/Hide AF Mode] in the [Custom] ([Focus/Shutter]) menu, you can set the items to display on the selection screen. (
[Show/Hide AF Mode])
|
– [Time Lapse Shot]
– [Live Cropping]
– [Miniature Effect] ([Filter Settings])
|
[Human Detect AF]/[Human/Animal Detect AF]
The camera detects a person’s face, eyes, and body (entire body, upper half of the body, or head) and adjusts the focus. With animal detection enabled, the camera will also detect animals, such as birds, canines (including wolves), and felines (including lions).
When the camera detects a person’s face (A)/(B) or body or an animal’s body (C)1, an AF area is displayed.
-
When the animal detection is enabled.
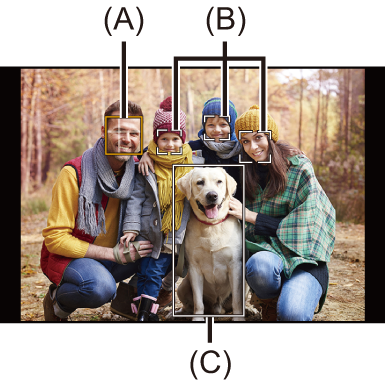
Yellow
AF area to be brought into focus.
The camera selects this automatically.
White
Displayed when multiple subjects are detected.
 Eye detection works only for the eyes inside the yellow frame (A).
|
The exposure will be adjusted to the face. (When [Metering Mode] is set to [
|
 Enable/Disable Animal Detection
-
Press [
] to display the AF mode selection screen.
-
Select [
 ] and then press
  .
.
This enables animal detection, and the icon changes to [![]() ].
].
Press again to disable animal detection.
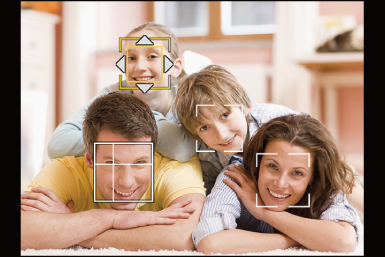
Specify the Person, Animal, or the Person’s Eye to Bring into Focus
When the person or animal to be brought into focus is shown using the white AF area, you can change this to a yellow AF area.
Touch operation
Touch the person, animal or eye indicated with the white AF area.
The AF area will change to yellow.
Touching outside the AF area displays the AF area setting screen. Touch [Set] to set the [![]() ] AF area at the position touched.
] AF area at the position touched.
To cancel the setting, touch [![]() ].
].

Button operation
Press .
Each press of switches the person, animal or eye to be brought into focus.
To cancel the settings specified, press .
Move and Change the Size of the Yellow AF Area
You can move the yellow AF area to the position of the white AF area and replace the white AF area with the yellow AF area.
If moving to a position outside an AF area, then the [![]() ] AF area will be set.
] AF area will be set.
-
Press [
] to display the AF mode selection screen.
-
Select [
] or [ ] and then press
  .
.
-
Press
to move the position of the AF area.
-
Rotate
 ,
,  or
or  to change the size of the AF area.
-
Press
.
On the recording screen, press , or touch [![]() ] to cancel the AF area setting.
] to cancel the AF area setting.
Operations on the AF area movement screen
|
Button operation |
Touch operation |
Description of operation |
|
|
Touch |
Moves the AF area. |
|
|
Pinch out/pinch in |
Enlarges/reduces the AF area in small steps. |
|
|
— |
Enlarges/reduces the AF area. |
|
[DISP.] |
[Reset] |
First time: Returns the AF area position to the center. Second time: Returns the AF area size to the default setting. |
[Tracking]
When the focus mode is set to [AFC], the AF area follows the movement of the subject, maintaining focusing.
-
Start tracking.
Aim the AF area over the subject, and press the shutter button halfway.
The camera will track the subject while the shutter button is pressed halfway or pressed fully.
If tracking fails, the AF area blinks red.
When set to [AFS], the focus will be on the AF area position. Tracking will not work.

|
To cancel tracking, press Tracking is also available with [AFS].
– [Monochrome]/[L.Monochrome]/[L.Monochrome D]/[L.Monochrome S] ([Photo Style]) – [Sepia]/[Monochrome]/[Dynamic Monochrome]/[Rough Monochrome]/[Silky Monochrome]/[Soft Focus]/[Star Filter]/[Sunshine] ([Filter Settings]) |
Move the Position of the AF Area
-
Press [
] to display the AF mode selection screen.
-
Select [
 ] and then press .
-
Press
to move the position of the AF area.
You can also move the AF area by touching.
To return the position back to the center, press [DISP.].
-
Press
.
[225-Area]
The camera selects the most optimal AF area to focus from 225 areas.
When multiple AF areas are selected, all selected AF areas will be brought into focus.
When the focus mode is set to [AFC], ensuring that the subject stays within the 225 areas during recording will ensure the subject stays in focus.

Specify the [AFC] Start Point
When the focus mode is set to [AFC], you can specify at which area to start [AFC].
-
Set the focus mode to [AFC]. (
Selecting the Focus Mode)
-
Set [AFC Start Point (225-Area)] to [ON].
![]() [
[![]() ]
] ![]() [
[![]() ]
] ![]() [AFC Start Point (225-Area)]
[AFC Start Point (225-Area)] ![]() [ON]
[ON]
-
Press [
] to display the AF mode selection screen.
-
Select [
 ] and then press .
After performing Steps 1 and 2, the icon changes from [![]() ] to [
] to [![]() ].
].
-
Press
to move the AF area to the start point.
You can also move the AF area by touching.
To return the position back to the center, press [DISP.].
-
Press
.
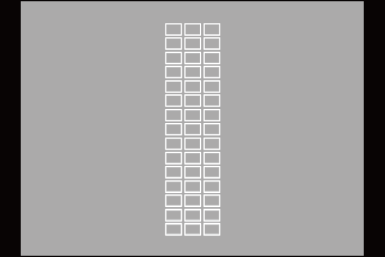
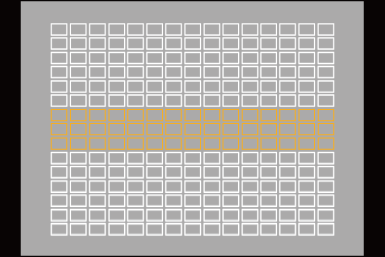
[Zone (Vert./ Horz.)]/[Zone (Square)]/[Zone (Oval)]
![]() [Zone (Vert./ Horz.)]
[Zone (Vert./ Horz.)]
Within the 225 AF areas, vertical and horizontal zones can be focused.
Horizontal pattern

Vertical pattern
![]() [Zone (Square)]
[Zone (Square)]
Within the 225 AF areas, a central square zone can be focused.

![]() [Zone (Oval)]
[Zone (Oval)]
Within the 225 AF areas, a central oval zone can be focused.

|
|
Move and Change the Size of the AF Area
-
Press [
] to display the AF mode selection screen.
-
Select [
 ], [
], [ ] or [
 ] and then press .
-
Press
to move the position of the AF area.
You can also move the AF area by touching.
When [![]() ] is selected
] is selected
Press to switch to a horizontal pattern AF area.
Press to switch to a vertical pattern AF area.
-
Rotate
, or to change the size of the AF area.
You can also pinch out/pinch in the AF area to change the size.
The first press of [DISP.] returns the AF area position to the center. The second press returns the size of the AF area to the default.
-
Press
.
|
[ |
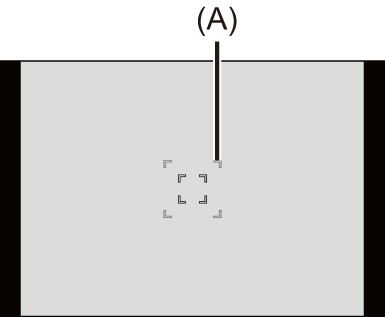
[1-Area+]/[1-Area]
![]() [1-Area+]
[1-Area+]
Emphasis within a single AF area can be focused.
Even when the subject moves out of the single AF area, the subject remains focused in a supplementary AF area (A).
Effective when recording moving subjects that are difficult to track with [![]() ].
].
![]() [1-Area]
[1-Area]
Specify the point to be brought into focus.

Switching of Automatic Detection
Automatic detection is now available in the [1-Area+]/[1-Area] AF modes.
When a part of a human or animal enters the [1-Area+]/[1-Area] AF area, the automatic detection AF area is indicated in yellow.
Eye detection works when a person’s face is inside the AF area.
-
Press [
] to display the AF mode selection screen.
-
Select [
 ] or [
 ] and then press .
Each press of switches automatic detection.
The automatic detection settings of [1-Area+] and [1-Area] are linked.

(A) Automatic detection: OFF (![]() /
/![]() )
)
(B) [Human Detect AF]: ON (![]() /
/![]() )
)
(C) [Human/Animal Detect AF]: ON (![]() /
/![]() )
)
Only 1 human or animal can be automatically detected in the AF area.
You cannot change the person, animal or eye being focused on during automatic detection.
Move and Change the Size of the AF Area
-
Press [
] to display the AF mode selection screen.
-
Select [
]/[ ]/[
]/[ ] or []/[
 ]/[
]/[ ] and then press .
-
Press
to move the position of the AF area.
-
Rotate
, or to change the size of the AF area.

-
Press
.
|
[ |
[Pinpoint]
You can achieve a more precise focus on a small point.
If you press the shutter button halfway, the screen that lets you check the focus will be enlarged.

|
|
Move the Position of the AF Area
-
Press [
] to display the AF mode selection screen.
-
Select [
 ] and then press .
-
Press
to set the position of [ ] and then press or .
The selected position on the screen will be enlarged.
The AF area cannot be moved to the edge of the screen.
-
Press
to fine-adjust the position of [].

-
Press
or .
Operations on the Magnification Window
|
Button operation |
Touch operation |
Description of operation |
||
|
|
Touch |
Moves [ |
||
|
|
Pinch out/pinch in |
Enlarges/reduces the screen in small steps. |
||
|
|
— |
Enlarges/reduces the screen. |
||
|
|
|
Switches magnification window (windowed mode/full screen mode).
|
||
|
[DISP.] |
[Reset] |
First time: Returns to the screen in Step 3. Second time: Returns the AF area position to the center. |
||


When the picture is displayed in windowed mode, you can enlarge the picture by approx. 3 to 6; when the picture is displayed in full screen, you can enlarge the picture by approx. 3 to 10.
You can also take a picture by touching [![]() ].
].
|
– Video recording/[6K/4K PHOTO]
[ |
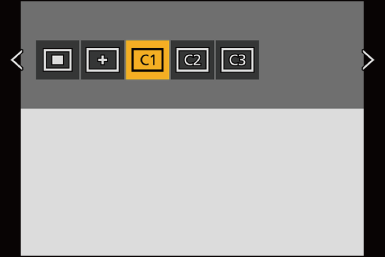
[Custom1] to [Custom3]
The shape of the AF area can be set freely in the 225 AF areas.
The set AF area can be registered using [![]() ] to [
] to [![]() ].
].
The AF area can also be moved while maintaining the set shape.
|
|
Register the AF Area Shape
-
Press [
] to display the AF mode selection screen.
-
Select one of [
 ] to [
 ] and then press .
-
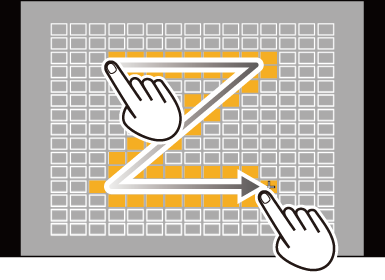
Select the AF area.
Touch operation
Touch the area to make the AF area.
To select consecutive points, drag the screen.
To cancel selection of the selected AF area, touch it again.
Button operation
Press to select the AF area and then set with or . (Repeat this)
To cancel selection of the selected AF area, press or again.
To cancel all selections, press [DISP.].
-
Press [Q].
Move the Position of the AF Area
-
Press [
] to display the AF mode selection screen.
-
Select a registered AF mode shape ([
] to []) and then press .
-
Press
to move the position of the AF area and then press .
Press [DISP.] to return the [] position to the center.