Image Stabilizer

![]()
![]()
![]()
![]()
![]()
![]()
![]()
![]()
This camera can use both the in-body image stabilizer and the in-lens image stabilizer.
Compatible with the Dual I.S. method, which effectively combines two image stabilizers, and the Dual I.S.2 method, which has a higher stabilizing effect.
Furthermore, during video recording, you can use the 5-Axis Hybrid Image Stabilizer that incorporates electronic stabilization.
Combinations of lenses and image stabilizers (As of May 2021)
Image stabilizers that can be used will differ depending on the attached lens.
|
Attached lens |
Available image stabilizer |
Example of icon |
|
Panasonic lenses compatible with Dual I.S. Mode (Based on the Micro Four Thirds System standard)
|
Body (Dual I.S./Dual I.S.2) |
|
|
Lenses compatible with the image stabilizer function (Based on the Micro Four Thirds System standard) |
Body or Lens |
|
|
Lenses without image stabilizer |
Body |
|
|
Lenses without communication function |
Body |
|

 The 5-Axis Hybrid Image Stabilizer (
 Image Stabilizer Settings) can be used with any lenses.
 Using the Image Stabilizer
When using a lens with an O.I.S. switch, set the switch on the lens to [ON].
When using a lens that does not have a communication function with this camera, after turning on the camera, a message asking for confirmation of the lens information is displayed.
Correctly operating the image stabilization function requires that the focal length and lens name be set to match the attached lens.
Follow the message to make the settings.
This can also be set using the menu. ([Lens Information])
|
If this is displayed, we recommend using a tripod, the self timer or the Shutter Remote Control (DMW-RS2: optional).
[
[ |
Image Stabilizer Settings
Set the image stabilizer operation to match the recording situation.

![]() [
[![]() ]
] ![]() [
[![]() ]
] ![]() Select [Image Stabilizer]
Select [Image Stabilizer]
|
[Operation Mode] |
Sets the stabilization movement (blur) to match the recording method (normal, panning). ( |
|
[E-Stabilization (Video)] |
Camera shake during video recording is corrected along the vertical, horizontal, roll, pitch, and yaw axes through the combined use of the in-lens, in-body, and electronic image stabilizers. (5-Axis Hybrid Image Stabilizer)
|
|
[Boost I.S. (Video)] |
Increases the effectiveness of the image stabilizer during video recording. This effect can help provide a stable composition when you want to perform recording from a fixed perspective. ( |
|
[Anamorphic (Video)] |
You can switch to an image stabilizer that suits anamorphic recording. ( |
|
[Lens Information] |
When using a lens that does not have a communication function with the camera, register the lens information in the camera. ( |
|
– [Variable Frame Rate] – [Live Cropping] |
[Operation Mode]
Set the stabilization movement (blur) to match the recording method (normal, panning).
|
|
[Normal] |
Corrects vertical, horizontal, and rotational camera shake. This function is suitable for normal recording. |
|
|
[Panning (Left/Right)] |
Corrects vertical camera shake. This is suitable for horizontal panning. |
|
|
[Panning (Up/Down)] |
Corrects horizontal camera shake. This is suitable for vertical panning. |
|
[OFF] |
Turns the image stabilization function OFF. |
|
The [Operation Mode] that can be used differ depending on the lens used.
When using lenses with an O.I.S. switch, the camera’s operation mode cannot be set to [OFF]. Set the switch on the lens to [OFF].
When the following functions are being used, [Operation Mode] switches to [![]() ] ([Normal]):
] ([Normal]):
– [![]() ] mode
] mode
– Video recording/[6K/4K PHOTO]/[Post-Focus]
[Boost I.S. (Video)]
Increase the effectiveness of the image stabilizer during video recording.
This effect can help provide a stable composition when you want to perform recording from a fixed perspective.
Settings: [ON]/[OFF]
When [Boost I.S. (Video)] is operating, [![]() ] is displayed on the recording screen.
] is displayed on the recording screen.
To change composition while recording, first set this to [OFF] before moving the camera.
To set this to [OFF] during recording, use the Fn button. (Fn Buttons)
Longer focal lengths will result in weaker stabilization.
[Anamorphic (Video)]
You can switch to an image stabilizer that suits anamorphic recording.
Settings:
[![]() ]([2.0
]([2.0 ])/[
])/[![]() ]([1.8])/[
]([1.8])/[![]() ]([1.5])/[
]([1.5])/[![]() ]([1.33])/[
]([1.33])/[![]() ]([1.30])/[OFF]
]([1.30])/[OFF]
Make settings to suit the magnification of the anamorphic lens you are using.
While [Anamorphic (Video)] is functioning, the set magnification appears on the image stabilizer icons on the recording screen, as shown by [![]() ] and [
] and [![]() ].
].
|
|
[Lens Information]
Register the information for lenses that cannot communicate with the camera.
Match the in-body image stabilizer with the information of the lens you register.
-
Press

 to select the lens information to use and then press or
  .
.
In the default setting, the lens information for 6 lenses with a focal length of between 24 mm and 135 mm is registered.
The lens information for up to 12 lenses can be registered.
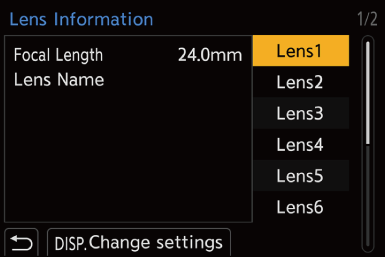
Registering, modifying, and deleting lens information
-
Press
to select the lens information and then press [DISP.].
If lens information that has not been registered is selected, press or to proceed to Step 3.
-
Press
to select [Edit] or [Delete] and then press or .
The lens information is deleted when you select [Delete].
You cannot delete the lens information for a lens that is being used.
-
Enter the lens Information.
The lens information changes if the lens information has already been registered.
[Focal Length]
Enter the focal length.
The live view images can be enlarged for display when you rotate  or
or  .
.
[Lens Name]
Register the lens.
For information on how to enter characters (Entering Characters)
Up to a maximum of 30 characters can be entered.
-
(If lens information that has not been registered is selected) Press [DISP.] to register the lens information.