[Custom] Menu
 [Custom] menu ([Image Quality])
[Custom] menu ([Focus/Shutter])
[Custom] menu ([Monitor / Display (Photo)])
[Custom] menu ([Monitor / Display (Video)])
[Custom] menu ([Lens / Others])
[Custom] menu ([Image Quality])
 : Default settings
[Photo Style Settings]
|
[Show/Hide Photo Style] |
[Vivid]/[Natural]/[L.ClassicNeo]/[Flat]/[Landscape]/[Portrait]/[L.Monochrome]/[L.Monochrome D]/[L.Monochrome S]/[Cinelike D2]/[Cinelike V2]/[Like709]/[V-Log L]/[Hybrid Log Gamma]/[MY PHOTO STYLE 1] to [MY PHOTO STYLE 10] |
|
Sets Photo Style items to be displayed on the menu. |
|
|
[My Photo Style Settings] |
[Add Effects] |
|
[Load Preset Setting] |
|
|
Enables detailed image quality adjustment settings for My Photo Style. [Add Effects]: Enables [Sensitivity] and [White Balance] settings in image quality adjustment. [Load Preset Setting]: Sets the timing at which image quality adjustment values changed in My Photo Style are returned to their registered state. |
|
|
[Reset Photo Style] |
|
|
Returns details changed in [Photo Style] and [Photo Style Settings] to their default settings. |
|
[ISO Increments]
|
|
|
Changes the intervals between ISO sensitivity adjustment values. |
[Extended ISO]
|
[ON]/ |
|
Setting of ISO sensitivity to a minimum of [ISO100] is possible. |
[Exposure Offset Adjust.]
|
[Multi Metering] |
[ |
|
[Center Weighted] |
[ |
|
[Spot] |
[ |
|
[Highlight Weighted] |
[ |
|
Adjusts the exposure level that is the standard exposure for each item of [Metering Mode]. Adds the adjustment value from this function to the exposure compensation value (
|
|


 For video recording, [6K/4K PHOTO], and [Post-Focus], it is not possible to add an adjustment value of a range that exceeds
 [Color Space]
|
|
|
This sets the method for correcting the color reproduction of the recorded images on the screens of a PC or on a device such as a printer. [sRGB]: This is widely used in PCs and similar devices. [AdobeRGB]: AdobeRGB is mainly used for business purposes such as professional printing because it has a greater range of reproducible colors than sRGB.
– Video recording/[6K/4K PHOTO]/[Post-Focus] – [Like709]/[V-Log L] ([Photo Style]) – [Filter Settings] |
[Exposure Comp. Reset]
|
[ON]/ |
|
This resets the exposure value when you change the recording mode or turn off the camera. |
[Auto Exposure in P/A/S/M]
|
|
|
Selects the setting method for aperture value, shutter speed, and ISO sensitivity for the video being recorded in the [P]/[A]/[S]/[M] modes. [ON]: Records with values set automatically by the camera. [OFF]: Records with manually set values. |
[CreativeVideo Combined Set.]
|
[F/SS/ISO/Exposure Comp.] |
|
|
[White Balance] |
|
|
[Photo Style] |
|
|
[Metering Mode] |
|
|
[AF Mode] |
|
|
Content set in [ |
|
[Custom] menu ([Focus/Shutter])
: Default settings
[Focus/Shutter Priority]
|
[AFS] |
|
|
[AFC] |
[FOCUS]/ |
|
This sets whether to give priority to focus or shutter release during AF. [FOCUS]: Disables recording when focus is not achieved. [BALANCE]: Performs recording while controlling the balance between focusing and shutter release timing. [RELEASE]: Enables recording even when focus is not achieved. |
|
[Focus Switching for Vert / Hor]
|
[ON]/ |
|
This stores separate AF area positions (MF positions for MF Assist) for when the camera is held vertically and when it is held horizontally. |
[AF/AE Lock Hold]
|
[ON]/ |
|
This sets button operations for AF/AE Lock. Turning this [ON] maintains the lock after releasing the button until it is pressed again. |
[AF+MF]
|
[ON]/ |
|
When the focus mode is set to [AFS], you can fine-adjust the focus manually during AF lock.
|
[MF Assist]
|
(When an interchangeable lens with a focus ring is attached) [Focus Ring] |
|
|
[AF Mode] |
|
|
[Press Joystick] |
[ON]/ |
|
[MF Assist Display] |
[FULL]/ |
|
This sets the display method of MF Assist (enlarged screen). [Focus Ring]: The screen is enlarged by focusing with the lens. [AF Mode]: The screen is enlarged by pressing [ [Press Joystick]: Press the joystick to enlarge the display. (if [Joystick Setting] is set to [D.FOCUS Movement]) ( [MF Assist Display]: Sets the display method (full screen mode/windowed mode) of MF Assist (enlarged screen).
– Video recording – [6K/4K Pre-Burst] |
|
 ].
].[MF Guide]
|
[
|
|
During MF, MF Guide, which acts as a guide to recording distance, is displayed on the screen. You can select from meters or feet for the display unit.
|
[Focus Ring Lock]
|
[ON]/ |
|
This disables the focus ring operation during MF to lock the focus.
|
[Show/Hide AF Mode]
|
[Human/Animal Detect AF] |
|
|
[Tracking] |
|
|
[225-Area] |
|
|
[Zone (Vert./ Horz.)] |
|
|
[Zone (Square)] |
[ON]/ |
|
[Zone (Oval)] |
|
|
[1-Area+] |
|
|
[Pinpoint] |
|
|
[Custom1] |
[ON]/ |
|
[Custom2] |
[ON]/ |
|
[Custom3] |
[ON]/ |
|
Sets the AF mode items to be displayed on the AF mode selection screen. |
|
[Pinpoint AF Setting]
|
[Pinpoint AF Time] |
[LONG]/ |
|
[Pinpoint AF Display] |
[FULL]/ |
|
Changes enlarged screen settings displayed when AF mode is [ [Pinpoint AF Time]: Sets the time for which the screen is enlarged when the shutter button is pressed halfway. [Pinpoint AF Display]: Sets the display method (full screen mode/windowed mode) of the enlarged screen. |
|
[AF-Point Scope Setting]
|
[Keep Enlarged Display] |
[ON]/ |
|
[PIP Display] |
[FULL]/ |
|
Changes the enlarged screen settings of AF-Point Scope ( [Keep Enlarged Display]: Setting this to [ON] maintains the enlarged screen after pressing the Fn button until it is pressed again. [PIP Display]: Sets the display method (full screen mode/windowed mode) of the enlarged screen. |
|
[Shutter AF]
|
|
|
This adjusts focus automatically when you press the shutter button halfway. |
[Half-Press Shutter]
|
[ON]/ |
|
You can release the shutter quickly by pressing the shutter button halfway. |
[Assign REC to Shutter Button]
|
|
|
Use the shutter button for the start/stop operation of video recording in the [ The start/stop operation of video recording using the shutter button can be disabled when set to [OFF]. |
[Quick AF]
|
[ON]/ |
|
When the amount of camera shake becomes small, the camera will automatically adjust the focus and focus adjustment will then be quicker when the shutter button is pressed.
– In preview mode – In low light situations |
[Eye Sensor AF]
|
[ON]/ |
|
When looking through the viewfinder, if the eye sensor operates, then AF will function.
|
[Looped Focus Frame]
|
[ON]/ |
|
When moving the AF area or MF Assist, this enables its position to loop from one edge to the other edge of the screen. |
[AFC Start Point (225-Area)]
|
[ON]/ |
|
When the focus mode is set to [AFC] in the [ |
[Custom] menu ([Operation])
: Default settings
[Q.MENU Settings]
|
[Layout Style] |
|
|
[Front Dial Assignment] |
[Item]/ |
|
[Item Customize (Photo)] |
|
|
[Item Customize (Video)] |
|
|
Customizes the Quick menu. |
|
[Touch Settings]
|
[Touch Screen] |
|
|
[Touch Tab] |
[ON]/ |
|
[Touch AF] |
|
|
[Touch Pad AF] |
[EXACT]/[OFFSET1] to [OFFSET7]/ |
|
Enables touch operation on the monitor display. [Touch Screen]: All touch operations. [Touch Tab]: Operations of tabs, such as [ [Touch AF]: Operation to optimize the focus ([AF]) for a touched subject. Alternatively, operation to optimize both the focus and brightness ([AF+AE]). ( [Touch Pad AF]: Touch pad operation during viewfinder display. ( |
|
[Operation Lock Setup]
|
[Cursor] |
|
|
[Joystick] |
|
|
[Touch Screen] |
|
|
[Dial] |
|
|
[DISP. Button] |
|
|
This sets the control functions to be disabled with the Fn button [Operation Lock]. (Only for recording screen) [Cursor]: Cursor buttons, [MENU/SET] button, and [Joystick]: Joystick [Touch Screen]: Touch screen [Dial]: [DISP. Button]: [DISP.] button |
|

 ,
,  , and
, and [Fn Button Set]
|
[Setting in REC mode] |
|
[Setting in PLAY mode] |
|
Registers a function to the Fn button. |
[WB/ISO/Expo. Button]
|
[WHILE PRESSING]/[AFTER PRESSING1]/ |
|
This sets the operation to be performed when [WB] (White balance), [ISO] (ISO sensitivity) or [ [WHILE PRESSING]: Allows you to change the setting while pressing and holding the button. Release the button to confirm the settings value, and to return to the recording screen. [AFTER PRESSING1]: Press the button to change settings. Press the button again to confirm the settings value, and to return to the recording screen. [AFTER PRESSING2]: Press the button to change settings. Each press of the button switches the settings value. (Except that of exposure compensation) To confirm your selection and return to the recording screen, press the shutter button halfway. |
[ISO Displayed Setting]
|
[Front/Rear Dials] |
|
|
This sets the operations of the dials in the setting screen for ISO sensitivity. Assigning [ |
|
[Exposure Comp. Disp. Setting]
|
[Cursor Buttons (Up/Down)] |
[ |
|
This sets the operations of the Assigning [ |
|
|
[Front/Rear Dials] |
|
|
This sets the operations of the dials in the exposure compensation screen. Assigning [ |
|


[Dial Set.]
|
[Assign Dial (F/SS)] |
|
||||||
|
Sets the operations to be assigned to the dials in [P]/[A]/[S]/[M] modes.
|
|||||||
|
|
|
|
[P] |
[A] |
[S] |
[M] |
|
|
|
[SET1] |
|
|
F |
SS |
F |
|
|
|
|
|
F |
SS |
SS |
|
|
|
|
[SET2] |
|
— |
F |
— |
F |
|
|
|
|
|
— |
SS |
SS |
|
|
|
|
[SET3] |
|
— |
— |
SS |
SS |
|
|
|
|
|
F |
— |
F |
|
|
|
|
[SET4] |
|
— |
— |
— |
F |
|
|
|
|
|
F |
SS |
SS |
|
|
|
|
[SET5] |
|
|
F |
SS |
F |
|
|
|
|
— |
— |
— |
SS |
|
|
|
|
|
|
|
|
|
|
|
|
[Rotation (F/SS)] |
|
||||||
|
Changes the rotational directions of the dials for aperture value and shutter speed adjustment. |
|||||||
|
[Control Dial Assignment] |
[ [ [ [ |
||||||
|
Sets the function to be assigned to [ |
|||||||
|
[Exposure Comp.] |
[ |
||||||
|
Assigns exposure compensation to
|
|||||||
|
[Dial Operation Switch Setup] |
[ |
||||||
|
[ |
|||||||
|
In the Fn button [Dial Operation Switch], this sets the functions to be registered temporarily to |
|||||||
|
[Rotation (Menu Operation)] |
|
||||||
|
Changes the rotational direction of the dials when operating menus. |
|||||||
[Joystick Setting]
|
|
|
Sets the joystick movement on the recording screen. [D.FOCUS Movement]: Moves the AF area and MF Assist. ( [Fn]: Operates as Fn buttons. [MENU]: Operates as [OFF]: Disables the joystick. |
 . Operations that can be performed by moving the joystick are disabled.
[Video Rec. Button (Remote)]
|
You can register a favorite function to the video rec. button on a Shutter Remote Control (optional). (
|
[Custom] menu ([Monitor / Display (Photo)])
: Default settings
[Auto Review]
|
[Duration Time (photo)] |
[HOLD]/[5SEC] to [0.5SEC]/ |
|
[Duration Time (6K/4K PHOTO)] |
|
|
[Duration Time (Post-Focus)] |
|
|
[Playback Operation Priority] |
[ON]/ |
|
This displays an image immediately after it is recorded. [Duration Time (photo)]: Sets the Auto Review when taking pictures. [Duration Time (6K/4K PHOTO)]: Sets the Auto Review when recording 6K/4K photos. [Duration Time (Post-Focus)]: Sets the Auto Review when recording with Post-Focus. [Playback Operation Priority]: When this is set to [ON], you can toggle the playback screen during Auto Review, or delete pictures.
[Playback Operation Priority] will be fixed to [ON]. |
|
[Constant Preview]
|
[ON]/ |
|
|
[SET] |
[Effect] |
|
[Preview While MF Assist] |
|
|
You can always confirm the effects of aperture on the recording screen when in [A]/[M] mode. You can also confirm the shutter speed at the same time when in [M] mode.
|
|
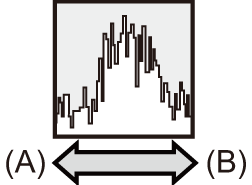
[Histogram]
|
[ON]/ |
|
This displays the histogram. Turning this [ON] displays the histogram transition screen. Press
By looking at the distribution of the graph, you can determine the current exposure.
(A) Dark (B) Bright
– During exposure compensation – When the standard exposure is not achieved, such as in low light situations.
– [WFM/Vector Scope]
|


[Photo Grid Line]
|
[ |
|
Sets the grid line pattern to be displayed on the recording screen. When using [
|
[AF Area Display]
|
|
|
Displays the AF areas for the [
– When [AFC Start Point (225-Area)] is not used during [ – When AF area shapes are not registered in [
– Video recording – [6K/4K PHOTO] |
[Live View Boost]
|
[MODE1]/[MODE2]/ |
|
|
[SET] |
[P/A/S/M]/ |
|
Displays the screen brighter to make it easier to check subjects and compositions even in low-light environment. [MODE1]: Setting for low brightness, with priority given to a soft display. [MODE2]: Setting for high brightness, with priority given to image visibility.
– When adjusting the exposure (when the shutter button is pressed halfway, for example) – When recording a video or 6K/4K photo – When using [Filter Settings] – When displaying the shutter speed effect of [Constant Preview] in the [M] mode |
|
[Night Mode]
|
[Monitor] |
[ON]/ |
|
[LVF] |
[ON]/ |
|
Displays the monitor and viewfinder in red. In dark environments, this reduces brightness of the screen that can make the surroundings difficult to see. You can also set the luminance of the red display.
|
|
 .
.[LVF/Monitor Disp. Set]
|
[LVF Disp. Set] |
[ |
|
[Monitor Disp. Set] |
[ |
|
Selects whether to show the live view without covering the information display, or to display over the entire screen. [
[
|
|
|
[Horizontal Image Flip(Monitor)] |
|
|
[Vertical Image Flip(Monitor)] |
|
|
[Horizontal Image Flip(Monitor)] [AUTO]: The screen automatically flips horizontally according to the angle to which the monitor is opened or closed. [ON]: The screen is flipped horizontally all the time. [OFF]: Screen is not flipped. [Vertical Image Flip(Monitor)] [AUTO]: The screen automatically flips vertically according to the angle to which the monitor is rotated. [ON]: The screen is flipped vertically all the time. [OFF]: Screen is not flipped.
|
|
[Expo.Meter]
|
[ON]/ |
|
This displays the exposure meter.
|
[Focal Length]
|
|
|
Displays the focal length on the recording screen during zoom control. |
[Blinking Highlights]
|
[ON]/ |
|
Overexposed areas appear blinking in black and white during Auto Review or playback.
Use this to delete the highlight display. (
|

[Sheer Overlay]
|
[ON]/ |
|
|
[SET] |
[Transparency] |
|
[Image Select] |
|
|
[Reset at Power Off] |
|
|
[Disp. Image (shutter-press)] |
|
|
Displays recorded pictures by overlapping on the recording screen.
Press
– Video recording/[6K/4K PHOTO]/[Post-Focus] |
|
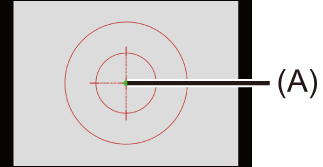
[I.S. Status Scope]
|
[ON]/ |
|
Displays a reference point (A) on the recording screen in order to let you check for camera shake.
– Video recording/[6K/4K PHOTO]/[Post-Focus] |
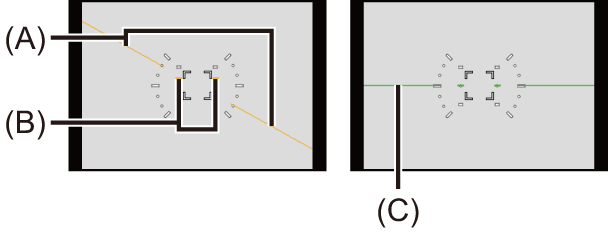
[Level Gauge]
|
|
|
Displays the level gauge which is useful in correcting camera tilt.
(A) Horizontal (B) Vertical (C) Green (no tilt)
|

[Luminance Spot Meter]
|
[ON]/ |
|
Specify any spot on the subject to measure the luminance over a small area. |
[Framing Outline]
|
[ON]/ |
|
Displays the outline for the live view. |
[Show/Hide Monitor Layout]
|
[Control Panel] |
|
|
[Black Screen] |
|
|
Displays the control panel and black screen when switching between displays using [DISP.] button. ( |
|
[Custom] menu ([Monitor / Display (Video)])
: Default settings
[V-LogL View Assist]
|
[Read LUT File] |
|
|
[LUT Select] |
|
|
[LUT View Assist (Monitor)] |
[ON]/ |
|
[LUT View Assist (HDMI)] |
[ON]/ |
|
You can show images with LUT data applied on the monitor/viewfinder, or output them via HDMI. |
|
[HLG View Assist]
|
[Monitor] |
[MODE1]/ |
|
[HDMI] |
|
|
At recording or playback of HLG video, this displays images with converted color gamut and brightness on the camera monitor/viewfinder, or outputs these over HDMI. |
|
[Anamorphic Desqueeze Display]
|
[ |
|
This displays the de-squeezed images suited to the magnification of the anamorphic lens on this camera. |
[Monochrome Live View]
|
[ON]/ |
|
You can display the recording screen in black and white.
|
[Center Marker]
|
[ON]/ |
|
The center of the recording screen will be displayed as [ |
[Frame Marker]
|
[ON]/ |
|
|
[SET] |
[Frame Aspect] |
|
[Frame Color] |
|
|
[Frame Mask] |
|
|
A frame with the set aspect ratio is displayed on the recording screen. |
|
[Zebra Pattern]
|
[ZEBRA1]/[ZEBRA2]/[ZEBRA1+2]/ |
|
|
[SET] |
[Zebra 1] |
|
[Zebra 2] |
|
|
Parts that are brighter than the benchmark value are displayed with stripes. |
|
[WFM/Vector Scope]
|
[WAVE]/[VECTOR]/ |
|
This displays the waveform monitor or the vector scope on the recording screen. |
[Color Bars]
|
[SMPTE]/[EBU]/[ARIB] |
|
The color bars are displayed on the recording screen. |
[Video-Priority Display]
|
[ON]/ |
|
When in [iA]/[P]/[A]/[S]/[M] modes, switch the recording screen display and the control panel to suit video recording, as with the [ The playback screen also switches to a display that prioritizes video.
– [6K/4K PHOTO] – [Time Lapse Shot] – [Stop Motion Animation] – [Multiple Exposure] |
[Red REC Frame Indicator]
|
[ON]/ |
|
A red frame is displayed on the recording screen that indicates that video is being recorded. |
[Streaming Blue Frame Indicator]
|
[ON]/ |
|
Displays a blue frame on the screen during streaming. |
[Custom] menu ([IN/OUT])
: Default settings
[HDMI Rec Output]
|
[Info Display] |
|
|
[Down Convert] |
|
|
[HDMI Recording Control] |
[ON]/ |
|
[Sound Down Convert] |
[AUTO]/ |
|
[Sound Output (HDMI)] |
|
|
[HDMI MF Assist Output] |
|
|
Sets HDMI output during recording.( |
|
[Custom] menu ([Lens / Others])
: Default settings
[Lens Focus Resume]
|
[ON]/ |
|
The camera saves the focus position when you turn it off. When an interchangeable lens that is compatible with power zoom is in use, the zoom position is also saved. |
[Power Zoom Lens]
|
[Step Zoom] |
[ON]/ |
|
[Zoom Speed] |
[Photo]: [H]/ |
|
[Video]: [H]/ |
|
|
[Zoom Ring] |
|
|
Sets the screen display and operation when using an interchangeable lens compatible with power zoom. ( |
|
[Lens Fn Button Setting]
|
|
|
Sets the function to be assigned to the focus button of an interchangeable lens.
|
[Aperture Ring Increment]
|
[SMOOTH]/ |
|
[SMOOTH]: You can finely adjust the aperture value. [1/3EV]: You can adjust the aperture value in increments of 1/3 EV. You can change the aperture adjustment increment by operating the aperture ring.
|
[Focus Ring Control]
|
|
|
|
[SET] |
[90°] to [360°] ( |
|
Sets the amount of movement for focusing using the focus ring. (When using supported lenses) [NON-LINEAR]: Focus responds by accelerating according to rotation speed of the focus ring. [LINEAR]: Focus responds at a constant amount according to the rotational angle of the focus ring. [SET]: Sets the rotational angle of the focus ring for when [LINEAR] is selected.
https://panasonic.jp/support/global/cs/dsc/ (English only) |
|
[Lens Information]
|
[Lens1] to [Lens12] ( |
|
When using a lens that does not have a communication function with the camera, register the lens information in the camera.
|
[Lens Info. Confirmation]
|
|
|
When you have attached a lens that does not have a communication function with this camera, a message asking for confirmation of the lens information is displayed when you turn on the camera. |
[Vertical Position Info (Video)]
|
|
|
You can set on the menu, whether or not to record the camera’s vertical orientation information during video recording. [ON]: Records vertical orientation information. Videos recorded with the camera held vertically will be automatically played vertically on the PC or smartphone etc. during playback. [OFF]: Does not record vertical orientation information.
|