Main Assist Functions
This section describes the main assist functions that are convenient when recording.
|
|

[SS/Gain Operation]
![]()
![]()
![]()
![]()
![]()
![]()
![]()
![]()
You can switch the units of shutter speed values and gain (sensitivity) values.

![]() [
[![]() ]
] ![]() [
[![]() ]
] ![]() Select [SS/Gain Operation]
Select [SS/Gain Operation]
|
[SEC/ISO] |
Displays the shutter speed in seconds and the gain in ISO. |
|
[ANGLE/ISO] |
Displays the shutter speed in degrees and the gain in ISO.
(When [Synchro Scan] is set to [OFF]) |
|
[SEC/dB] |
Displays the shutter speed in seconds and the gain in dB.
|
|
– [ISO Sensitivity (video)] – [ISO Auto Lower Limit Setting] – [ISO Auto Upper Limit Setting] – [Extended ISO] – [ISO Displayed Setting] |
[WFM/Vector Scope]
![]()
![]()
![]()
![]()
![]()
![]()
![]()
![]()
This displays the waveform monitor or the vector scope on the recording screen. You can change the size of the waveform display.
-
Set the mode dial to [
 ].
].

-
Set [WFM/Vector Scope].

![]() [
[![]() ]
] ![]() [
[![]() ]
] ![]() [WFM/Vector Scope]
[WFM/Vector Scope]
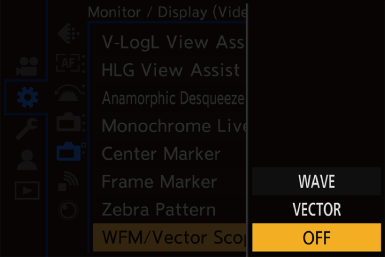
[WAVE]
Displays a waveform.
[VECTOR]
Displays the vector scope.
[OFF]
-
Select the position to display.
Press 


 to select and then press or
  .
.
 You can also move using touch operations.
You can rotate  to change the size of the waveform.
To return the waveform or vector scope position back to the center, press [DISP.]. With waveform, pressing [DISP.] once again returns the size to the default setting.

 Screen Displays
Waveform
The waveform displayed on the camera indicates the luminance as values based on the conversions below:
0 % (IRE 1): Luminance value 16 (8-bit)
100 % (IRE1): Luminance value 235 (8-bit)
-
IRE: Institute of Radio Engineers
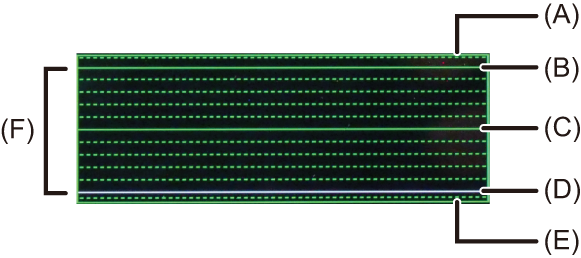
(A) 109 % (IRE) (Dotted line)
(B) 100 % (IRE)
(C) 50 % (IRE)
(D) 0 % (IRE)
(E)  4 % (IRE) (Dotted line)
(F) The range between 0 % and 100 % shows dotted lines at intervals of 10 %.
Display example

Vector scope
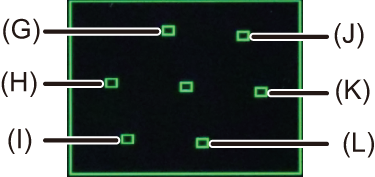
(G) R (Red)
(H) YL (Yellow)
(I) G (Green)
(J) MG (Magenta)
(K) B (Blue)
(L) CY (Cyan)
Display example
|
|
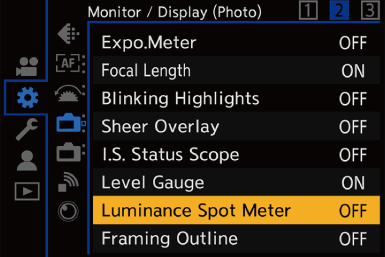
[Luminance Spot Meter]
![]()
![]()
![]()
![]()
![]()
![]()
![]()
![]()
Specify any spot on the subject to measure the luminance over a small area.
-
Set [Luminance Spot Meter].
![]() [
[![]() ]
] ![]() [
[![]() ]
] ![]() [Luminance Spot Meter]
[Luminance Spot Meter] ![]() [ON]
[ON]
-
Select the position where you want to measure the luminance.
Press to select and then press or .
You can also change the position by dragging the frame on the recording screen.
To return the position back to the center, press [DISP.].

(A) Luminance value
Measurement Range
Measuring is possible in the range 7 % to 109 % (IRE).
When [Photo Style] is set to [V-Log L], this can be measured with “Stop” units.
(Calculated as “0 Stop”=42 % (IRE))
[Zebra Pattern]
![]()
![]()
![]()
![]()
![]()
![]()
![]()
![]()
Parts that are brighter than the benchmark value are displayed with stripes.
You can also set the benchmark value and the breadth of the range so that the stripes are displayed on parts that are within the range of brightness you specify.
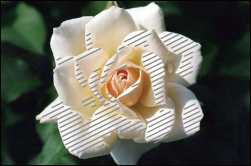
[ZEBRA1]
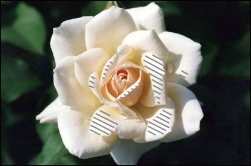
[ZEBRA2]

[ZEBRA1+2]
![]() [
[![]() ]
] ![]() [
[![]() ]
] ![]() Select [Zebra Pattern]
Select [Zebra Pattern]
|
[ZEBRA1] |
Parts that are brighter than the benchmark value are displayed with [ZEBRA1] stripes. |
|
[ZEBRA2] |
Parts that are brighter than the benchmark value are displayed with [ZEBRA2] stripes. |
|
[ZEBRA1+2] |
Both [ZEBRA1] and [ZEBRA2] are displayed. |
|
[OFF] |
— |
|
[SET] |
Sets the benchmark brightness. [Zebra 1]/[Zebra 2] [50%] to [105%]/[BASE/RANGE] |
When [BASE/RANGE] Was Selected with [SET]
Centered on the brightness set with [Base Level], parts with the brightness in the range set in [Range] are displayed with the stripes.
[Base Level] can be set in the range between 0 % and 109 % (IRE).
[Range] can be set in the range between  1 % and 10 % (IRE).
When [Photo Style] is set to [V-Log L], these are set at “Stop” units.
(Calculated as “0 Stop”=42 % (IRE))
|
|
[Frame Marker]
![]()
![]()
![]()
![]()
![]()
![]()
![]()
![]()
A frame with the set aspect ratio is displayed on the recording screen. This allows you to see during recording the angle of view that will be achieved with trimming (cropping) in post-processing.
![]() [
[![]() ]
] ![]() [
[![]() ]
] ![]() Select [Frame Marker]
Select [Frame Marker]
|
[ON] |
Displays video grid lines on the recording screen. |
|
[OFF] |
— |
|
[SET] |
Sets the aspect ratio of video grid lines. [Frame Aspect]: [2.39:1]/[2.35:1]/[2.00:1]/[1.85:1]/[16:9]/[4:3]/[5:4]/[1:1]/[4:5]/[9:16] |
|
[Frame Color]: Sets the color of video grid lines. |
|
|
Sets the outer side opacity of video grid lines. [Frame Mask]: [100%]/[75%]/[50%]/[25%]/[OFF] |
Color bars/Test Tone
![]()
![]()
![]()
![]()
![]()
![]()
![]()
![]()
The color bars are displayed on the recording screen.
A test tone is output while the color bars are being displayed.

[SMPTE]

[EBU]

[ARIB]
![]() [
[![]() ]
] ![]() [
[![]() ]
] ![]() Select [Color Bars]
Select [Color Bars]
Settings: [SMPTE]/[EBU]/[ARIB]
To end the display, press .
Adjusting the Test Tone
There are 4 levels ([12dB], [18dB], [20dB], and [MUTE]) of test tone to select.
-
Rotate
 , or
, or  to select the test tone level.
|
|