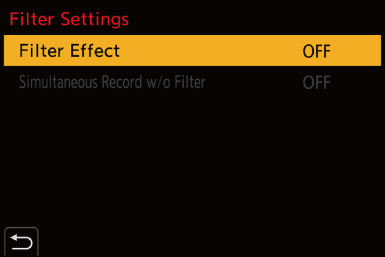
[Filter Settings]
 [Simultaneous Record w/o Filter]
![]()
![]()
![]()
![]()
![]()
![]()
![]()
![]()
This mode records with additional image effects (filters).
You can adjust the effect for each filter.
In addition, you can simultaneously take pictures without effects.
-
Set the [Filter Effect].

![]() [
[![]() ]
] ![]() [
[![]() ]
] ![]() [Filter Settings]
[Filter Settings] ![]() [Filter Effect]
[Filter Effect] ![]() [SET]
[SET]
-
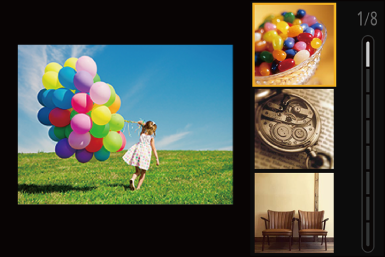
Select the filter.
Press 
 to select, and then press or
  .
.
You can also select the image effect (filter) by touching the sample picture.
 Press [DISP.] to switch the screen in the order of normal display, guide display, and list display.
The guide display shows the description of each filter.
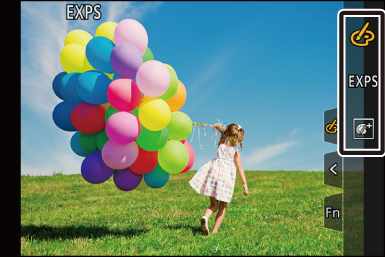
 Adjusting the Filter Effect
You can adjust the filter effect.
-
Select the filter.
-
On the recording screen, press [WB].
-
Rotate
 ,
,  or
or  to set.
To return to the recording screen, press [WB] again.
When the filter effect is adjusted, the filter icon on the recording screen is indicated with [ ].
].

|
Filter |
Items that can be adjusted |
|
|
[Expressive] |
Vividness |
|
|
[Retro] |
Coloring |
|
|
[Old Days] |
Contrast |
|
|
[High Key] |
Coloring |
|
|
[Low Key] |
Coloring |
|
|
[Sepia] |
Contrast |
|
|
[Monochrome] |
Coloring |
|
|
[Dynamic Monochrome] |
Contrast |
|
|
[Rough Monochrome] |
Grittiness |
|
|
[Silky Monochrome] |
Defocus level |
|
|
[Impressive Art] |
Vividness |
|
|
[High Dynamic] |
Vividness |
|
|
[Cross Process] |
Coloring |
|
|
[Toy Effect] |
Coloring |
|
|
[Toy Pop] |
Area with reduced peripheral brightness |
|
|
[Bleach Bypass] |
Contrast |
|
|
[Miniature Effect] |
Vividness |
|
|
[Soft Focus] |
Defocus level |
|
|
[Fantasy] |
Vividness |
|
|
[Star Filter] |
|
Short rays/Long rays |
|
|
Few rays/Many rays |
|
|
|
Rotate to left/Rotate to right |
|
|
[One Point Color] |
Amount of color left |
|
|
[Sunshine] |
Coloring |
|
Setting a Filter with Touch Operation
|
Set [Touch Tab] to [ON] in [Touch Settings] in the [Custom] ([Operation]) menu. ( |

-
Touch [
 ].
].
-
Touch the item to set.
[![]() ]: Filter on/off
]: Filter on/off
[![]() ]: Filter
]: Filter
[![]() ]: Filter effect adjustment
]: Filter effect adjustment
|
– [
– [Multiple Exposure] – [Live Cropping]
|
Setting the Type of Defocus ([Miniature Effect])
-
Set [Filter Effect] to [Miniature Effect].
-
Press
to display the setting screen.
The setting screen can also be displayed by touching [![]() ] then [
] then [![]() ].
].
-
Press
or 
 to move the in-focus portion.
You can also move the in-focus portion by touching the screen.
You can also switch the defocus orientation by touching [![]() ].
].

-
Rotate
, or to change the size of in-focus portion.
The portion can also be enlarged/reduced by pinching out/pinching in the screen.
To reset the in-focus portion setting to the default, press [DISP.].
-
Press
or to set.
|
When the system frequency is set to [50.00Hz (PAL)] or [24.00Hz (CINEMA)], the length of the video recorded will be approx. 1/8 of the actual recording time. The displayed video recording time will be approx. 8 times longer than the recording time displayed during normal video recording.
|
Setting the Color to Be Left ([One Point Color])
-
Set [Filter Effect] to [One Point Color].
-
Press
to display the setting screen.
The setting screen can also be displayed by touching [![]() ] then [
] then [![]() ].
].
-
Press
to move the frame and select the color you want to leave.
You can also select the color you want to leave by touching the screen.
To return the frame back to the center, press [DISP.].

-
Press
or to set.
Setting the Light Source Position and Size ([Sunshine])
-
Set [Filter Effect] to [Sunshine].
-
Press
to display the setting screen.
The setting screen can also be displayed by touching [![]() ] then [
] then [![]() ].
].
-
Press
to move the center position of the light source.
The position of the light source can also be moved by touching the screen.

-
Rotate
, or to adjust the size of the light source.
This can also be enlarged/reduced by pinching out/pinching in the screen.
To reset the light source setting to the default, press [DISP.].
-
Press
or to set.
[Simultaneous Record w/o Filter]
![]()
![]()
![]()
![]()
![]()
![]()
![]()
![]()
You can simultaneously take pictures with no added filter effects.
![]() [
[![]() ]
] ![]() [
[![]() ]
] ![]() [Filter Settings]
[Filter Settings] ![]() Select [Simultaneous Record w/o Filter]
Select [Simultaneous Record w/o Filter]
Settings: [ON]/[OFF]
|
– Burst recording – [6K/4K PHOTO]/[Post-Focus] – [Time Lapse Shot] – [Stop Motion Animation] – [RAW – [Bracketing] |
