AF Area Movement Operation
 Moving the AF Area Position with the Touch Pad
[Focus Switching for Vert / Hor]
![]()
![]()
![]()
![]()
![]()
![]()
![]()
![]()
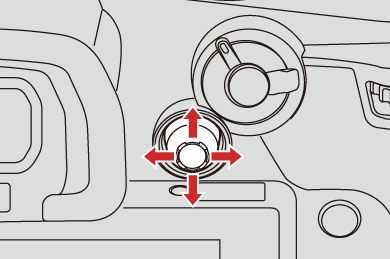
In default settings, you can use the joystick to directly move and change the size of the AF area when recording.
-
Move the position of the AF area.
On the recording screen, tilt the joystick.

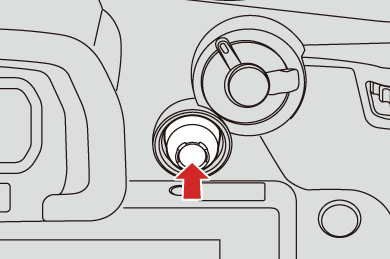
 Pressing
  enables switching between the default and set AF area positions.
In [![]() ]/[
]/[![]() ], this operation switches the person, animal or eye to be brought into focus.
], this operation switches the person, animal or eye to be brought into focus.
In [![]() ], this operation displays the enlarged screen.
], this operation displays the enlarged screen.
-
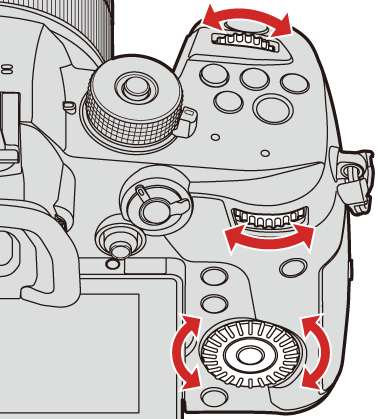
Change the size of the AF area.
Rotate  ,
,  or
or  .
.
Use for more detailed adjustments.
The first press of [DISP.] returns the AF area position to the center. The second press returns the size of the AF area to the default.
-
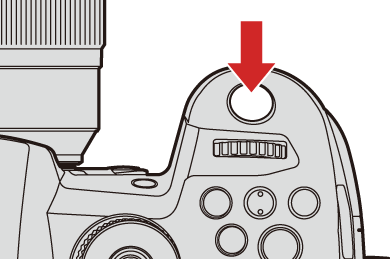
Confirm your selection.
Press the shutter button halfway.
This will return you to the recording screen.
|
[ |

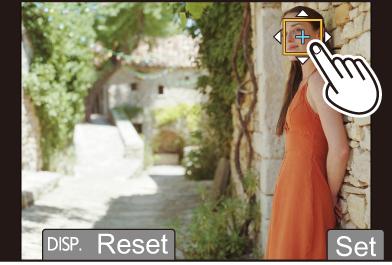
Moving the AF Area by Touch
You can move the AF area to a touched position on the monitor.
You can also change the size of the AF area.

![]() [
[![]() ]
] ![]() [
[![]() ]
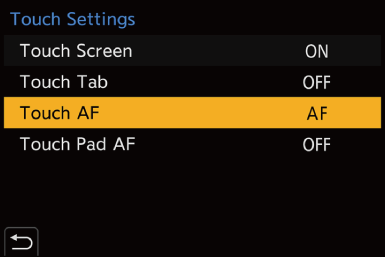
] ![]() [Touch Settings]
[Touch Settings] ![]() Select [Touch AF]
Select [Touch AF]
|
[AF] |
This focuses on the touched subject. |
|
[AF+AE] |
This focuses on and adjusts brightness for the touched subject. |
The default setting is [AF].
 Focus on the Touched Position ([AF])
-
Touch the subject.
The AF area moves to the touched position.
-
Pinch out/pinch in to change the AF area size.
The first touch of [Reset] returns the AF area position to the center.
The second touch returns the size of the AF area to the default.
-
Touch [Set].
In [![]() ], touch [Exit].
], touch [Exit].
For [![]() ]/[
]/[![]() ], the AF area setting is canceled if you touch [
], the AF area setting is canceled if you touch [![]() ] on the recording screen.
] on the recording screen.
Focus on and Adjust Brightness for the Touched Position ([AF+AE])
-
Touch the subject to which you wish to adjust the brightness.
At the touched position, an AF area that works in the same way as [![]() ] is displayed.
] is displayed.
This places a point to adjust brightness at the center of the AF area.
-
Pinch out/pinch in to change the AF area size.
The first touch of [Reset] returns the AF area position to the center. The second touch returns the size of the AF area to the default.
-
Touch [Set].
The [AF+AE] area setting is canceled if you touch [![]() ] (when [
] (when [![]() ] or [
] or [![]() ] is set: [
] is set: [![]() ]) on the recording screen.
]) on the recording screen.
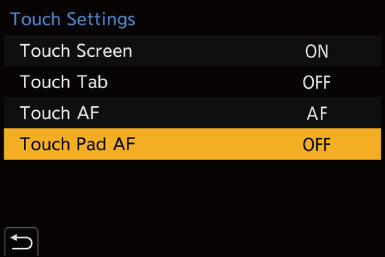
Moving the AF Area Position with the Touch Pad
During viewfinder display, you can touch the monitor to change the position and size of the AF area.
-
Set [Touch Pad AF].
![]() [
[![]() ]
] ![]() [
[![]() ]
] ![]() [Touch Settings]
[Touch Settings] ![]() [Touch Pad AF]
[Touch Pad AF] ![]() [EXACT]/[OFFSET1] to [OFFSET7]
[EXACT]/[OFFSET1] to [OFFSET7]
-
Move the position of the AF area.
During viewfinder display, touch the monitor.

-
Change the size of the AF area.
Rotate , or .
Use for more detailed adjustments.
The first press of [DISP.] returns the AF area position to the center. The second press returns the size of the AF area to the default.
-
Confirm your selection.
Press the shutter button halfway.
Setting Items ([Touch Pad AF])
|
[EXACT] |
Moves the AF area of the viewfinder by touching a desired position on the touch pad.
|
|
[OFFSET1] to [OFFSET7] |
Moves the AF area of the viewfinder according to the distance you drag your finger on the touch pad. Select the range to be detected with the drag operation.
[OFFSET1] (entire area)/[OFFSET2] (right half)/ [OFFSET3] (upper right)/[OFFSET4] (lower right)/ [OFFSET5] (left half)/[OFFSET6] (upper left)/ [OFFSET7] (lower left) |
|
[OFF] |
— |


[Focus Switching for Vert / Hor]
Memorizes separate positions for AF areas for when the camera is vertically aligned and for when it is horizontally aligned.
Two vertical orientations, left and right, are available.

![]() [
[![]() ]
] ![]() [
[![]() ]
] ![]() Select [Focus Switching for Vert / Hor]
Select [Focus Switching for Vert / Hor]
|
[ON] |
Memorizes separate positions for vertical and horizontal orientations. |
|
[OFF] |
Sets the same position for vertical and horizontal orientations. |
|
|