Wi-Fi Connections
 Connect to Wi-Fi Using Previously Saved Settings
Fn Button Assigned with [Wi-Fi]
When [New Connection] has been selected in [Wi-Fi Function] in [Wi-Fi] of the [Setup] ([IN/OUT]) menu, select the connection method from either [Via Network] or [Direct] to connect.
On the other hand, when you use [Select a destination from History] or [Select a destination from Favorite], the camera connects to the selected device with the previously-used settings.
[Via Network]
Connect the camera and destination device through the wireless access point.

Select the method for connecting to a wireless access point.
Settings: [WPS (Push-Button)]/[WPS (PIN code)]/[From List] ( [WPS (Push-Button)], [WPS (PIN code)], [From List])
|
To change the wireless access point used for connection, press [DISP.] and change the connection destination.
|
 [WPS (Push-Button)]
Press the WPS button on the wireless access point to set up a connection.
Press the wireless access point WPS button until it switches to WPS mode.
Example)

[WPS (PIN code)]
Enter a PIN code into the wireless access point to set up a connection.
-
On the camera screen, select the wireless access point you are connecting to.
-
Enter the PIN code displayed on the camera screen into the wireless access point.
-
Press
 or
or  of the camera.
[From List]
Searches for a wireless access point to use, and connects to this.
|
|
-
Select the wireless access point you are connecting to.
 Press [DISP.] to run a wireless access point search again.
If no wireless access point is found (Connecting by Manual Input)
-
(If network authentication is encrypted) Enter the encryption key.
How to enter characters (Entering Characters)
Connecting by Manual Input
|
|
-
In the screen in Step 1 of “[From List]”, select [Manual Input]. (
[From List])
-
Enter the SSID of the wireless access point you are connecting to, and then select [Set].
How to enter characters (Entering Characters)
-
Select the network authentication.
[WPA3-SAE]/[WPA2-PSK]/[WPA2/WPA-PSK]
Supported encryption: [TKIP], [AES]
[No Encryption]
-
(When other than [No Encryption] is selected) Enter the encryption key and then select [Set].
[Direct]
Directly connect the camera and the destination device.

Select the method for connecting with the destination device.
[WPS Connection]
[WPS (Push-Button)]: Press the WPS button on the destination device to connect.
On the camera, press [DISP.] to extend the connection wait time.
[WPS (PIN code)]: Enter the PIN code into the camera, and connect.
[Manual Connection]
Search for the camera on the destination device to connect.
-
Select the network authentication.
[WPA3]/[WPA3/WPA2]
If [Wi-Fi Password] in [Wi-Fi Setup] is [OFF], this is not displayed if the connected device is [Smartphone].
-
Enter the SSID and password displayed on the camera into the device.
If [Wi-Fi Password] in [Wi-Fi Setup] is [OFF], the password is not displayed if the connected device is [Smartphone].
Select the SSID to establish a connection. (Connecting to a Smartphone ([Wi-Fi connection]))

|
|
Connect to Wi-Fi Using Previously Saved Settings
Use the Wi-Fi connection history to connect using the same settings as previously.
-
Display the Wi-Fi connection history.
![]() [
[![]() ]
] ![]() [
[![]() ]
] ![]() [Wi-Fi]
[Wi-Fi] ![]() [Wi-Fi Function]
[Wi-Fi Function] ![]() [Select a destination from History]/[Select a destination from Favorite]
[Select a destination from History]/[Select a destination from Favorite]
-
Select the History item to connect to.
Press [DISP.] to confirm details of the connection history.
Register to Favorite
You can register the Wi-Fi connection history to Favorite.
-
Display the Wi-Fi connection history.
![]() [
[![]() ]
] ![]() [
[![]() ]
] ![]() [Wi-Fi]
[Wi-Fi] ![]() [Wi-Fi Function]
[Wi-Fi Function] ![]() [Select a destination from History]
[Select a destination from History]
-
Select the History item to register and then press
 .
.
-
Enter a registration name and then select [Set].
How to enter characters (Entering Characters)
A maximum of 30 characters can be entered. A two-byte character is treated as two characters.
Editing Items Registered in Favorite
-
Display items registered to Favorite.
![]() [
[![]() ]
] ![]() [
[![]() ]
] ![]() [Wi-Fi]
[Wi-Fi] ![]() [Wi-Fi Function]
[Wi-Fi Function] ![]() [Select a destination from Favorite]
[Select a destination from Favorite]
-
Select the History item to edit in Favorite and then press
.
[Remove from Favorite]
[Change the Order in Favorite]
Specify the destination location of the desired item to change the display order.
[Change the Registered Name]
Enter characters to change the registered name.
How to enter characters (Entering Characters)
|
Change the Wi-Fi settings of the device you want to connect to so that the access point to be used is set to the camera. You can also select [New Connection] and reconnect the devices. (
– [Auto Transfer] |
Fn Button Assigned with [Wi-Fi]
You can perform the following operations by pressing the Fn button assigned with [Wi-Fi] after connecting to Wi-Fi. (Fn Buttons)
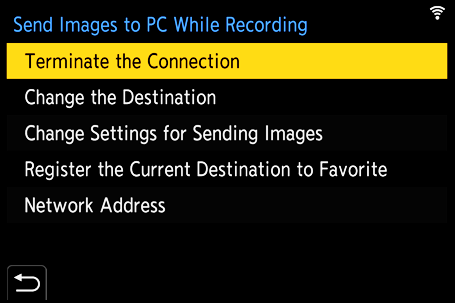
[Terminate the Connection]
Terminates the Wi-Fi connection.
[Change the Destination]
Terminates the Wi-Fi connection, and allows you to select a different Wi-Fi connection.
[Change Settings for Sending Images]
Sets the image size, file format, and other items for sending recorded images. (Image Send Settings)
[Register the Current Destination to Favorite]
Registers the current connection destination or method so that you can easily connect with the same connection settings next time.
[Network Address]
Displays the MAC address and IP address of the camera. ([Network Address])
Depending on the Wi-Fi function being used or the connection destination, you may not be able to perform some of these operations.