Setting Flash
 [Firing Mode]/[Manual Flash Adjust.]
![]()
![]()
![]()
![]()
![]()
![]()
![]()
![]()
![]()
You can set the flash function to control flash firing from the camera.
[Flash Mode]
Sets the flash mode.

![]() [
[![]() ]
] ![]() [
[![]() ]
] ![]() Select [Flash Mode]
Select [Flash Mode]
[![]() ] (Forced Flash On)/[
] (Forced Flash On)/[![]() ] (Forced On/Red-Eye)
] (Forced On/Red-Eye)
The flash fires every time regardless of the recording conditions.
This is suitable for recording when there is backlighting or under lighting such as fluorescent lighting.
[![]() ] (Slow Sync.)/[
] (Slow Sync.)/[![]() ] (Slow Sync./Red-Eye)
] (Slow Sync./Red-Eye)
When recording images against a nightscape, this will slow the shutter speed when the flash fires to make not only the subject but also the nightscape appear brighter.
 Slower shutter speeds may result in blurry images. To avoid this, we recommend using a tripod.
[![]() ] (Forced Flash Off)
] (Forced Flash Off)
The flash does not fire.
|
The interval between the first and second firings is longer when [
– [Firing Mode]: [MANUAL] – [Flash Synchro]: [2ND] – [Wireless]: [ON]
The effect, which is influenced by factors such as distance to the subject and whether the subject is looking at the camera when the preliminary flash is fired, may not be very noticeable in some cases. |
 Available Flash Settings by Recording Mode
The available flash settings depend on the recording mode.
( : Available, —: Not available)
|
Recording mode |
[ |
[ |
[ |
[ |
[ |
|
[P]/[A] |
|
|
|
|
|
|
[S]/[M] |
|
|
— |
— |
|
|
|
Shutter Speeds for Flash Modes
[![]() ]/[
]/[![]() ]: 1/60 of a second
]: 1/60 of a second to 1/250 of a second
[![]() ]/[
]/[![]() ]: 1 second to 1/250 of a second
]: 1 second to 1/250 of a second
-
In [S] mode, this will be 60 seconds and in [M] mode it will be [B] (Bulb).
[Firing Mode]/[Manual Flash Adjust.]
You can select whether to set the flash output automatically or manually.
|
Set on the flash when a Flash (DMW-FL580L/DMW-FL360L/DMW-FL200L: optional) is attached. |
-
Set the [Firing Mode].
![]() [
[![]() ]
] ![]() [
[![]() ]
] ![]() [Firing Mode]
[Firing Mode]
[TTL]
Sets flash output to be set automatically by the camera.
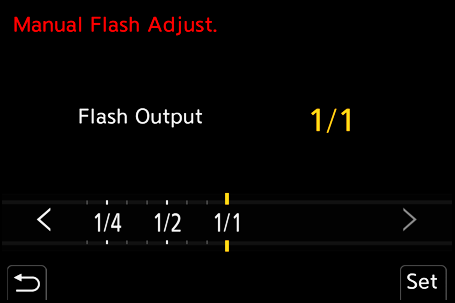
[MANUAL]
Sets the flash output manually.
With [TTL], you can record the images you want even when recording dark scenes where the flash output tends to become greater.
The flash output ([1/1], etc.) is displayed on the flash icon of the recording screen.
-
(When set to [MANUAL]) Select [Manual Flash Adjust.] and then press
or  .
.
-
Press

 to set the flash output and then press or .
It can be set within the range of [1/1] (full flash output) to [1/128] in 1/3 steps.
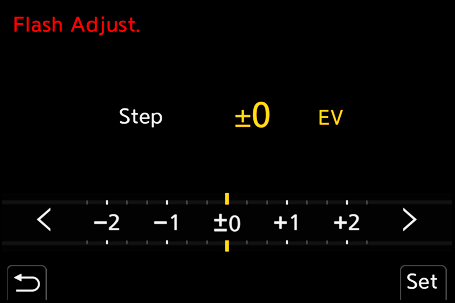
[Flash Adjust.]
You can adjust the flash output when taking pictures with the flash in TTL output mode.
-
Select [Flash Adjust.].
![]() [
[![]() ]
] ![]() [
[![]() ]
] ![]() [Flash Adjust.]
[Flash Adjust.]
-
Press
to adjust the flash output and then press or .
It can be adjusted within the range of [−3 EV] to [+3 EV] in 1/3 EV steps.
|
– [Firing Mode]: [MANUAL] – [Wireless]: [ON] |
[Flash Synchro]
When a moving subject is recorded at night using a slow shutter and flash, a trail of light may appear in front of the subject.
If you set [Flash Synchro] to [2ND], you can take a dynamic picture with a trail of light appearing behind the subject by firing the flash immediately before the shutter closes.
![]() [
[![]() ]
] ![]() [
[![]() ]
] ![]() Select [Flash Synchro]
Select [Flash Synchro]
[1ST]
This is the normal method for recording with the Flash.

[2ND]
The light source appears behind the subject and the picture becomes dynamic.

|
– [Wireless] – [Live View Composite]
|
[Auto Exposure Comp.]
Automatically adjust the flash output in conjunction with the exposure compensation value. ( Exposure Compensation)
![]() [
[![]() ]
] ![]() [
[![]() ]
] ![]() Select [Auto Exposure Comp.]
Select [Auto Exposure Comp.]
Settings: [ON]/[OFF]