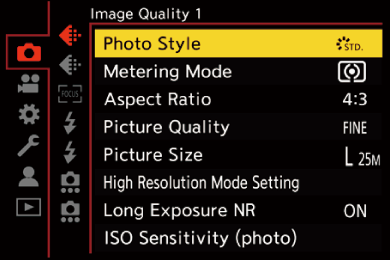
[Photo Style]
![]()
![]()
![]()
![]()
![]()
![]()
![]()
![]()
![]()
You can select the finishing settings of images to suit your subjects and expression styles.
The image quality can be adjusted for each Photo Style.
You can also apply the LUT file you have loaded in the camera and record pictures and videos.

![]() [
[![]() ]/[
]/[![]() ]
] ![]() [
[![]() ]
] ![]() Select [Photo Style]
Select [Photo Style]
![]() [Standard]
[Standard]
The standard setting.
![]() [Vivid]
[Vivid]
A setting that produces a more vivid quality with higher saturation and contrast.
![]() [Natural]
[Natural]
A setting that produces a softer quality with lower contrast.
![]() [L.ClassicNeo]
[L.ClassicNeo]
A setting for a film-like effect that has a nostalgic, soft coloring.
![]() [Flat]
[Flat]
A setting that produces a flatter image quality with lower saturation and contrast.
![]() [Landscape]
[Landscape]
A setting suited for sceneries with vivid blue skies and greens.
![]() [Portrait]
[Portrait]
A setting suited for portraits with a healthy and beautiful skin tone.
![]() [Monochrome]
[Monochrome]
A monochrome setting with no color shades.
![]() [L.Monochrome]
[L.Monochrome]
A monochrome setting with rich gradation and crisp black accents.
![]() [L.Monochrome D]
[L.Monochrome D]
A monochrome setting that creates a dynamic impression with enhanced highlights and shadows.
![]() [L.Monochrome S]
[L.Monochrome S]
A setting for a monochrome effect with a gentle touch suited to portraits.
![]() [LEICA Monochrome]
[LEICA Monochrome]
A setting mode that realizes Leica monochrome mode, featuring deep contrasts between black and white.
![]() [Cinelike D2]
[Cinelike D2]
A setting that creates a film-like finishing touch using a gamma curve and gives priority to the dynamic range.
 This function is suitable for video editing processes.
![]() [Cinelike V2]
[Cinelike V2]
A setting that creates a film-like finishing touch using a gamma curve that gives priority to the contrast.
![]() [Like709]
[Like709]
A setting that minimizes overexposure by applying a gamma curve correction equivalent to Rec.709 to perform compression (knee adjustment) of high-luminance areas. ( Recording While Controlling Overexposure (Knee))
Rec.709 is an abbreviation of “ITU-R Recommendation BT.709”, a standard for high-definition broadcasting.
![]() [V-Log]
[V-Log]
A gamma curve setting intended for post-production processing. (Log Recording)
It allows you to add rich gradation to images during post-production editing.
![]() [REAL TIME LUT]
[REAL TIME LUT]
A setting for recording images with a LUT file applied to the [V-Log] Photo Style.
You can apply the LUT file that was registered in [LUT Library]. ([LUT Library])
[Vlog_709] is applied in the default setting.
[![]() ] is displayed on the recording screen when a LUT file has not been applied.
] is displayed on the recording screen when a LUT file has not been applied.
Selecting the LUT file to apply
-
Press

 to select [LUT] and then press [
 ].
].
-
Press
to select the LUT file to apply, then press or  .
.
-
Press the shutter button or video rec. button to start recording.
![]() [Hybrid Log Gamma]
[Hybrid Log Gamma] 1
1
A setting used to record HLG format video. (HLG Videos)
![]() [MY PHOTO STYLE 1]2 to [MY PHOTO STYLE 10]2
[MY PHOTO STYLE 1]2 to [MY PHOTO STYLE 10]2
Adjusts the image quality of Photo Style items to your preferred settings and registers these as My Photo Style items. (Registering Settings in My Photo Style)
Effects up to [MY PHOTO STYLE 4] are displayed with the default settings.
Applying a LUT file
With image quality adjustments, you can apply a LUT file registered in [LUT Library]. ([LUT Library])
With My Photo Style, you can also apply LUT files to [Photo Style] other than [V-Log].
When applying a LUT file created with image editing software, select the [Photo Style] that is the same as the Photo Style used as the base when creating it.
When you select a different [Photo Style], the images may not be displayed or recorded correctly.
[![]() ] switches to [
] switches to [![]() ] when [LUT] is applied in the [Photo Style] image quality adjustments.
] when [LUT] is applied in the [Photo Style] image quality adjustments.
-
Can only be selected when in the [
 ] mode and set to a 10-bit [Rec Quality]. ([Rec Quality])
-
You can set the items to display in the menu with [Show/Hide Photo Style] in [Photo Style Settings]. (
[Photo Style Settings])
|
– [Standard] or [Monochrome] can be set. – The setting will be reset to [Standard] when the camera is switched to another recording mode or it is turned off. – Image quality cannot be adjusted.
– [Like709]/[V-Log]/[REAL TIME LUT]/[Hybrid Log Gamma]
|
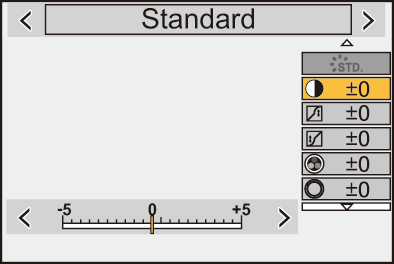
 Adjusting Image Quality
-
Press

 to select the type of Photo Style.
-
Press
to select an item and then press to adjust.
Adjusted items are indicated with [ ].
].
-
Press
or .
When the image quality is adjusted, the Photo Style icon on the recording screen is indicated with [].
Settings Items (Image Quality Adjustment)
![]() [Contrast]
[Contrast]
Adjusts the contrast in the image.
![]() [Highlight]
[Highlight]
Adjusts the brightness of bright areas.
![]() [Shadow]
[Shadow]
Adjusts the brightness of dark areas.
![]() [Saturation]
[Saturation]
Adjusts the vividness of colors.
![]() [Color Tone]
[Color Tone]
Adjusts blue and yellow tints.
![]() [Hue]
[Hue]
Assuming that the reference point is red, this rotates the hue toward violet/magenta or yellow/green to adjust the coloring of the entire image.
![]() [Filter Effect]
[Filter Effect]
[Yellow]: Enhances the contrast. (Effect: weak) Records the sky with a clear blue.
[Orange]: Enhances the contrast. (Effect: medium) Records the sky with a darker blue.
[Red]: Enhances the contrast. (Effect: strong) Records the sky with a much darker blue.
[Green]: Skin and lips of people appear in natural tones. Green leaves appear brighter and more enhanced.
[Off]
![]() [Grain Effect]
[Grain Effect]
[Low]/[Standard]/[High]: Sets the grain effect level.
[Off]
![]() [Color Noise]
[Color Noise]
[On]: Adds color to the grain effect.
[Off]
![]() [Sharpness]
[Sharpness]
Adjusts the outlines in the image.
![]() [Noise Reduction]
[Noise Reduction]
Adjusts the noise reduction effect.
Increasing the effect may cause a slight drop in picture resolution.
![]() [Sensitivity]3
[Sensitivity]3
Sets the ISO sensitivity. (ISO Sensitivity)
![]() [White Balance]3
[White Balance]3
Sets the white balance. (White Balance (WB))
While [WB] is selected, press [] to display the white balance setting screen.
Press [] again to return to the original screen.
![]() [LUT]
[LUT]
Applies the preset ([Vlog_709]) or the LUT file that was registered in [LUT Library]. ([LUT Library])
-
Select either [REAL TIME LUT] or one of [MY PHOTO STYLE 1] to [MY PHOTO STYLE 10] in [Photo Style].
-
Press
to select [LUT] and then press [].
-
Press
to select the LUT file to apply, then press or .
-
Available when the following is set while [MY PHOTO STYLE 1] to [MY PHOTO STYLE 10] are selected:
[![]() ]
] ![]() [
[![]() ]
] ![]() [Photo Style Settings]
[Photo Style Settings] ![]() [My Photo Style Settings]
[My Photo Style Settings] ![]() [Add Effects]
[Add Effects] ![]() [Sensitivity]/[White Balance]
[Sensitivity]/[White Balance] ![]() [ON]
[ON]
The items that you can adjust the image quality for depend on the Photo Style type.
|
|
|
|
|
|
|
|
|
|
|
|
|
|
|
|
|
|
|
|
|
|
|
|
|
|
|
|
|
|
|
|
|
([Saturation]) |
|
|
|
|
|
|
|
([Color Tone]) |
|
|
|
|
|
|
|
|
|
|
|
|
|
|
|
|
|
|
|
|
|
|
|
|
|
|
|
|
|
|
|
|
|
|
|
|
|
|
|
|
|
|
|
|
|
|
|
|
|
|
|
|
|
|
|
|
|
|
|
|
|
|

-
Can be set when [Grain Effect] is one of [Low], [Standard], or [High].
-
Can be set when [Photo Style] is My Photo Style.
|
– Video recording |
Range Properties When Recording with a LUT File Applied
The following table shows the range properties for videos recorded with LUT files applied in Photo Style:
|
[Photo Style] |
LUT file applied |
[Luminance Level] |
|
Range property |
|
[REAL TIME LUT]/when [V-Log] is selected in My Photo Style |
[Vlog_709] |
Fixed to [16-255] ([64-1023]) |
|
Video range |
|
Other than [Vlog_709] |
Fixed to [0-255] ([0-1023]) |
|
Full range |
|
|
When other than [V-Log] is selected in My Photo Style |
[Vlog_709] |
[0-255] ([0-1023]) |
|
Full range |
|
[16-235] ([64-940])/[16-255] ([64-1023]) |
|
Video range |
||
|
Other than [Vlog_709] |
[0-255] ([0-1023]) |
|
Full range |
|
|
[16-235] ([64-940])/[16-255] ([64-1023]) |
|
Video range |

|
If you record with a LUT file for video range applied, it may not be possible to properly display or record the images.
When loading the video files into the image editing software, select the correct range setting for each video file.
|
Registering Settings in My Photo Style
![]()
![]()
![]()
![]()
![]()
![]()
![]()
![]()
![]()
-
Press
to select the type of Photo Style.
-
Adjust the image quality.
My Photo Style displays the types of Photo Style at the top of image quality adjustment.
Select the base Photo Style.
-
Press [DISP.].
-
(When [MY PHOTO STYLE 1] to [MY PHOTO STYLE 10] is selected)
Press to select [Save Current Setting] and then press or .
-
Press
to select the registration destination number and then press or .
A confirmation screen will be displayed.
On the confirmation screen, press [DISP.] to change the My Photo Style name.
Up to 22 characters may be entered. Double-byte characters are treated as 2 characters.
How to enter characters (Entering Characters)
Changing the Registered Contents of My Photo Style
-
Select any value from [MY PHOTO STYLE 1] to [MY PHOTO STYLE 10].
-
Press [DISP.] and then set the item.
[Load Preset Setting]
[Save Current Setting]
[Edit Title]
[Restore to Default]