Monitor/Viewfinder Display Settings
 Switching Between the Monitor and Viewfinder
Switching the Display Information
Setting the Viewfinder
 Adjusting the Viewfinder Diopter
Rotate the diopter adjustment dial while looking through the viewfinder.
 Adjust until you can clearly see the text on the viewfinder.

Switching Between the Monitor and Viewfinder
With the default settings, automatic viewfinder/monitor switching is set. When you look through the viewfinder, the eye sensor (A) works and the camera switches from monitor display to viewfinder display.
You can switch to viewfinder display or monitor display with [LVF] button (B).
Press [LVF].


(C) Automatic viewfinder/monitor switching
(D) Viewfinder display
(E) Monitor display
Simultaneous Display on the Monitor and Viewfinder
When automatic viewfinder/monitor switching (C), if the monitor is rotated towards the lens, the recording screen is displayed on the monitor even when you look into the viewfinder.

|
– HDMI output – Wi-Fi connection with a smartphone – Tethered recording
(
|
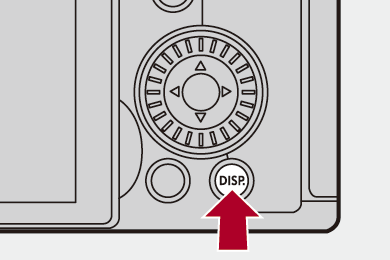
Switching the Display Information
Press [DISP.].
The display information is switched.
Recording Screen
Monitor
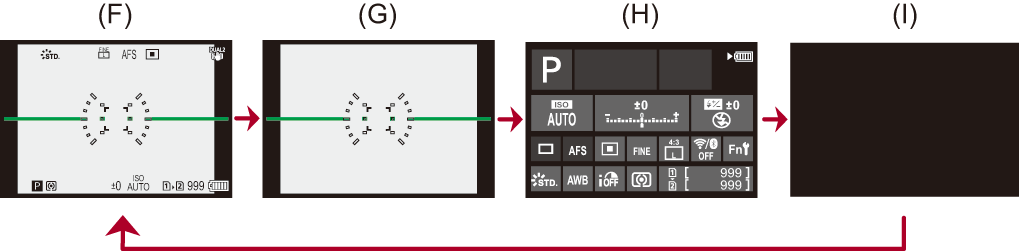
(F) With information
(G) Without information
(H) Control panel
(I) Turned off (black)
Viewfinder

(J) With information
(K) Without information
|
This can also be set by using [Level Gauge]. (
|
 ] to switch between display/hide of the level gauge.
Playback Screen
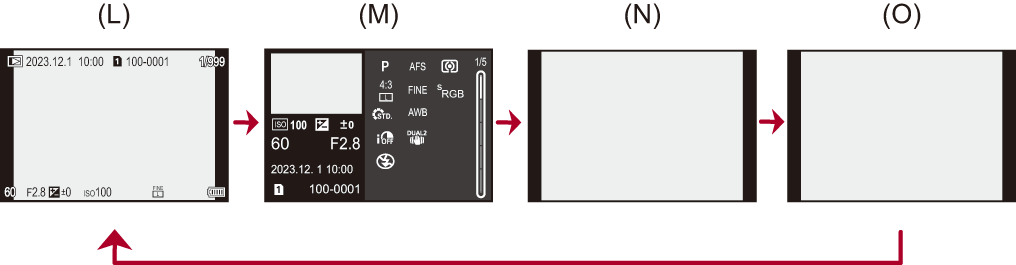
(L) With information
(M) Detailed information display
Pressing 
 switches the display information. (
 Detailed information display)
(N) Without information
(O) Without blinking highlights
This is a screen without blinking highlights display that is shown when [Blinking Highlights] of the [Custom] ([Monitor / Display (Photo)]) is set to [ON].
In other than this screen, overexposed parts of the screen will blink. ([Blinking Highlights])