Selecting the AF Mode
 [Zone(Horizontal/Vertical)]/[Zone]
![]()
![]()
![]()
![]()
![]()
![]()
![]()
![]()
![]()
Select the focusing method to match the position and number of subjects.
In an AF mode other than Pinpoint, you can automatically focus by detecting subjects.
-
Press [
 ].
].
The AF mode selection screen appears.

-
Select the AF mode.
Press 
 to select an item and then press
  or
or  .
.
Selection is also possible by pressing [].

![]() [Tracking]
[Tracking]
![]() [Full Area AF]
[Full Area AF]
![]() [Zone(Horizontal/Vertical)]
[Zone(Horizontal/Vertical)]
![]() [Zone]
[Zone]
( [Zone])
![]() [1-Area+]
[1-Area+]
![]() [1-Area]
[1-Area]
([1-Area])
![]() [Pinpoint]
[Pinpoint]
|
– [Time Lapse Shot] – [Live View Composite]
|
Automatic Detection
When automatic detection is enabled, subjects for recording are automatically detected and the camera focuses.
|
|
-
Set [AF Detection Setting] to [ON].
![]() [
[![]() ]/[
]/[![]() ]
] ![]() [
[![]() ]
] ![]() [AF Detection Setting]
[AF Detection Setting] ![]() [ON]
[ON]
 You can also press
  in the AF mode selection screen to switch automatic detection [ON]/[OFF].
-
Select [Detecting Subject].
![]() [
[![]() ]/[
]/[![]() ]
] ![]() [
[![]() ]
] ![]() [Detecting Subject]
[Detecting Subject]
Select [Type of Subject] and [Target Parts].
It is also possible to select by pressing [DISP.] in the AF mode selection screen.
|
[Type of Subject] |
[HUMAN] |
Detects humans. Select either [Eye/Face/Body] or [Eye/Face] for the [Target Parts].
|
|
[ANIMAL] |
Detects animals. Select either [Body] or [Eye/Body] for the [Target Parts].
|
|
|
[CAR] |
Detects cars (mainly for motor sports). [Target Parts] cannot be selected.
|
|
|
[MOTORCYCLE] |
Detects motorcycles (mainly for motor sports). [Target Parts] cannot be selected.
|
|
|
[Target Parts] |
Select the part to be brought into focus. This can be set when the [Type of Subject] is either [HUMAN] or [ANIMAL]. |
|
 When [
![]() ]
]
When a subject to be recorded is detected, an AF area is displayed.
If multiple subjects are detected, multiple AF areas are also displayed, and you can select the subject you want to focus on from amongst these.
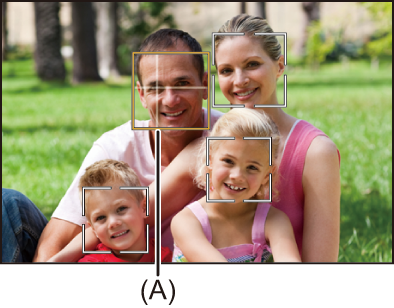
Yellow
AF area to be brought into focus.
The camera selects this automatically.
A cross appears in the AF area when a human eye is detected. (A)
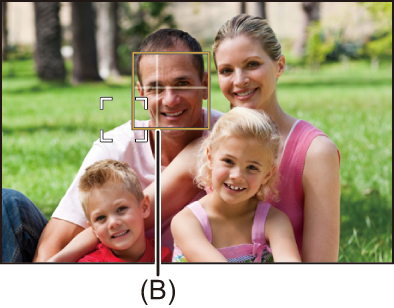
White
Displayed when multiple subjects are detected.
When [![]() ], [
], [![]() ], [
], [![]() ], [
], [![]() ], or [
], or [![]() ]
]
If even part of a subject to be recorded enters the AF area, it is automatically detected and focused.
If eyes are detected inside the AF area, eye detection (B) works.
It is not possible to change the eye to focus on.
|
The exposure will be adjusted to the face. (When [Metering Mode] is set to [
[HUMAN] ([Eye/Face/Body], [Eye/Face]): Maximum 15 (maximum 3 bodies detected) [ANIMAL] ([Body]), [CAR], [MOTORCYCLE]: Maximum 3 [ANIMAL] ([Eye/Body]): Maximum 1
(
|
 [Tracking]
When the focus mode is set to [AFC], the AF area follows the movement of the subject, maintaining focusing.
Start tracking.
Aim the AF area over the subject, and press the shutter button halfway.
The camera will track the subject while the shutter button is pressed halfway or pressed fully.
If tracking fails, the AF area blinks red.
When set to [AFS], the focus will be on the AF area position. Tracking will not work.

How to manipulate the AF area (AF Area Operations)
|
To cancel tracking, press Tracking is also available with [AFS].
|
 [Full Area AF]
The camera selects the most optimal AF area to focus.
When multiple AF areas are selected, all selected AF areas will be brought into focus.
When the focus mode is set to [AFC], you can ensure that the focus stays on the subject by recording while keeping the subject within the Full Area AF area.
Specify the Subject to Bring into Focus
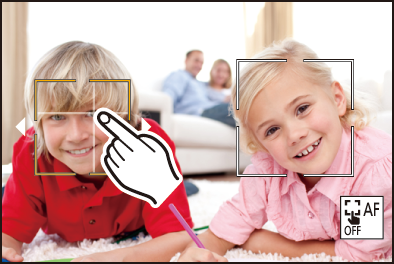
When automatic detection is [ON], multiple subjects are detected.
When the subject to be brought into focus is shown using the white AF area, you can change this to a yellow AF area.
Touch operations
Touch the subject indicated with the white AF area.
The AF area will change to yellow.
To cancel the setting, touch [![]() ].
].
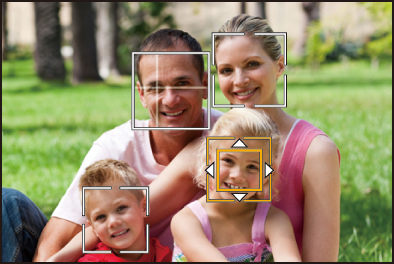
Operations with the joystick
Tilt the joystick to  .
.
Each tilt to switches the subject to be brought into focus.
To cancel the setting, press .
Button operations
-
Press
in the AF mode selection screen.
-
Press
to move the position of the AF area.
-
When the white AF area changes to yellow, press
.
To cancel the setting, press .
Setting the AF Area in Any Position
The [![]() ] AF area can be set in any position.
] AF area can be set in any position.
Touch operations
Touch any position on the recording screen and then touch [Set].
Touch [![]() ] to return to [
] to return to [![]() ].
].
Operations with the joystick
Press and hold the joystick.
The [![]() ] AF area is set in the center of the screen.
] AF area is set in the center of the screen.
Either press and hold the joystick again or press to return to [![]() ].
].
Button operations
-
Press
in the AF mode selection screen.
-
Press
to move the AF area, and then press to confirm.
Press again to return to [![]() ].
].
|
|
 [Zone(Horizontal/Vertical)]/
 [Zone]
![]() [Zone(Horizontal/Vertical)]
[Zone(Horizontal/Vertical)]
Within the full area, vertical and horizontal zones can be focused.
Horizontal pattern

Vertical pattern

To switch between the horizontal pattern and vertical pattern, press in the AF area setting screen.
How to manipulate the AF area (AF Area Operations)
![]() [Zone]
[Zone]
Within the full area, a central oval zone can be focused.

How to manipulate the AF area (AF Area Operations)
|
– During video recording – [ – [S&Q] mode |
 [1-Area+]/
 [1-Area]
![]() [1-Area+]
[1-Area+]
Emphasis within a single AF area can be focused.
Even when the subject moves out of the single AF area, the subject remains focused in a supplementary AF area (E).
Effective when recording moving subjects that are difficult to track with [![]() ].
].

![]() [1-Area]
[1-Area]
Specify the point to be brought into focus.

A dot (F) is displayed on the recording screen when a single AF area is reduced to the minimum size. The AF area can be set on the location where the dot is displayed.

How to manipulate the AF area (AF Area Operations)
|
– During video recording – [ – [S&Q] mode – [Ex. Tele Conv.] |
 [Pinpoint]
You can achieve a more precise focus on a small point.
If you press the shutter button halfway, the screen that lets you check the focus will be enlarged.

The enlarged screen is displayed when you set an AF area.
How to manipulate the AF area (AF Area Operations)
|
– During video recording – [ – [S&Q] mode |
Operations on the Magnification Window
|
Button operations |
Touch operations |
Description of operation |
||
|
|
Touch |
Moves [+].
|
||
|
|
Pinch out/pinch in |
Enlarges/reduces the screen in small steps. |
||
|
|
— |
Enlarges/reduces the screen. |
||
|
|
|
Switches magnification window (windowed mode
|
||
|
[DISP.] |
[Reset] |
Quits the enlarged display. |
||


-
You can enlarge by approx. 3× to 6×.
-
You can enlarge by approx. 3× to 10×.
You can also take a picture by touching [![]() ].
].
|
|