Attaching a Lens
The camera can use the dedicated lenses that comply with the Micro Four Thirds™ system lens mount specification (Micro Four Thirds mount).
For information about the lens that can be used ( Lenses That Can Be Used)
|
If dirt or dust gets on the lens (
|

(A) Lens fitting marks
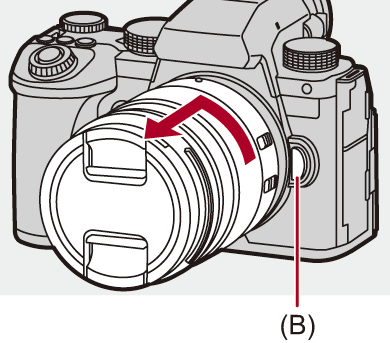
 Removing a Lens
 While pressing the lens release button (B), rotate the lens in the direction of the arrow until it stops and then remove it.
|
Inserting this at an angle to attach it may damage the camera lens mount.
|
Attaching a Lens Hood
For recording against strong backlight, a lens hood can reduce the inclusion of unwanted light in images and drop in contrast resulting from the irregular reflection of light that occurs within the lens.
It allows you take more beautiful pictures by cutting out excess light.
When attaching the lens hood (flower shape) supplied with the interchangeable lens (H-ES12060/H-FS12060)
Hold the lens hood by placing your fingers as shown in the figure.
Do not hold the lens hood in such a way that it will become bent.


-
Align mark (C) (
 ) on the lens hood with the mark on the tip of the lens.

-
Rotate the lens hood in the direction of the arrow to align mark (D) (
 ) on the lens hood with the mark on the tip of the lens.
 Attach the lens hood by rotating it until it clicks.

Removing the Lens Hood (H-ES12060)
While pressing the lens hood button (E), rotate the lens hood in the direction of the arrow and then remove it.

|
Example) H-ES12060
|
