Tethered Recording
 Operating the Camera from a PC
Using “LUMIX Tether” with a Wired LAN Connection
Remote Control of Multiple Cameras
If you install the “LUMIX Tether” camera control software on your PC, you can connect the camera to the PC via USB and then control the camera from the PC and record while checking the live view on the PC screen (tethered recording).
In addition, you can output via HDMI to an external monitor or TV during tethered recording.
By using a commercially available USB ethernet adaptor, you can use tethered recording by connecting the camera to the PC via a LAN cable. Multiple cameras can also be operated remotely this way.
|
https://panasonic.jp/support/global/cs/dsc/connect/index.html (English only) |
Installing Software
 “LUMIX Tether”
This software is for controlling the camera from a PC.
It allows you to change various settings and to record remotely and then save the images to the PC.
Check the following site and then download and install the software:
https://panasonic.jp/support/global/cs/soft/download/d_lumixtether.html
(English only)
Operating environment
Supported OS
Windows: Windows 10 (64 bit), Windows 11
Mac: macOS 10.15.3 to 10.15.7, 11.0 to 11.7, 12.0 to 12.6, 13.0 to 13.2
Interface
USB port (SuperSpeed USB (USB 3.1))
|
|
Operating the Camera from a PC
Getting started:
 Turn on the camera and PC.
Install “LUMIX Tether” on PC.
-
Connect the camera and PC with the USB connection cable. (
 USB port)
-
Press

 to select [PC(Tether)] and then press
  or
or  .
.
[![]() ] is displayed on the camera’s screen.
] is displayed on the camera’s screen.
-
Use “LUMIX Tether” to operate the camera from the PC.
|
– [Streaming] – [Wi-Fi Function] ([LAN / Wi-Fi]) – [Bluetooth] |
Using “LUMIX Tether” with a Wired LAN Connection
Getting started:
Turn on the camera and PC.
Install “LUMIX Tether” on PC.
-
Set the camera as a DHCP server.
![]() [
[![]() ]
] ![]() [
[![]() ]
] ![]() [LAN / Wi-Fi]
[LAN / Wi-Fi] ![]() [LAN / Wi-Fi Setup]
[LAN / Wi-Fi Setup] ![]() [IP Address Setting (LAN)]
[IP Address Setting (LAN)] ![]() [DHCP Server]
[DHCP Server]
If you have modified settings in [IP Address Setting (LAN)], turn the camera off and on again.
-
Set to wired LAN tethering connection.
![]() [
[![]() ]
] ![]() [
[![]() ]
] ![]() [USB]
[USB] ![]() [Tether(USB ethernet adaptor)]
[Tether(USB ethernet adaptor)] ![]() [ON]
[ON]
-
Connect the commercially available USB ethernet adaptor to the camera, then use a commercially available LAN cable to connect the camera and the PC.
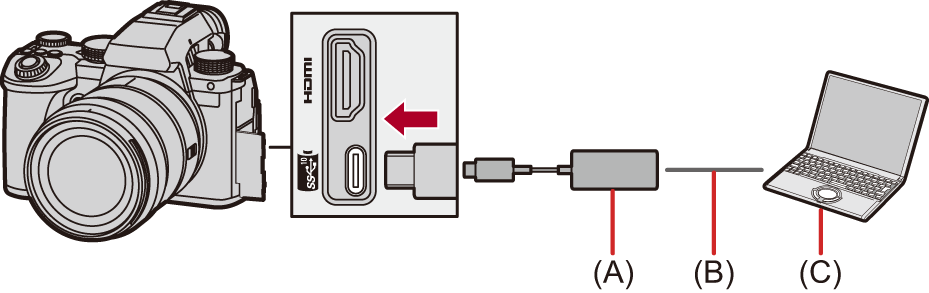
(A) USB ethernet adaptor (commercially available)
(B) LAN cable (commercially available)
(C) A PC on which “LUMIX Tether” is installed
-
Use “LUMIX Tether” to remotely control the camera.
(Initial connection) Set the password to be used to connect from “LUMIX Tether” to the camera. (Between 8 and 31 characters)
[![]() ] is displayed on the top right of the camera’s screen.
] is displayed on the top right of the camera’s screen.
Reconnect the USB connection cable if there is a problem with operation.
Remote Control of Multiple Cameras
A number of cameras can be remotely controlled using “LUMIX Tether”.
Getting started:
Turn on the camera and PC.
Install “LUMIX Tether” on PC.
-
Set the camera as a DHCP client (default setting).
![]() [
[![]() ]
] ![]() [
[![]() ]
] ![]() [LAN / Wi-Fi]
[LAN / Wi-Fi] ![]() [LAN / Wi-Fi Setup]
[LAN / Wi-Fi Setup] ![]() [IP Address Setting (LAN)]
[IP Address Setting (LAN)] ![]() [DHCP Client]
[DHCP Client]
If there is no DHCP server in the LAN, it is also possible to make the connection by setting one camera as [DHCP Server], and the remainder as [DHCP Client].
If you have modified settings in [IP Address Setting (LAN)], turn the camera off and on again.
-
Do the operations in “Using “LUMIX Tether” with a Wired LAN Connection” from Step 2.
Connect the cameras, PC, and router (hub) according to the diagram below.
For example: When there is a DHCP server in the LAN, and the camera is to be connected as a DHCP client
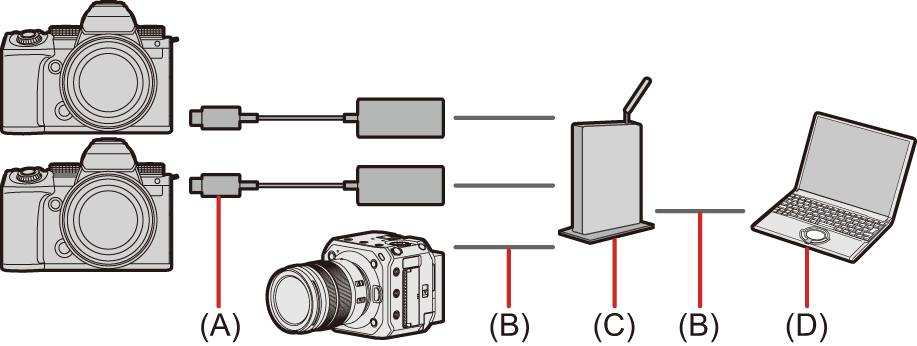
(A) USB ethernet adaptor (commercially available)
(B) LAN cable (commercially available)
(C) Router (or hub)
(D) A PC on which “LUMIX Tether” is installed
You can use “LUMIX Tether” to remotely control multiple cameras.
|
When set to [ON], power is supplied from the battery of this camera to the connected device, so the battery will be consumed faster.
– [Wi-Fi Function] ([LAN / Wi-Fi]) – [Bluetooth]
[ |