Using AF
![]()
![]()
![]()
![]()
![]()
![]()
![]()
![]()
![]()
AF (Auto Focus) refers to automatic focusing.
Select the focus mode and the AF mode appropriate for the subject and scene.
-
Set the focus mode to [AFS] or [AFC].
 Set the focus mode lever. (
 Selecting the Focus Mode)
-
Select the AF mode.
 Press [
 ] to display the AF mode selection screen, and set using
  or
or  . (
. ( Selecting the AF Mode)
 In [iA] mode, each press of [
 ] switches between [
![]() ] and [
] and [![]() ]. (
]. ( AF Mode)
-
Press the shutter button halfway.
 The AF operates.

|
|
Focus |
|
|
|
In focus |
Not in focus |
|
Focus icon (A) |
Lights |
Blinking |
|
AF area (B) |
Green |
Red |
|
AF beep |
Two beeps |
— |
Low illumination AF
 In dark environments, low illumination AF automatically operates, and the focus icon is indicated as [
![]() ].
].
 Achieving focus may take more time than usual.
Starlight AF
 If the camera detects stars in the night sky after determining low illumination AF, then Starlight AF will be activated.
When focus is achieved, the focus icon will display [![]() ], and the AF area will be displayed on the area in focus.
], and the AF area will be displayed on the area in focus.
 Edges of the screen cannot detect Starlight AF.
 [AF ON] button
You can also activate AF by pressing [AF ON].

|
– Fast-moving subjects – Extremely bright subjects – Subjects without contrast – Subjects recorded through windows – Subjects near shiny objects – Subjects in very dark locations – When recording subjects both distant and near
– When zooming from the wide-angle end to the telephoto end – When the subject is suddenly changed from one far away to one close by
|
|
(
This function is useful when the camera mistakenly focuses on the background:
This function is useful when taking pictures through fences or nets: |
[AF Custom Setting(Photo)]
![]()
![]()
![]()
![]()
![]()
![]()
![]()
![]()
![]()
You can select features of AF operation when taking pictures with [AFC] that are appropriate for the subject and scene.
Each of these features can be further customized.
-
Set the focus mode to [AFC].
 Set the focus mode lever. (
 Selecting the Focus Mode)
-
Set [AF Custom Setting(Photo)].


 [
[![]() ]
]  [
[![]() ]
]  [AF Custom Setting(Photo)]
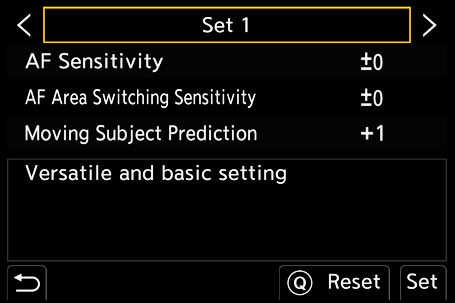
[Set 1]
Basic general-purpose setting.
[Set 2]
Suggested for situations where the subject moves at a constant speed in one direction.
[Set 3]
Suggested when the subject moves randomly, and other objects may be in the scene.
[Set 4]
Suggested for situations where the speed of the subject changes significantly.
 Adjusting AF Custom Settings
-
Press

 to select the AF Custom setting type.
-
Press

 to select items and press
 to adjust.
 A description of the item is displayed on the screen when you press [DISP.].
 To reset settings to the default, press [Q].
-
Press
 or
or  .
.
[Focus Limiter]
![]()
![]()
![]()
![]()
![]()
![]()
![]()
![]()
![]()
You can restrict the range for AF to work.
The focusing speed of AF increases when you limit the range where AF works.
-
Set the focus mode to [AFS] or [AFC].
 Set the focus mode lever. (
 Selecting the Focus Mode)
-
Set [Focus Limiter].


 [
[![]() ]/[
]/[![]() ]
]  [
[![]() ]
]  [Focus Limiter]
[ON]
Enables the following settings.
[OFF]
Disables the following settings.
[SET]
-
Use the same procedure as MF (
 Record Using MF) to check the focus, then press [WB] or [ISO] to set the range of operation for AF.
 This can also be set by touching [Limit1]/[Limit2].
 [Limit1]/[Limit2] can be set from either.
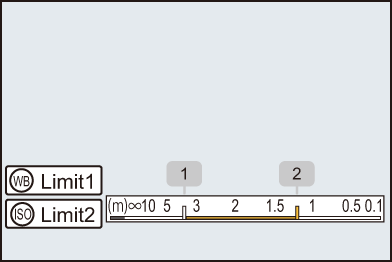
-
Press
 or
or  to confirm the setting.
 Press [DISP.] to return the operation range to the default setting.
|
– [AF+MF] |
[AF Assist Light]
![]()
![]()
![]()
![]()
![]()
![]()
![]()
![]()
![]()
When recording in low light conditions, the AF assist light turns on when you press the shutter button halfway, making it easier for the camera to focus.

 [
[![]() ]/[
]/[![]() ]
]  [
[![]() ]
]  Select [AF Assist Light]
Settings: [ON]/[OFF]

|
– When the interchangeable lens (S-R2060) is attached and at wide-angle end. Approx. 1.0 m (3.3 feet) to 3.0 m (9.8 feet) – When the interchangeable lens (S-S50) is attached. Approx. 1.0 m (3.3 feet) to 3.0 m (9.8 feet)
|
[1-Area AF Moving Speed]
![]()
![]()
![]()
![]()
![]()
![]()
![]()
![]()
![]()
Sets the speed when moving a single AF area.

 [
[![]() ]/[
]/[![]() ]
]  [
[![]() ]
]  Select [1-Area AF Moving Speed]
Settings: [FAST]/[NORMAL]
[AF Micro Adjustment]
![]()
![]()
![]()
![]()
![]()
![]()
![]()
![]()
![]()
You can make fine adjustments to the focus point when focusing with phase detection AF.
|
|

 [
[![]() ]
]  [
[![]() ]
]  Select [AF Micro Adjustment]
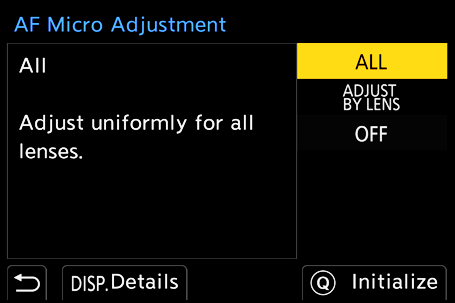
[ALL]
Adjust uniformly for all lenses.
Used in cases such as when you have attached lenses that are not registered in [ADJUST BY LENS].
[ADJUST BY LENS]
Adjust each lens separately and register the adjustment values on the camera.
When a registered lens is attached, the adjusted value is recalled when it is set in [ADJUST BY LENS].
 When using a zoom lens, you can adjust the focus point individually at the wide-angle end and the telephoto end.
 If the lens has already been registered, the adjustment value is overwritten.
[OFF]
 Registering the Adjusted Value
-
Select [ALL] or [ADJUST BY LENS] and then press [DISP.].
-
(When [ADJUST BY LENS] is selected) Register the lens.
 Press [DISP.] and select [Yes] to register.
 If the lens is already registered, the screen moves to the one in Step 3.
-
(When [ADJUST BY LENS] is selected) Select [Wide Adjustment] or [Tele Adjustment].
 Press
Press 
 to select, and then press
  or
or  .
.
 When using a prime lens, [Adjustment] is displayed.
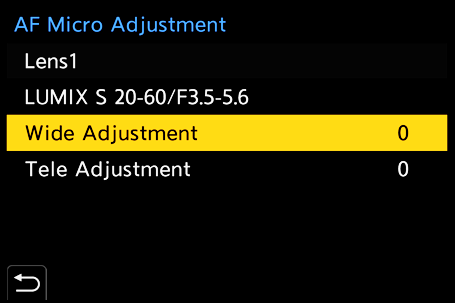
-
Adjust the focus point.
 Press
Press 
 to adjust the focus point and then press
  or
or  .
.
 You can also adjust by rotating
  ,
,  , or
, or  .
.
 The focus point is moved backward when adjusted with the [+] side. The focus point is moved forward when adjusted with the [−] side.
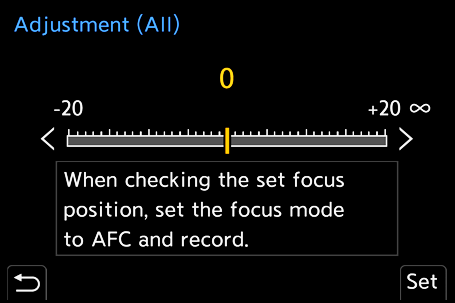
-
Record and repeat Step 4 until the suitable focus point is reached.
 Check the set focus point in an image recorded with [AFC] of the [Focus/Shutter Priority] set to [FOCUS] and with the focus mode set to [AFC]. (
 [Focus/Shutter Priority])
|
|
 Initializing
Registered lens information and adjusted values are initialized.
-
Select [ALL] or [ADJUST BY LENS] and then press [Q].
-
Select [Yes] to initialize.
|
|
