Streaming function
You can perform streaming of audio and video currently shot with the unit over a network (wired LAN, wireless LAN, and USB tethering ).
).
Streaming can be performed using the unit, application software of a device connected via a network, or a server that is capable of receiving streaming video sent from the unit.
There are 2 ways to start streaming: streaming from application software and streaming from the unit. This section describes how to connect the unit to a network for each method.
-
Available for use when using
 .
.
 Setting for each protocol and starting the streaming
 Management of setting information
 Entering the setting using the setting tool
|
|
Basic setting of the camera
 Specifying the network settings
Specify the network settings. ( Network settings)
 Settings for the streaming function
-
Set the [SYSTEM] menu
 [FREQUENCY]/[REC FORMAT].
Set to the FHD (1920×1080) recording format.
-
Select the [NETWORK] menu
 [NETWORK FUNC]
  [STREAMING].
Streaming function is enabled.
-
Select the protocol with the [NETWORK] menu
 [STREAMING]
  [STREAMING PROTOCOL].
-
In the [NETWORK] menu
 [STREAMING]
  [STREAMING FORMAT], set the format when streaming.
 For details about the setting items (
 Settings when using the streaming function)
-
Set the setting corresponding to the selected protocol. (
 Setting for each protocol and starting the streaming)
|
– The [SCENE FILE] menu – The [SYSTEM] menu – The menu has been set according to “Settings when using the streaming function” (This cannot be used when set to UHD) ( – Interval recording, background recording, and dual codec recording
(For the
|
 Settings when using the streaming function
The item that can be selected varies depending on the [STREAMING PROTOCOL] settings.
 When the [SYSTEM] menu
  [FREQUENCY]
  [59.94Hz] is set
 When the [SYSTEM] menu
  [FREQUENCY]
  [50.00Hz] is set
-
Factory setting
Setting for each protocol and starting the streaming
 RTMP(S)
-
Select the [NETWORK] menu
 [STREAMING]
  [STREAMING PROTOCOL]
  [RTMP(S)].
-
Set the destination. (
 Setting of the destination)
-
Select the [NETWORK] menu
 [STREAMING]
  [START]
  [ON].
[ON].
If the camera is connected to the transmission destination through a network, the camera starts the transmission of streaming video.
 To stop the transmission of the streaming image, select the [NETWORK] menu
  [STREAMING]
  [START]
  [OFF].
|
|
 RTSP
RTSP
Start the streaming with an operation of the application software or device at the receiving side (referred to as “receiving side” hereinafter).
-
Select the [NETWORK] menu
 [STREAMING]
  [STREAMING PROTOCOL]
  [RTSP].
-
Set the standby port with the [NETWORK] menu
 [STREAMING]
  [RTSP SETTING]
  [LISTEN PORT] on the camera if required.
-
Specify the IP address and the path of the camera as following on the receiving side, and start streaming.
rtsp://(IP address):(Port number)/stream
|
|
 Streaming with multicast
One streaming can be distributed to multiple receivers via supported router, etc., when the multicast function is used.
-
Select the [NETWORK] menu
 [STREAMING]
  [RTSP SETTING]
  [MULTICAST]
  [ENABLE].
-
Select the [NETWORK] menu
 [STREAMING]
  [RTSP SETTING], and specify [MULTICAST ADDRESS] and [MULTICAST PORT].
 Set [MULTICAST ADDRESS] within following range.
– IPv4: 224.0.1.0 to 239.255.255.254
– IPv6: Multicast address starting with FF
 Set [MULTICAST PORT] within the range of 1024 to 50000.
-
Specify the address of the unit and start streaming with the application software.
|
|
Management of setting information
You can set, save and load the RTMP(S) destination.
 Setting of the destination
Information regarding the destination can be set or referenced.
Setting the destination with the camera menu
-
Select the [NETWORK] menu
 [STREAMING]
  [CONNECTION INFO.]
  [MEMORY].
-
Enter the destination URL in the [NETWORK] menu
 [STREAMING]
  [RTMP(S) RECEIVER URL].
 Enter the destination URL in following format.
– rtmp://(server URL):(port number)/(path)/(stream key)
– rtmps://(server URL):(port number)/(path)/(stream key)
|
|
Referencing destination from the memory card
-
Insert the memory card with the destination information saved.
 The card slot to perform loading and saving can be set in the [OTHERS] menu
  [FILE]
  [SLOT FOR LOAD/SAVE].
-
Select the [NETWORK] menu
 [STREAMING]
  [CONNECTION INFO.]
  [SD CARD].
|
|
 Saving the destination information on the memory card
-
Insert a memory card formatted with the unit.
 The card slot to perform loading and saving can be set in the [OTHERS] menu
  [FILE]
  [SLOT FOR LOAD/SAVE].
-
Select the [NETWORK] menu
 [STREAMING]
  [SAVE (SD CARD)].
-
Select [YES].
|
|
 Loading destination information from the memory card
-
Insert the memory card with the destination information saved.
 The card slot to perform loading and saving can be set in the [OTHERS] menu
  [FILE]
  [SLOT FOR LOAD/SAVE].
-
Select the [NETWORK] menu
 [STREAMING]
  [LOAD (SD CARD)].
-
Select [YES].
|
– Information saved with the unit – Setting file created with the P2 Network Setting software ( |
 Clearing the destination information
-
Select the [NETWORK] menu
 [STREAMING]
  [CLEAR (MEMORY)].
 Stopping streaming of video
Stop the streaming in following procedure if the streaming was started with the operation of the camera.
-
Select the [NETWORK] menu
 [STREAMING]
  [START]
  [OFF].
 If [STREAMING START] is assigned to a USER button, streaming can also be stopped with the USER button. (
 Assigning functions to the USER buttons)
Entering the setting using the setting tool
 Installing software
Download and expand the P2 Network Setting software for Windows from the following website.
https://panasonic.jp/support/global/cs/e_cam/index.html
 Creating the SD card for setting using the P2 Network Setting software
The SD card created with this software can be used as the reference destination when loading into the unit’s menu or when the [NETWORK] menu  [STREAMING]
  [CONNECTION INFO.]
  [SD CARD] is selected.
Setting procedure
-
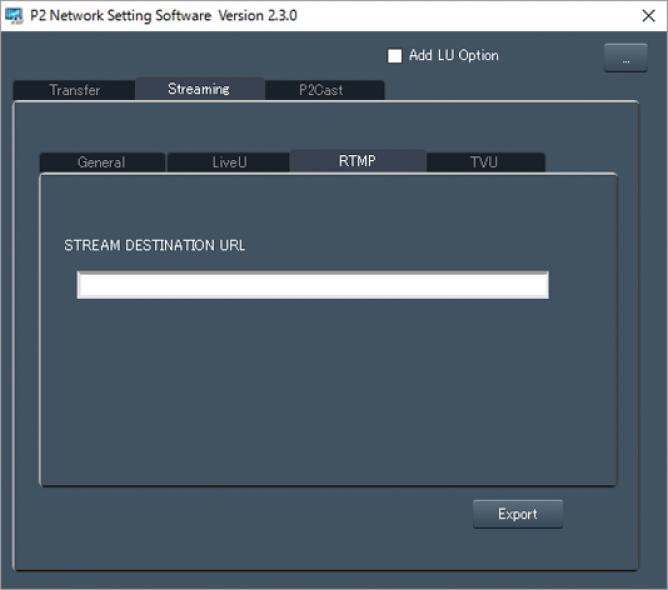
Start the P2 Network Setting software.
-
Select the “Streaming” tab
 “RTMP” tab.
-
Enter the destination URL in “STREAM DESTINATION URL”.

-
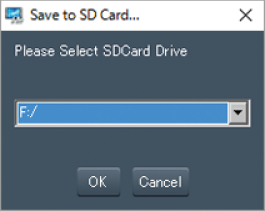
Click “Export” and select the destination in the drive selection dialog, and then click “OK”.

 This cannot be saved to anything other than a removable drive.
