Setting of time data
The unit provides time code, user bits, and date and time (real time) data as time data, and records in each frame synchronized with the video. The time data is also recorded as the clip meta data.
 Presetting the time code to external [X2]
 Supplying the time code externally [X2]
Definition of time data
 Time code
[FREE RUN] and [REC RUN] can be switched with the [RECORDING] menu  [TC/UB]
  [FREE/REC RUN].
[FREE RUN]:
Advances regardless of the operation mode. It is advancing even when the power is turned off, so it can be treated equally as time.
 (For the
 ![]() )
)
Time data can also be recorded to the time code input to the <TC IN/OUT> terminal using slave lock.
[REC RUN]:
Advances only while recording. Recording is started with the value continuing from the last time code recorded previously.
|
– When deleting recorded clips – When recording is interrupted due to a malfunction of [REC WARNING], etc. during recording.
|
 User bits
User bits are built-in. User bits are recorded in the clip.
The user setting value, time, date, time code, and frame rate information of shooting, and the clip name can be selected for recording.
The value at the time when the recording has started is recorded in the user bits of the clip meta data.
 Counter
Press the <COUNTER> button and display the counter to display the counter value in the time code display of the viewfinder/LCD monitor.
Counter value is displayed as “hour:minute:second.frame”.
In addition, press the <RESET> button while the counter value is displayed to reset the counter value.
Either of the following settings can be set in the [RECORDING] menu  [REC COUNTER].
[TOTAL]:
Counting continues cumulatively until the counter value is reset. The counter value will be maintained even if the memory card is replaced or the power is turned off.
[CLIP]:
Clears the counter value and starts counting from 0 each time recording starts. You can shoot while always checking the recording time of the clip you are currently shooting.
 Date/time (real time)
 The internal clock is the standard while the power is turned off for the free run time code count, the user bits time, and the date data. Also, it will be the reference for the file generation time and file name when the clip is recorded.
 The free run time code is reset if the built-in battery is exhausted.
|
|
User bits settings
Set the user bits to be recorded.
-
Select the user bits to record in the [RECORDING] menu
 [TC/UB]
  [UB MODE].
[FRAME RATE]:
Records the frame rate information of the shooting.
Use with this setting when using the frame rate information of the user bits with an editing device such as a computer.
[USER]:
Records the user bits set in the [RECORDING] menu  [TC/UB]
  [UB PRESET]. The setting value is maintained even if the power is turned off.
 For detailed setting procedures (
 How to input user bits)
[TIME]:
Records the hour, minute, and second of the date and time measured with the internal clock.
[DATE]:
Records the last 2 digits of year, month, date, and hour of the date and time measured with the internal clock.
[TC]:
Records the value for the time code as users bits.
[CLIP NAME]:
Records the value that CAM INDEX (one character) and CARD COUNT (3-digit number) both converted to ASCII character code.
 How to input user bits
By setting user bits, information such as memos (date, time) up to 8 digits long (hexadecimal) can be recorded.
-
Select the [RECORDING] menu
 [TC/UB]
  [UB MODE]
  [USER].
-
Select the [RECORDING] menu
 [TC/UB]
  [UB PRESET].
The user bits setting screen is displayed.
-
Set the user bits.
 Set 2 digits each.
Press the <RESET> button to reset to [00].
-
Confirm the setting value of the user bits.
 The setting value is confirmed when last 2 digits are set.
 Memory function of the user bits
The setting content of the user bits is automatically recorded and maintained even if the power is turned off.
Frame rate information
The relationship between frame rate, image pull-down, time code, and user bits is as follows.

(A) Verification information on the right-hand 6 digits
(B) Fixed value
(C) Frame rate
(D) Camera video mode
(E) REC mark
Camera video mode
The display of the camera video mode differs depending on the setting of following menus.
 The [SYSTEM] menu
  [REC FORMAT]
 The [SCENE FILE] menu
  [VFR] or the [SYSTEM] menu
  [SUPER SLOW]
Setting the time code
-
Select the [SYSTEM] menu
 [FREQUENCY]
  [59.94Hz]/[50.00Hz].
-
From the [SYSTEM] menu
 [FILE FORMAT]/[REC FORMAT], select the recording format.
-
Select the [RECORDING] menu
 [TC/UB]
  [DF/NDF]
  [DF]/[NDF].
[DF]:
Time code is compensated in accordance with the actual time. It is mainly used for broadcasting such as TV programs.
 Time code display example: TCG 00:00:00.00
[NDF]:
It will not compensate the time code. (There will be a difference from the actual time)
 Time code display example: TCG 00:00:00:00
-
Select the [RECORDING] menu
 [TC/UB]
  [TC PRESET].
The [TC PRESET] screen is displayed.
-
Set the time code.
Press the <RESET> button to reset the time code to 0.
-
Confirm the setting value of the time code.
The setting value is confirmed when last 2 digits are set.
 Setting range of time code
The range of the time code that can be set differs depending on the frame rate of [REC FORMAT].
|
– When the frame rate of the [REC FORMAT] is 23.98p – When interval recording is enabled |
Time code function during battery replacement
The operation of the time code generator will continue by the backup mechanism functioning even when replacing the battery.
The time code of the free run may shift when any item in the [SYSTEM] menu  [FREQUENCY], [FILE FORMAT], or [REC FORMAT] is changed.
After turning on the power again with the power switch, check the time code and set again if necessary.
Time code in variable frame rate recording/super slow recording
The time code is fixed to [REC RUN] when the variable frame rate recording function or the super slow recording function is enabled.
During recording, the time code progresses at a speed according to a ratio of the frame rate of the [REC FORMAT] and the setting values in [SCENE FILE] menu  [FRAME RATE].
As an example, the time code will advance 60/24 frames per second (two seconds 12 frames) when the frame rate of [REC FORMAT] is set to 23.98p and the [SCENE FILE] menu  [FRAME RATE] is set to [60fps].
 The time code output from the <TC IN/OUT> terminal
 , <SDI OUT> terminal
 or the <HDMI> terminal proceeds at 1× speed starting at the same time as recording.
-
Available for use when using
 .
.
Presetting the time code to external [X2]
The internal time code generator of the camera can be slave locked in a simplified manner to an external generator.
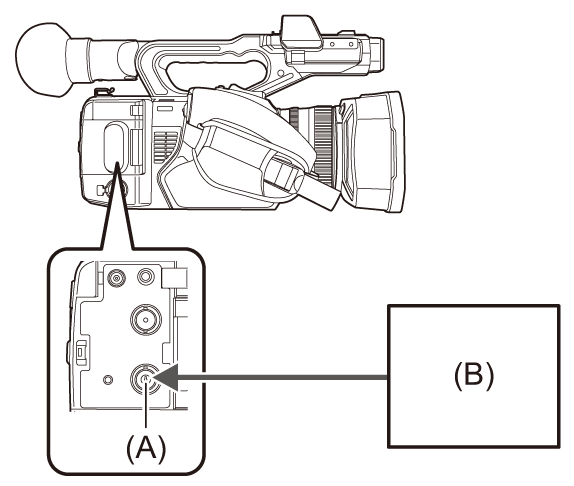
 Connection example of the camera and an external generator
Connect the reference time code to the <TC IN/OUT> terminal.

(A) <TC IN/OUT> terminal
(B) Reference time code
 External lock
Externally lock the time code.
 Connect the camera to an external generator in advance.
-
Select the [RECORDING] menu
 [TC/UB]
  [FREE/REC RUN]
  [FREE RUN].
-
Select the [RECORDING] menu
 [TC/UB]
  [TC IN/OUT SEL]
  [TC IN].
-
Enter the external time code to the <TC IN/OUT> terminal.
[TCG] in the camera image screen will be displayed in black and white inversion.
Enter the time code matching the setting in the [SYSTEM] menu  [REC FORMAT] as the reference time code.
Enter the time code of the non-drop frame as well for 23.98p, 25.00p, 50.00p, and 50.00i.
|
After recording or remote recording with the external device is stopped, the time code is slave-locked to the external device’s time code, and as a result, some time code values may be repeated or skipped.
– When the time code is set in [TC PRESET] – When the power is turned off – When switched [DF]/[NDF] – When set to [REC RUN] – When the variable frame rate recording function or super slow recording function is enabled
|
 Cautions when switching the power supply from the battery to the AC adaptor while an external lock is active
To maintain the continuity of the time code generator power, remove the battery only after the power status display in the camera image screen has changed to [![]() ] after connecting the AC adaptor to the <DC IN 12V> terminal. The continuity of the external lock of the time code is not guaranteed when the battery is removed first.
] after connecting the AC adaptor to the <DC IN 12V> terminal. The continuity of the external lock of the time code is not guaranteed when the battery is removed first.
Supplying the time code externally [X2]
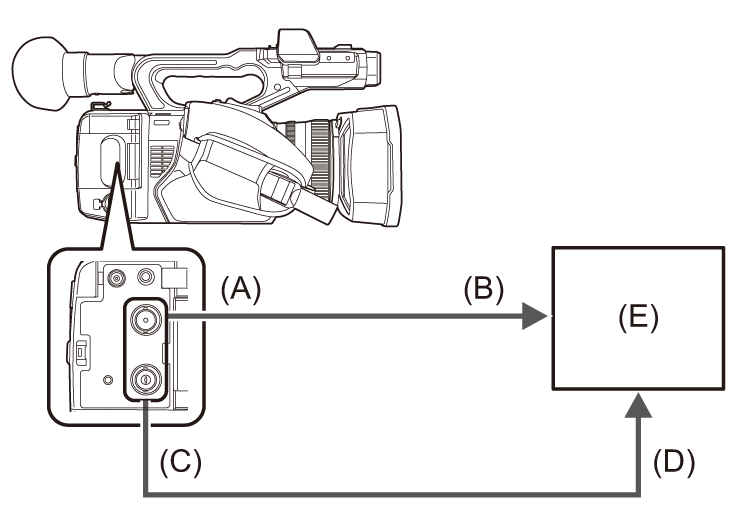
The time code output from the camera corresponding to the camera video or the playback video can be supplied to an external recording device.

(A) <SDI OUT> terminal
(B) SDI IN terminal
(C) <TC IN/OUT> terminal
(D) TC IN terminal
(E) VTR, etc.
-
Select the [RECORDING] menu
 [TC/UB]
  [TC IN/OUT SEL]
  [TC OUT].
-
Select the [RECORDING] menu
 [TC/UB]
  [TC OUT REF]
  [RECORDING].
The same time code can be recorded to the video of the same time on two devices.
 To match the time code output from the <TC IN/OUT> terminal to the video of the SDI output or the monitor output
-
Select the [RECORDING] menu
 [TC/UB]
  [TC OUT REF]
  [SDI OUT].
|
|
