White balance adjustment
 Setting the variable value for the white balance
 Settings of the auto tracking white balance (ATW) function
Follow the steps below to adjust the white balance automatically.
 When stored in white balance “Ach”
-
Switch to manual mode with the <AUTO/MANU> switch. (
 About auto mode/manual mode)
-
Set the gain value. (
 Gain)
Gain)
Normally, set this to 0 dB. If it is too dark, set the gain to an appropriate value.
-
Press the <WHITE BAL> button to switch to “Ach”.
Each time you press the button, the white balance switches in the order “Preset”, “Ach”, “Bch”.
-
Change the <ND FILTER> switch settings according to the light conditions.
 For setting examples for the <ND FILTER> switch (
 Brightness adjustment)
-
Place the white pattern at a point where the light conditions match those for the light source for the subject, and zoom in on the white pattern so that the white color appears in the screen.
-
Adjust the iris (the lens stop).
Adjust the iris so that the brightness of Y GET is approx. 70 %.
-
Either press the USER button assigned to [AWB] or touch the USER button icon.
Automatic adjustment of the white balance starts and the white balance adjustment value is memorized.
 White pattern
 A white object (cloth or wall) near the subject may also be used for the white pattern.
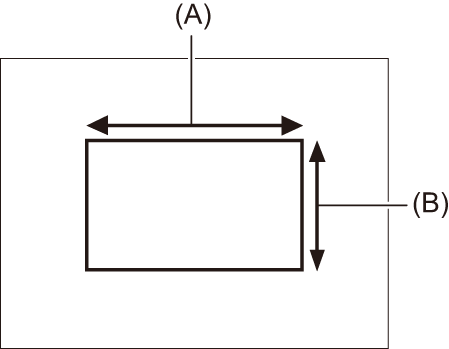
 Required size of white pattern is as follows.

(A) 1/2 or more of the screen width
(B) 1/2 or more of the screen height
 Keep bright spotlights out of the screen.
 The white pattern must be placed at the center of the screen.
|
|
 Messages displayed in the viewfinder and LCD monitor
 When the auto tracking white balance (ATW) function is operating, white balance cannot be adjusted.
 When the white balance has not been automatically adjusted
When the white balance has not been successfully adjusted, an error message is displayed on the viewfinder screen and LCD monitor displays.
 When having no time to adjust the white balance
-
Press the <WHITE BAL> button to switch to “Preset”.
When switched to “Preset”, the white balance set in [W.BAL PRESET] is displayed. ( [W.BAL PRESET])
-
Either press the USER button assigned to [AWB] or touch the USER button icon to switch the white balance.
[P 3200K], [P 5600K], and “VAR” (the value set in the [CAMERA] menu  [SW MODE]
  [W.BAL VAR]) change in order.
 When “VAR” is selected, turning the multidial can set any white balance value between [V 2000K] and [V 15000K].
Setting the variable value for the white balance
The color temperature of white balance can be adjusted by the setting menu.

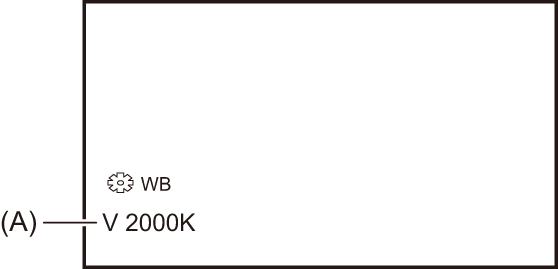
(A) “VAR” setting value
-
Press the <WHITE BAL> button to switch to “Preset”.
-
Either press the USER button assigned to [AWB] or touch the USER button icon to switch to “VAR”.
The setting values for [![]() WB] and “VAR” are displayed on the camera image screen.
WB] and “VAR” are displayed on the camera image screen.
-
In the [CAMERA] menu
 [SW MODE]
  [W.BAL VAR], set the color temperature.
This can be set from [2000K] to [15000K].
 Setting with the multi manual function
-
Press the <WHITE BAL> button to switch to “Preset”.
-
Either press the USER button assigned to [AWB] or touch the USER button icon to switch to “VAR”.
The setting values for [![]() WB] and “VAR” are displayed on the camera image screen.
WB] and “VAR” are displayed on the camera image screen.
The “VAR” setting value is highlighted in orange.
-
Turn the multidial to select the color temperature.
-
Press the multidial.
The setting changes to the value displayed and exits.
Press the <EXIT> button to exit without changing the setting.
|
|
Settings of the auto tracking white balance (ATW) function
The unit is equipped with the Auto Tracking White Balance (ATW) function that automatically tracks the white balance of images according to the lighting conditions.
The auto tracking white balance function can be assigned to each of “Ach”, “Bch”, and “Preset” in white balance.
Set the function with the [CAMERA] menu  [SW MODE]
  [ATW].
 Applications for the USER button
[ATW]:
Switches enable/disable of the ATW function.
[ATW LOCK]:
Locks the white balance value adjusted with the ATW function. This is enabled when the white balance setting is [ATW].
 For USER button settings (
 Assigning functions to the USER buttons)
 Canceling the auto tracking white balance
Switch white balance by pressing the USER button assigned to the [ATW] again, touching the USER button icon again, or pressing the <WHITE BAL> button. However, with white balance set in [CAMERA] menu  [SW MODE]
  [ATW], it is not canceled by pressing the USER button.
|
|
