Functions Added to “LUMIX Lab”
The following functions have been added to “LUMIX Lab”:
 Sending Images on the Camera to a Smartphone with Simple Operations
Stream by Operating a Smartphone
[Remote shooting]
You can use the smartphone to record from a remote location while viewing the live view images from the camera.
Getting started:
 Connect the camera to a smartphone by Bluetooth. (
 Connecting to a Smartphone (Bluetooth Connection))
On the smartphone, start up “LUMIX Lab”.
-
Select [Remote shooting] in the [Camera] screen.
Connect to the camera with Wi-Fi. Select [Join] to start the connection.
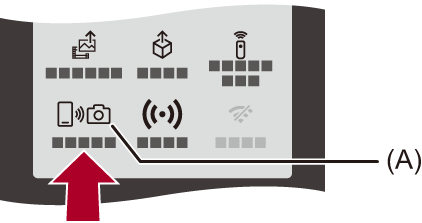
(A) [Remote shooting]
-
Start recording.
The recorded image is saved on the camera.
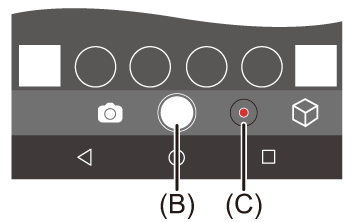
(B) Takes a picture
(C) Starts/ends the video recording
|
|
 Operation Method During Remote Recording
Set either the camera or the smartphone as the priority control device to be used during remote recording.
Touch [![]() ] in the “LUMIX Lab” remote recording screen.
] in the “LUMIX Lab” remote recording screen.
The icon switches each time you touch it.
![]() (Camera prioritized)
(Camera prioritized)
Operation is possible on both the camera and the smartphone.
The camera’s dial settings, etc. cannot be changed with the smartphone.
![]() (Smartphone prioritized)
(Smartphone prioritized)
Operation is possible only on the smartphone.
The camera’s dial settings, etc. can be changed with the smartphone.
To end remote recording, press any of the buttons on the camera to turn on the screen, and select [End].
The default setting is [![]() ] (Camera prioritized).
] (Camera prioritized).
[Shutter Remote Control]
You can use the smartphone as a remote control for the shutter.
Getting started:
Connect the camera to a smartphone by Bluetooth. (Connecting to a Smartphone (Bluetooth Connection))
On the smartphone, start up “LUMIX Lab”.
-
Select [Shutter Remote Control] in the [Camera] screen.
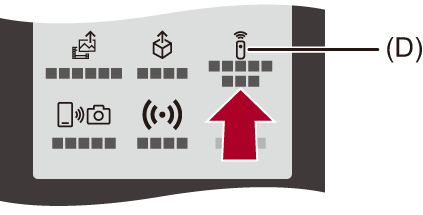
(D) [Shutter Remote Control]
-
Start recording.

![]()
Starts/ends the video recording
![]()
Takes a picture
Bulb Recording
The shutter can be kept open from the start to end of recording, which is useful for recording of starry skies or night scenery.
Getting started:
Set the camera to [M] mode.
Set the camera shutter speed to [B] (Bulb).
-
Touch [
 ] to start recording (keep touching, without removing your finger).
-
Remove your finger from [
] to end recording.
Slide [![]() ] in the direction of [LOCK] to record with the shutter button locked in a fully-pressed state.
] in the direction of [LOCK] to record with the shutter button locked in a fully-pressed state.
(Slide [![]() ] back to its original position or press the camera shutter button to end recording)
] back to its original position or press the camera shutter button to end recording)
During [B] (Bulb) recording, if the Bluetooth connection is broken, then carry out Bluetooth connection again, then end recording from the smartphone.
|
|
Sending Images on the Camera to a Smartphone with Simple Operations
You can transfer pictures to a smartphone connected by Bluetooth just by pressing [Q] during playback.
You can also use the menu to connect easily.
You can also perform the same operation by pressing the Fn button registered with [Send Image (Smartphone)].
Getting started:
Install “LUMIX Lab” on your smartphone.
Connect the camera to a smartphone by Bluetooth. (Connecting to a Smartphone (Bluetooth Connection))
Press [ ] on the camera to display the playback screen.
Send a single image
-
Press

 to select the image.
-
Press [Q].
-
Select [Single Select].
To change the send settings of images, press [DISP.].
-
Select [OK] on the smartphone.
This connects automatically using Wi-Fi.
Send multiple images
-
Press [Q].
-
Select [Multi Select].
To change the send settings of images, press [DISP.].
-
Select the images and then transfer.
: Select images
 : Set/Cancel
[DISP.]: Transfer
-
Select [OK] on the smartphone.
This connects automatically using Wi-Fi.
Using the menu to transfer easily
![]() [
[![]() ]
] ![]() [
[![]() ]
] ![]() [Bluetooth]
[Bluetooth] ![]() [Send Image (Smartphone)]
[Send Image (Smartphone)]
Settings: [Single Select]/[Multi Select]
If [Single Select], press to select the image and then press to execute.
If [Multi Select], use the same operation as with “Send multiple images”. (Send multiple images)
|
– [MOV] videos, [Apple ProRes] videos
|
Stream by Operating a Smartphone
![]()
![]()
![]()
![]()
![]()
![]()
![]()
![]()
Operate the smartphone app “LUMIX Lab” to start streaming. (Supported protocols: RTMP*/RTMPS)
-
RTMP is no longer supported on models for Europe and Ukraine (DC-GH7E/DC-GH7LE/DC-GH7ME).

Getting started:
Install “LUMIX Lab” on your smartphone. (Installing “LUMIX Lab”)
Connect the camera to a smartphone by Bluetooth. (Connecting to a Smartphone (Bluetooth Connection))
(When using USB tethering) Confirm that the camera and smartphone are not connected via USB.
-
Set the camera’s recording mode to [
 ].
].
Set the mode dial. (Selecting the Recording Mode)
-
Set streaming on the smartphone.
-
Start up “LUMIX Lab”.
-
Select [Live streaming] in the “LUMIX Lab” home screen.
-
Select a live streaming platform.
-
Make detailed streaming settings.
The setting items depend on the selection made in Step 3. Follow the smartphone screen to make the settings.
[Connection Method]: Select [Wi-Fi] or [USB Tethering].
If you select [Wi-Fi], set the wireless access point that the camera will connect to for streaming.
[Streaming Quality]: Sets the image quality that will be streamed.
[Privacy settings]: Selects privacy setting.
[Stream URL]: Enter the streaming URL acquired from the streaming service.
[Stream key]: Enter the streaming key acquired from the streaming service.
-
Select [Set to the camera].
The settings will be sent from the smartphone to the camera.
[Streaming Function] on the camera turns [ON] and [![]() ] is displayed on the recording screen.
] is displayed on the recording screen.
(When using Wi-Fi) The camera connects via Wi-Fi to the access point.
-
(When using USB tethering) Set the USB tethering connection.
-
Connect the camera and the smartphone using a USB connection cable.

(A) USB connection cable (commercially available)
-
Enable the USB tethering function on the smartphone.
Select [USB Tethering] (for Android devices) or [Personal Hotspot] (for iOS devices) on the smartphone.
If a confirmation message appears on the smartphone screen asking for permission to enable access by the connected device, grant permission. Connection is not complete until permission is given.
Please also refer to the operating instructions of your smartphone.
-
Start streaming.
Select [Start streaming] on “LUMIX Lab”.
[![]() ] is displayed on the camera’s recording screen.
] is displayed on the camera’s recording screen.
-
Stop streaming.
Select [Stop streaming] on “LUMIX Lab”.
-
End the streaming function.
If you select [End streaming] on “LUMIX Lab”, the [Streaming Function] of the camera will be set to [OFF].
|
(
|