Basic Video Operations
![]()
![]()
![]()
![]()
![]()
![]()
![]()
![]()
It is possible to record video with a maximum resolution of 5.8K (5760×4320) on this camera.
It also supports switching of the system frequency and 3 types of recording file format; MP4, MOV, and Apple ProRes.
In the [![]() ] mode (Creative Video mode), which is specifically for video recording, you can use all of the video functions.
] mode (Creative Video mode), which is specifically for video recording, you can use all of the video functions.
-
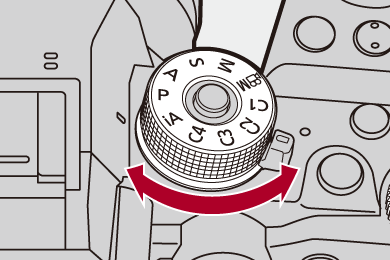
Select the recording mode.
 Set the mode dial. (
 Selecting the Recording Mode)
-
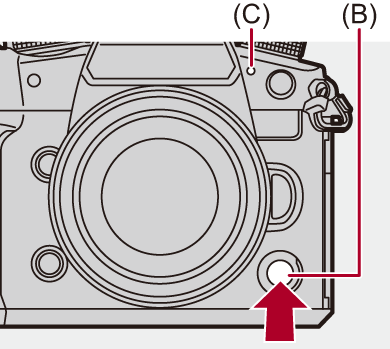
Start recording.
Press the video rec. button (A).
You can also perform the same operation by pressing the sub video rec. button (B).
 Release the video rec. button right after you press it.
During video recording, the front tally lamp (C) and rear tally lamp (D) light.

-
Stop recording.
Press the video rec. button (A) again.
You can also perform the same operation by pressing the sub video rec. button (B).
 Screen Displays While Video Recording
The live view angle of view changes to the angle of view for video recording, and video recording time (E) and elapsed recording time (F) are displayed.
“h” is an abbreviation for hour, “m” for minute and “s” for second.
The recording state indication (G) and card access indication (H) turn red while videos are being recorded.

|
|
Exposure Control While Video Recording
Videos will be recorded using the aperture value, shutter speed, and ISO sensitivity settings below.
|
Recording mode |
Aperture value/shutter speed/ISO sensitivity |
|
[iA] |
The camera automatically makes the settings to suit the scene. ( |
|
[P]/[A]/[S]/[M] |
The settings vary depending on the [Auto Exposure in P/A/S/M] in the [Custom] ([Image Quality]) menu. The default setting is [ON]. ( [ON]: Records with values set automatically by the camera. [OFF]: Records with the values set in the [P]/[A]/[S]/[M] modes. |
|
[ |
Records with manually set values. |
Size Interval for Dividing Files
A new file will be created to continue recording if the continuous recording time or the file size exceeds the following conditions.
(A) Using an SDHC memory card
(B) Using an SDXC memory card
(C) Using an external SSD
(D) Using a CFexpress card
|
[Rec. File Format] |
Resolution |
Bit rate |
Recording media |
File division |
|
|
Continuous recording time |
File size |
||||
|
[MP4] |
[FHD] |
All |
(A) |
30 minutes |
4 GB |
|
(B) |
|||||
|
(C) |
|||||
|
(D) |
|||||
|
Other than [FHD] |
(A) |
30 minutes |
4 GB |
||
|
(B) |
3 hours 4 minutes |
96 GB |
|||
|
(C) |
|||||
|
(D) |
|||||
|
[MOV] |
All |
600 Mbps or less |
(A) |
30 minutes |
4 GB |
|
(B) |
3 hours 4 minutes |
192 GB |
|||
|
(C) |
|||||
|
(D) |
|||||
|
800 Mbps or more |
(A) |
|
|||
|
(B) |
|||||
|
(C) |
3 hours 4 minutes |
640 GB |
|||
|
(D) |
|||||
|
[Apple ProRes] |
[FHD] |
All |
(A) |
30 minutes |
4 GB |
|
(B) |
3 hours 4 minutes |
192 GB |
|||
|
(C) |
|||||
|
(D) |
|||||
|
Other than [FHD] |
(A) |
|
|||
|
(B) |
|||||
|
(C) |
3 hours 4 minutes |
640 GB |
|||
|
(D) |
|||||

-
When the recording quality is [Apple ProRes RAW HQ] or [Apple ProRes RAW], recording is stopped.
|
– Record the video about 3 seconds longer, and then divide the last part of the video using [Video Divide] in the [Playback] ([Edit Image]) menu. – Use the Shutter Remote Control (DMW-RS2: optional) for recording.
If you experience any of these, play them back on the camera.
– [Time Lapse Shot] – [Stop Motion Animation]
When the temperature of the camera rises, [ |
|
|