Panasonic

Printing

If you connect the camera to a printer that supports PictBridge, you can select pictures on the camera’s monitor and then print them.


Getting started:

bullet02Turn on the camera and printer.

bullet02Set the print quality and other settings on the printer.


  1. Play back the card that contains the picture you want to print.

character_bullet-largePress [button_playback].

character_bullet-largeAfter pressing [button_af-mode], press character_upcharacter_down to select [Card Slot 1(CFexpress)] or [Card Slot 2(SD)], and then press button_menu-set or button_joy-stick-push_s.


bullet02The card for printing cannot be changed after connecting to the printer.

  1. Connect the camera and printer with the USB connection cable. (character_referenceUSB port)

  1. Press character_upcharacter_down to select [PictBridge(PTP)] and then press button_menu-set or button_joy-stick-push_s.

  1. Press character_leftcharacter_right to select a picture and then press button_menu-set or button_joy-stick-push_s.

character_bullet-largeTo print multiple pictures, press character_up, set the picture selection method, and then select pictures.
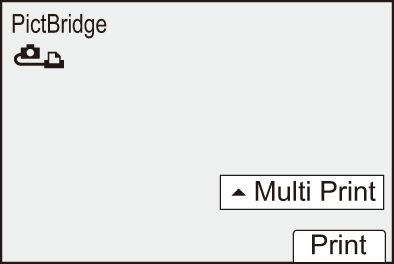
gui_printing2_eng


[Multi Select]

Selects the picture to print.


  1. Press character_upcharacter_downcharacter_leftcharacter_right to select a picture and then press button_menu-set or button_joy-stick-push_s.

bullet02To cancel the setting, press button_menu-set or button_joy-stick-push_s again.

  1. Press [DISP.] to end selection.


[Select All]

Prints all the stored pictures.


[Rating]

Prints all pictures with [Rating] levels from [character_star-black1] to [character_star-black5].


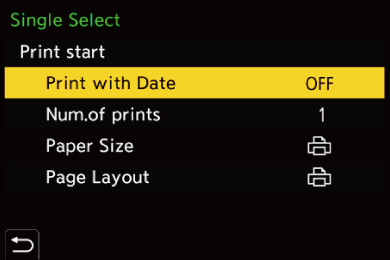
  1. Set the print settings.

gui_usb-pict-bridge02_eng

  1. Start printing.

character_bullet-largeSelect [Print start] and then press button_menu-set or button_joy-stick-push_s.


character_diamondSetting Items (Print Settings)


[Print start]

Starts printing.


[Print with Date]

Sets printing with date.

bullet02If the printer does not support printing with date, the date cannot be printed.


[Num.of prints]

Sets the number of prints to be printed (up to 999).


[Paper Size]

Sets the paper size.


[Page Layout]

Sets whether to add borders and how many images to be printed on each sheet of paper.


icon_hints_s

bullet02If [USB Mode] is set to [PictBridge(PTP)] in the [Setup] ([IN/OUT]) menu, the camera will be automatically connected to the printer without the [USB Mode] selection screen being displayed. (character_reference[USB Mode])

icon_info_s

bullet02Take care not to turn off the camera while printing is in progress.

bullet02When connecting with the printer is not possible, set [USB Power Supply] to [OFF] and then try connecting again. (character_reference[USB Power Supply])

bullet02Do not disconnect the USB connection cable while [icon_cable-disconnect] (Cable disconnect prohibit icon) is displayed.

bullet02Disconnect the USB connection cable after printing.

bullet02Turn off the camera and disconnect the USB connection cable before removing the card from the camera. Otherwise, the recorded data may be damaged.

bullet02To print images with paper size and layout settings not supported by the camera, set the [Paper Size] and [Page Layout] to [icon_page-layout] and then select the desired settings on the printer.

(For details, refer to the operating instructions for your printer.)

bullet02If a yellow [character_circle-black] is displayed, the camera is receiving an error message from the printer. Check that there is no problem with the printer.

bullet02If the number of prints is high, the pictures may be printed in batches. In this case, the remaining number of prints indicated may differ from the number set.

bullet02RAW images cannot be printed.

bullet02Images recorded with the following function cannot be printed:

– Video recording