Importing Images to a PC
If you connect the camera to a PC, you can copy the recorded images to the PC.
You will need to use software that is compatible with the recorded video format in order to play back or edit video on the PC.
You can also use software for processing and editing RAW images. ( Installing Software)
Copying Images to a PC
After connecting to the PC, you can copy the recorded images by dragging files and folders on this camera to the PC.
|
Supported OS Windows: Windows 10 Mac: macOS 10.13, 10.14, 10.15.3 to 10.15.7, 11.0 to 11.4
Supported by “Final Cut Pro X”. For details on “Final Cut Pro X”, please contact Apple Inc. |
Getting started:
 Turn on the camera and PC.
-
Connect the camera and PC with the USB connection cable. (
USB port)
-
Press

 to select [PC(Storage)] and then press
  or
or  .
.
 Windows: The drive (“LUMIX” or the volume label of the card set with [CINE Style File Setting]) is displayed in [This PC].
Mac: The drive (“LUMIX” or the volume label of the card set with [CINE Style File Setting]) is displayed on the desktop.
-
Drag the files and folders from the camera to the PC.
 Folder Structure Inside Card
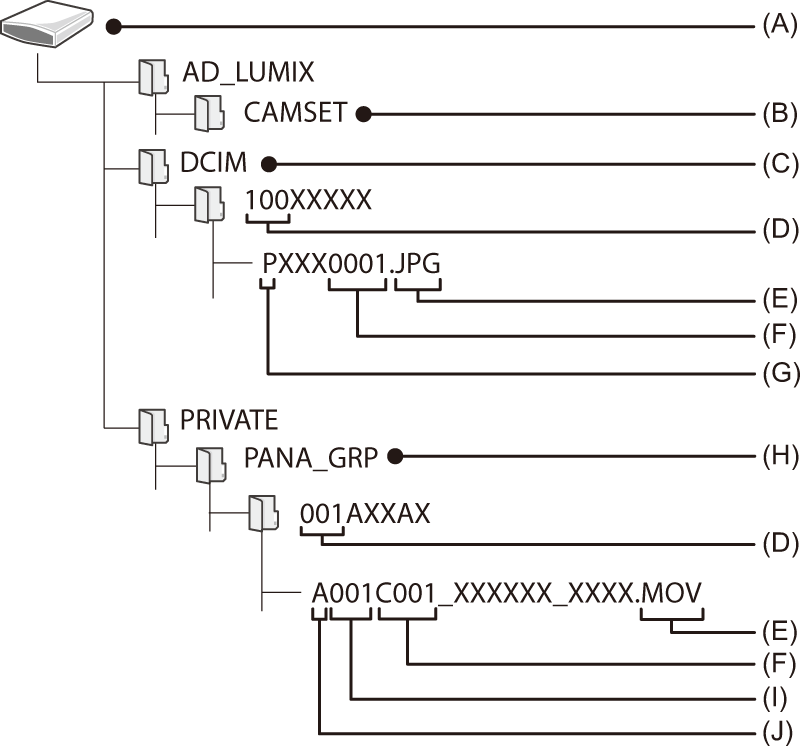
(A) Volume label
When [Video File Name] is set to [Same As Photo(DCF Standard)]: LUMIX
When [Video File Name] is set to [CINE Style]: The volume label of the card set in [CINE Style File Setting]
(B) The camera’s setup information
(C) Images
(D) Folder number
(E) JPG: JPEG format pictures
RW2: RAW format pictures
MP4: MP4 videos
MOV: MOV videos, Apple ProRes videos
(F) File number
(G) Color space
P: sRGB
_: AdobeRGB
(H) CINE Style video
(I) Card number
(J) Camera index
|
|
Installing Software
Install the software to process and edit RAW images.
|
|
SILKYPIX Developer Studio SE
This software processes and edits RAW images.
Edited images can be saved in a format (JPEG, TIFF, etc.) that can be displayed on a PC.
Check the following site and then download and install the software:
http://www.isl.co.jp/SILKYPIX/english/p/
Operating environment
Supported OS
Windows: Windows 10, Windows 8.1 (64 bit recommended)
Mac: macOS 10.13 to 10.15, 11
For more information such as how to use “SILKYPIX Developer Studio”, refer to the Help or the Ichikawa Soft Laboratory’s support site.