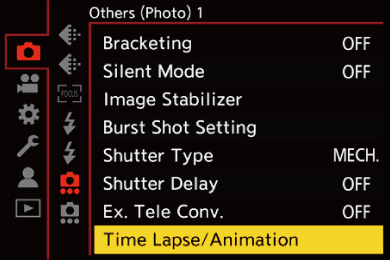
Recording with Stop Motion Animation
![]()
![]()
![]()
![]()
![]()
![]()
![]()
![]()
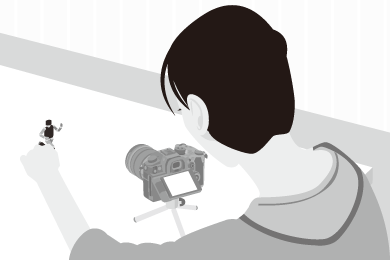
Take pictures while moving the subject little by little.
The pictures taken will be saved as a set of group images that can be combined into a stop motion video. ( Group Images)
-
Set the drive mode to [
 ].
].
 Set the drive mode dial. (Selecting the Drive Mode)
-
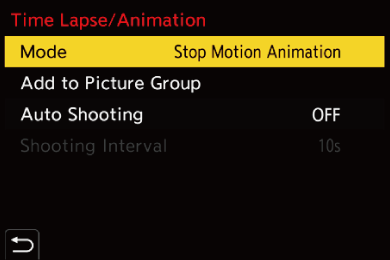
Set [Mode] to [Stop Motion Animation].

![]() [
[![]() ]
] ![]() [
[![]() ]
] ![]() [Time Lapse/Animation]
[Time Lapse/Animation] ![]() [Mode]
[Mode] ![]() [Stop Motion Animation]
[Stop Motion Animation]
-
Set the recording settings.
[Mode]
Switches between Time Lapse Shot and Stop Motion Animation.
[Add to Picture Group]
Allows you to continue recording for a set of stop motion images that have already been recorded.
 Select an image and proceed to Step 5.
[Auto Shooting]
[ON]: Takes pictures automatically at a set recording interval.
[OFF]: This is for taking pictures manually, frame by frame.
[Shooting Interval]
Sets the recording interval for [Auto Shooting].
-
Close the menu.
Press the shutter button halfway.
-
Start recording.
Press the shutter button fully.
Take pictures repeatedly while moving the subject little by little.
The recording screen displays up to two pictures taken previously. Use them as reference for the amount of movement.
You can play back the recorded stop motion images by pressing [ ] during recording.
Press [ ] to delete unnecessary images.
To return to the recording screen, press [] again.
-
Stop recording.
Press and then select [Time Lapse/Animation] from the [Photo] menu to stop recording.
-
Create a video. (
Time Lapse Shot/Stop Motion Animation Videos)
After the recording has stopped, select [Yes] on the confirmation screen to proceed to create a video.
Even if you select [No], you can still create a video with [Stop Motion Video] in the [Playback] ([Process Image]) menu. ([Stop Motion Video])
|
|