Using “LUMIX Lab”
 Sending Images on the Camera to a Smartphone with Simple Operations
This explains the functions for operating the camera from “LUMIX Lab”.
LUT Library Operations
Operate “LUMIX Lab” to update the [LUT Library] in the camera.
Getting started:
 Connect the camera to a smartphone by Bluetooth. (
 Connecting to a Smartphone (Bluetooth Connection))
On the smartphone, start up “LUMIX Lab”.
-
Select [LUT Transfer] in the [Camera] screen.
Connect to the camera with Wi-Fi. Select [Join] to start the connection.

(A) [LUT Transfer]
-
Select the LUT file in the [LUT Library] screen to edit.
You can transfer, rename, delete or reorder your LUT files.
A list of LUT files saved to “LUMIX Lab” is shown in [Device].
A list of LUT files saved to the camera is shown in [Camera].

-
Select from [Device] the LUT file to transfer.
-
Select [Transfer to Camera] and update the [LUT Library] on the camera.
|
– [Frame.io Connection] |
[Remote shooting]
You can use the smartphone to record from a remote location while viewing the live view images from the camera.
Getting started:
Connect the camera to a smartphone by Bluetooth. (Connecting to a Smartphone (Bluetooth Connection))
On the smartphone, start up “LUMIX Lab”.
-
Select [Remote shooting] in the [Camera] screen.
Connect to the camera with Wi-Fi. Select [Join] to start the connection.

(B) [Remote shooting]
-
Start recording.
The recorded image is saved on the camera.
![]() : Takes a picture
: Takes a picture
![]() : Starts/ends the video recording
: Starts/ends the video recording
|
– [Frame.io Connection] |
 Operation Method During Remote Recording
Set either the camera or the smartphone as the priority control device to be used during remote recording.
Touch [![]() ] in the “LUMIX Lab” remote recording screen.
] in the “LUMIX Lab” remote recording screen.
The icon switches each time you touch it.
![]() (Camera prioritized)
(Camera prioritized)
Operation is possible on both the camera and the smartphone.
You cannot use the smartphone to change settings for photo/video/S&Q mode, recording mode, etc.
![]() (Smartphone prioritized)
(Smartphone prioritized)
Operation is possible only on the smartphone.
You can use the smartphone to change settings for photo/video/S&Q mode, recording mode, etc.
To end remote recording, press any of the buttons on the camera to turn on the screen, and select [End].
The default setting is [![]() ] (Camera prioritized).
] (Camera prioritized).
[Shutter Remote Control]
You can use the smartphone as a remote control for the shutter.
Getting started:
Connect the camera to a smartphone by Bluetooth. (Connecting to a Smartphone (Bluetooth Connection))
On the smartphone, start up “LUMIX Lab”.
-
Select [Shutter Remote Control] in the [Camera] screen.

(C) [Shutter Remote Control]
-
Start recording.

![]()
Starts/ends the video recording
![]()
Takes a picture
Bulb Recording
The shutter can be kept open from the start to end of recording, which is useful for recording of starry skies or night scenery.
Getting started:
Set the camera to [M] mode. (Manual Exposure Mode)
Set the camera shutter speed to [B] (Bulb). ([B] (Bulb))
-
Touch [
 ] to start recording (keep touching, without removing your finger).
-
Remove your finger from [
] to end recording.
Slide [![]() ] in the direction of [LOCK] to record with the shutter button locked in a fully-pressed state.
] in the direction of [LOCK] to record with the shutter button locked in a fully-pressed state.
(Slide [![]() ] back to its original position or press the camera shutter button to end recording)
] back to its original position or press the camera shutter button to end recording)
During [B] (Bulb) recording, if the Bluetooth connection is broken, then carry out Bluetooth connection again, then end recording from the smartphone.
|
– [Frame.io Connection] |
Sending Images on the Camera to a Smartphone with Simple Operations
You can transfer pictures to a smartphone connected by Bluetooth just by pressing [Q] during playback.
You can also use the menu to connect easily.
You can also perform the same operation by pressing the Fn button registered with [Send Image (Smartphone)]. (Fn Buttons)
Getting started:
Connect the camera to a smartphone by Bluetooth. (Connecting to a Smartphone (Bluetooth Connection))
Press [ ] on the camera to display the playback screen.
Send a single image
-
Press

 to select the image.
-
Press [Q].
-
Select [Single Select].
To change the send settings of images, press [DISP.]. (Image Send Settings)
-
Select [OK] on the smartphone.
This connects automatically using Wi-Fi.
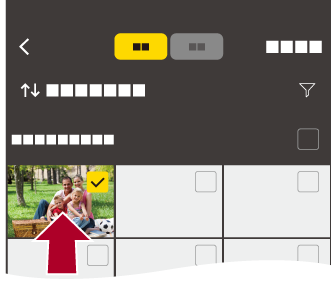
Send multiple images
-
Press [Q].
-
Select [Multi Select].
To change the send settings of images, press [DISP.]. (Image Send Settings)
-
Select the images and then transfer.
: Select images
 or
or  : Set/Cancel
[DISP.]: Transfer
-
Select [OK] on the smartphone.
This connects automatically using Wi-Fi.
Using the menu to transfer easily
![]() [
[![]() ]
] ![]() [
[![]() ]
] ![]() [Bluetooth]
[Bluetooth] ![]() [Send Image (Smartphone)]
[Send Image (Smartphone)]
Settings: [Single Select]/[Multi Select]
If [Single Select], press to select the image and then press or to execute.
If [Multi Select], use the same operation as with “Send multiple images”. (Send multiple images)
|
– [MOV] videos, [Apple ProRes] videos
– [Frame.io Connection] |
[Transfer Photo / Video]
Operate “LUMIX Lab” to transfer images from the camera to your smartphone.
Getting started:
Connect the camera to a smartphone. (Connecting to a Smartphone (Bluetooth Connection))
On the smartphone, start up “LUMIX Lab”.
-
Select [Transfer Photo / Video] in the [Camera] screen.
Connect to the camera with Wi-Fi. Select [Join] to start the connection.
-
Select the image to transfer.
Touch the checkbox to select.
-
Transfer the image.
Select [![]() ].
].

|
– [MOV], [Apple ProRes] videos
– [Frame.io Connection]
|
[Auto Transfer]
You can automatically transfer images from the camera to your smartphone as they are taken.
Getting started:
Connect the camera to a smartphone by Bluetooth. (Connecting to a Smartphone (Bluetooth Connection))
-
Enable [Auto Transfer] on the camera.
![]() [
[![]() ]
] ![]() [
[![]() ]
] ![]() [Bluetooth]
[Bluetooth] ![]() [Auto Transfer]
[Auto Transfer] ![]() [ON]
[ON]
The function can also be enabled in “LUMIX Lab”.
Connect to the smartphone with Wi-Fi.
-
Check the send settings on the camera and then press
.
To change the send setting, press [DISP.]. (Image Send Settings)
Automatic image transfer is possible when [![]() ] is displayed on the camera recording screen.
] is displayed on the camera recording screen.
-
Record with the camera.
[![]() ] is displayed in the recording screen of the camera while a file is being sent.
] is displayed in the recording screen of the camera while a file is being sent.
Image Send Settings
Set the size and file format for sending the image.
-
Send settings confirmation screen will be displayed, so press [DISP.].
-
Change the send settings.
[Size]
Resize the image to send.
[Original]/[Change] ([L], [M], [S], [XS] or [VGA])
[File Format]
Sets the file format of images to send.
[JPG]/[RAW+JPG]/[RAW]
To Stop the Automatic Transfer of Images
![]() [
[![]() ]
] ![]() [
[![]() ]
] ![]() [Bluetooth]
[Bluetooth] ![]() [Auto Transfer]
[Auto Transfer] ![]() Select [OFF]
Select [OFF]
A confirmation screen is displayed, asking you to terminate the Wi-Fi connection.
|
Start up the “LUMIX Lab” on the smartphone to connect to the camera.
– If the storage status of unsent files changes, then sending of files may no longer be possible. – If there are many unsent files, then sending of all files may not be possible.
The camera automatically reconnects when its temperature goes down and automatic image transfer restarts. If automatic image transfer does not restart, turn the camera off then on again to reconnect.
– Video recording
– [Frame.io Connection] |
[Location Logging]
The smartphone sends its location information to the camera via Bluetooth, and the camera performs recording while writing the acquired location information.
Getting started:
Enable the GPS function on the smartphone.
Connect the camera to a smartphone by Bluetooth. (Connecting to a Smartphone (Bluetooth Connection))
-
Enable [Location Logging] on the camera.
![]() [
[![]() ]
] ![]() [
[![]() ]
] ![]() [Bluetooth]
[Bluetooth] ![]() [Location Logging]
[Location Logging] ![]() [ON]
[ON]
The function can also be enabled in “LUMIX Lab”.
The camera will enter a mode where location information can be recorded and [![]() ] is displayed in the recording screen of the camera.
] is displayed in the recording screen of the camera.
-
Record images with the camera.
Location information will be written to the recorded images.
|
Smartphone GPS positioning may not be possible if the smartphone is within a building, a bag, or similar. Move the smartphone to a position affording a wide view of the sky to improve positioning performance. In addition, refer to the operating instructions of your smartphone.
– [Frame.io Connection] |