Main Assist Functions
|
|
[Flicker Decrease (Video)]
![]()
![]()
![]()
![]()
![]()
![]()
![]()
![]()
When recording video in [![]() ] mode, you can fix the shutter speed to mitigate the flickering and horizontal stripes that appear in videos.
] mode, you can fix the shutter speed to mitigate the flickering and horizontal stripes that appear in videos.
 This can be set when [Auto Exposure in Photo Mode] is [ON]. (
 [Auto Exposure in Photo Mode])
-
Set to [
 ] mode.
-
Set [Flicker Decrease (Video)].


![]() [
[![]() ]
] ![]() [
[![]() ]
] ![]() [Flicker Decrease (Video)]
[Flicker Decrease (Video)]
[1/50]/[1/60]/[1/100]/[1/120]
[OFF]
[SS/Gain Operation]
![]()
![]()
![]()
![]()
![]()
![]()
![]()
![]()
You can switch the units of shutter speed values and gain (sensitivity) values.
-
Set to [
 ] or [S&Q] mode.
-
Set [SS/Gain Operation].
![]() [
[![]() ]
] ![]() [
[![]() ]
] ![]() [SS/Gain Operation]
[SS/Gain Operation]
[SEC/ISO]
Displays the shutter speed in seconds and the gain in ISO.
[ANGLE/ISO]
Displays the shutter speed in degrees and the gain in ISO.
The angle can be set in a range between 11° and 358°.
(when [Synchro Scan(Video)] is set to [OFF])
[SEC/dB]
Displays the shutter speed in seconds and the gain in dB.
0 dB corresponds to either of the following ISO sensitivity values.
– When [Dual Native Gain Setting] is set to [AUTO] or [LOW]: [80]
– When [Dual Native Gain Setting] is set to [HIGH]: [400]
|
– [Dual Native ISO Setting] – [ISO Sensitivity (video)] – [ISO Auto Lower Limit Setting] – [ISO Auto Upper Limit Setting] – [Extended ISO] – [ISO Displayed Setting] |
 Setting Range for Gain (Sensitivity)
When [SS/Gain Operation] is set to [SEC/dB], gain (sensitivity) can be set in the following ranges.
|
[Dual Native Gain Setting] |
[Extended Gain Setting] |
Setting Range for Gain (Sensitivity) |
|
[AUTO] |
[OFF] |
[AUTO], [0dB] to [+56dB] |
|
[ON] |
[AUTO], [−6dB] to [+62dB] |
|
|
[LOW] |
[OFF] |
[AUTO], [0dB] to [+20dB] |
|
[ON] |
[AUTO], [−6dB] to [+20dB] |
|
|
[HIGH] |
[OFF] |
[AUTO], [0dB] to [+42dB] |
|
[ON] |
[AUTO], [−6dB] to [+48dB] |
[Shutter Speed Limiter]
![]()
![]()
![]()
![]()
![]()
![]()
![]()
![]()
You can change the lower limit of the shutter speed according to the recording frame rate of the video. When you set to [ON], you can limit the shutter speed so that it does not go below the frame rate. If you want to make the shutter speed longer than the frame rate, set to [OFF].
-
Set to [
] mode.
-
Set [Shutter Speed Limiter].
![]() [
[![]() ]
] ![]() [
[![]() ]
] ![]() [Shutter Speed Limiter]
[Shutter Speed Limiter]
[ON]
Limits the shutter speed so it does not go below the frame rate.
[OFF]
No limit is placed on the shutter speed so it does not go below the frame rate.
Minimum shutter speed
|
Recording frame rate of the video |
[Shutter Speed Limiter] |
|||
|
[ON] |
[OFF] |
|||
|
[AFS]/[AFC] |
[MF] |
[AFS]/[AFC] |
[MF] |
|
|
23.98p/24.00p/25.00p |
1/25 of a second |
1/2 of a second |
||
|
29.97p |
1/30 of a second |
|||
|
47.95p |
1/50 of a second |
1/25 of a second ([iA]/[S]/[M]) 1/50 of a second ([P]/[A]) |
||
|
48.00p |
||||
|
50.00p |
||||
|
59.94p |
1/60 of a second |
1/30 of a second ([iA]/[S]/[M]) 1/60 of a second ([P]/[A]) |
||
|
100.00p |
1/100 of a second |
|||
|
119.88p/120.00p |
1/125 of a second |
|||
-
In [
] mode:
Can be set in [M] mode ([Exposure Control(Video Mode)] is set to [M], or set to the [MODE DIAL] and the mode dial is [M]) ([Exposure Control(Video Mode)])
In [![]() ] mode:
] mode:
[Auto Exposure in Photo Mode] is set to [OFF] ([Auto Exposure in Photo Mode])
[WFM/Vector Scope]
![]()
![]()
![]()
![]()
![]()
![]()
![]()
![]()
This displays the waveform monitor or the vector scope on the recording screen. You can change the size of the waveform display.
-
Set [WFM/Vector Scope].
![]() [
[![]() ]
] ![]() [
[![]() ]
] ![]() [WFM/Vector Scope]
[WFM/Vector Scope]
[WAVE]
Displays a waveform.
[VECTOR]
Displays the vector scope.
[OFF]
-
Select the position to display.
Press 


 to select and then press or
  .
.
Positions can be moved to the diagonal directions using the joystick.
You can also move using touch operations.
You can rotate  to change the size of the waveform.
To return the waveform or vector scope position back to the center, press [DISP.]. With waveform, pressing [DISP.] once again returns the size to the default setting.

Screen Displays
Waveform
The waveform displayed on the camera indicates the luminance as values based on the conversions below:
0 % (IRE ): Luminance value 16 (8 bit)/64 (10 bit)
100 % (IRE): Luminance value 235 (8 bit)/940 (10 bit)
-
IRE: Institute of Radio Engineers
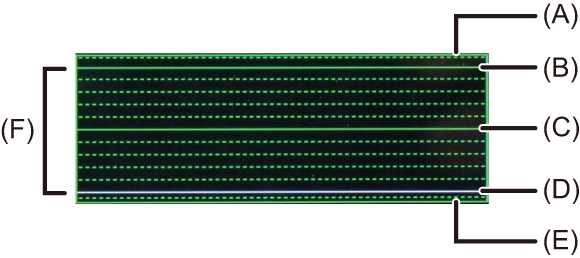
(A) 109 % (IRE) (Dotted line)
(B) 100 % (IRE)
(C) 50 % (IRE)
(D) 0 % (IRE)
(E) −4 % (IRE) (Dotted line)
(F) The range between 0 % and 100 % shows dotted lines at intervals of 10 %.
Display example)

Vector scope

(G) R (Red)
(H) YL (Yellow)
(I) G (Green)
(J) MG (Magenta)
(K) B (Blue)
(L) CY (Cyan)
Display example)

|
|
[Luminance Spot Meter]
![]()
![]()
![]()
![]()
![]()
![]()
![]()
![]()
Specify any spot on the subject to measure the luminance over a small area.
-
Set [Luminance Spot Meter].
![]() [
[![]() ]
] ![]() [
[![]() ]
] ![]() [Luminance Spot Meter]
[Luminance Spot Meter] ![]() [ON]
[ON]
-
Select the position where you want to measure the luminance.
Press to select and then press or .
Positions can be moved to the diagonal directions using the joystick.
You can also change the position by dragging the frame on the recording screen.
To return the position back to the center, press [DISP.].

(M) Luminance value
Measurement Range
Measuring is possible in the range −7 % to 109 % (IRE).
When [Photo Style] is set to [V-Log], or when a LUT file has not been applied in [REAL TIME LUT] (base Photo Style is [V-Log]), this is measured with “Stop” units. (18 % gray output level is calculated as 0 Stop)
[Zebra Pattern]
![]()
![]()
![]()
![]()
![]()
![]()
![]()
![]()
Parts that are brighter than the base value are displayed with stripes.
You can also set the base value and the breadth of the range so that the stripes are displayed on parts that are within the range of brightness you specify.

[ZEBRA1]

[ZEBRA2]

[ZEBRA1+2]
![]() [
[![]() ]
] ![]() [
[![]() ]
] ![]() Select [Zebra Pattern]
Select [Zebra Pattern]
|
[ZEBRA1] |
Parts that are brighter than the base value are displayed with [ZEBRA1] stripes. |
|
|
[ZEBRA2] |
Parts that are brighter than the base value are displayed with [ZEBRA2] stripes. |
|
|
[ZEBRA1+2] |
Both [ZEBRA1] and [ZEBRA2] are displayed. |
|
|
[OFF] |
— |
|
|
[SET] |
Sets the base brightness. |
|
|
[Zebra 1] |
[50%] to [105%]/[BASE/RANGE] |
|
|
[Zebra 2] |
[50%] to [105%]/[BASE/RANGE] |
|
When [BASE/RANGE] Was Selected with [SET]
Centered on the brightness set with [Base Level], parts with the brightness in the range set in [Range] are displayed with the stripes.
[Base Level] can be set in the range between 0 % and 109 % (IRE).
[Range] can be set in the range between ±1 % and ±10 % (IRE).
When [Photo Style] is set to [V-Log], or when a LUT file has not been applied in [REAL TIME LUT] (base Photo Style is [V-Log]), this is measured with “Stop” units. (18 % gray output level is calculated as 0 Stop)
|
|
[False Color]
![]()
![]()
![]()
![]()
![]()
![]()
![]()
![]()
The image is separated into colors to represent the luminance levels. This is a convenient method of checking the exposure of the image overall.
![]() [
[![]() ]
] ![]() [
[![]() ]
] ![]() Select [False Color]
Select [False Color]
[Start]
The recording screen has the false colors applied.
The recorded images are recorded as images without the false colors applied.
[False Color Index]
The index of the false colors is displayed.
Display Patterns
(A) [Photo Style] is set to [V-Log], [REAL TIME LUT] (base Photo Style is [V-Log]) ([LUT] not applied)
(B) [Photo Style] is set to other than (A) ([LUT] not applied)
(C) [LUT] is applied with [Photo Style] or [Filter Settings] is [ON]
|
– Focus frame – [Level Gauge] – Spot metering target – Touch AE – [Luminance Spot Meter] – [Histogram] – [WFM/Vector Scope] – [I.S. Status Scope] – [Live Cropping] – [Audio Information] – [Time Code Display]
– [Multiple Exposure] |
[Frame Marker]
![]()
![]()
![]()
![]()
![]()
![]()
![]()
![]()
A frame with the set aspect ratio is displayed on the recording screen. This allows you to see during recording the angle of view that will be achieved with trimming (cropping) in post-processing.
![]() [
[![]() ]
] ![]() [
[![]() ]
] ![]() Select [Frame Marker]
Select [Frame Marker]
|
[ON] |
Displays the frame on the recording screen. |
|
|
[OFF] |
— |
|
|
[SET] |
[Frame Aspect] |
Sets the aspect ratio of the frame. [2.39:1]/[2.35:1]/[2.00:1]/[1.85:1]/[16:9]/[4:3]/[5:4]/[1:1]/[4:5]/[9:16]/[CUSTOM] |
|
[Frame Color] |
Sets the color of the frame. |
|
|
[Frame Mask] |
Sets the opacity of the outside of the frame. [100%]/[75%]/[50%]/[25%]/[OFF] |
|
When [CUSTOM] Is Selected with [Frame Aspect] in [SET]
You can freely set the aspect ratio of the frame.
Press to move the center position.
Positions can be moved to the diagonal directions using the joystick.
You can also change the position by dragging the frame on the recording screen.
Set the height of the frame with [ ], and the width with [].
You can also pinch out/pinch in the frame to change the size.

(D) Center coordinates (0 being the center of the screen)
(E) Height and width of the frame
The aspect ratio can be set in the range between 1 % to 100 %.
The first press of [DISP.] returns the frame position to the center.
The second press returns the frame size to the default.
Color Bars/Test Tone
![]()
![]()
![]()
![]()
![]()
![]()
![]()
![]()
The color bars are displayed on the recording screen.
A test tone is output while the color bars are being displayed.
![]() [
[![]() ]
] ![]() [
[![]() ]
] ![]() Select [Color Bars]
Select [Color Bars]
Settings: [SMPTE]/[EBU]/[ARIB]
To end the display, press .

[SMPTE]

[EBU]

[ARIB]
Adjusting the Test Tone
There are 4 levels ([−12dB], [−18dB], [−20dB], and [MUTE]) of test tone to select.
Rotate , or  to select the test tone level.
|
|