Fn Buttons
 Register Functions to the Fn Buttons
You can register functions to the Fn (Function) buttons.
Different functions can be set for each of the photo mode, video/S&Q mode, and for playback.
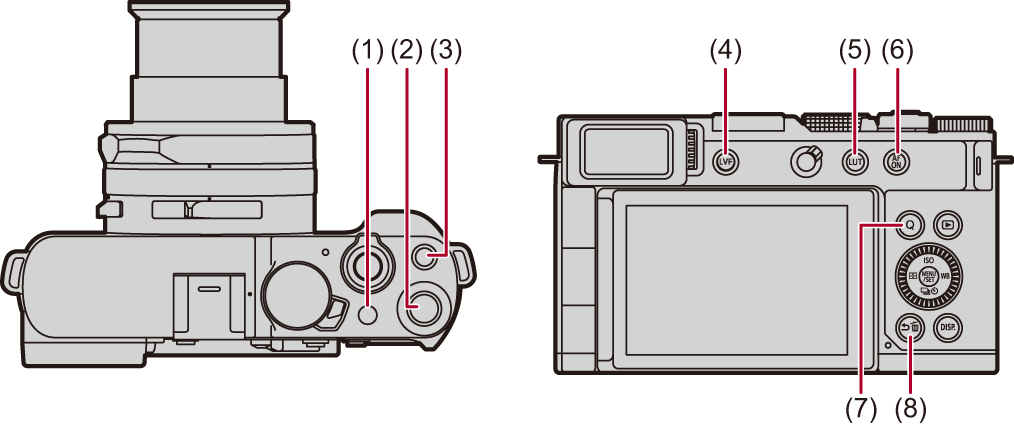
 Fn Button Default Settings
|
Fn buttons |
[Setting in Photo Mode] |
[Setting in Video/S&Q Mode] |
[Setting in Playback Mode] |
|
|
(1) |
|
[Exposure Comp.] |
[Same Setting as Photo Mode] |
[No Setting] |
|
(2) |
[Fn2] |
[Photo Style] |
||
|
(3) |
Video rec. button |
[Video Record] |
[Video Record] |
|
|
(4) |
LVF |
[LVF/Monitor Switch] |
[LVF/Monitor Switch] |
|
|
(5) |
LUT |
[REAL TIME LUT] |
[No Setting] |
|
|
(6) |
AF ON |
[AF-ON] |
[Rating |
|
|
(7) |
Q |
[Q.MENU] |
[Send Image (Smartphone)] |
|
|
(8) |
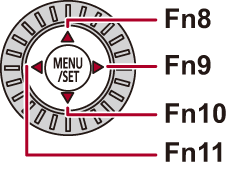
[Fn1]/ |
[Level Gauge] |
|
|
 /
/
|
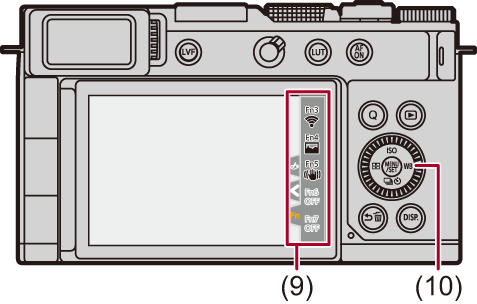
Fn buttons |
[Setting in Photo Mode] |
[Setting in Video/S&Q Mode] |
[Setting in Playback Mode] |
|
|
(9) |
[Fn3] |
[Wi-Fi] |
[Same Setting as Photo Mode] |
|
|
[Fn4] |
[Histogram] |
[Waveform Monitor] |
||
|
[Fn5] |
[Image Stabilizer] |
[Same Setting as Photo Mode] |
||
|
[Fn6] |
[Off (Disable Press and Hold)] |
[Off (Disable Press and Hold)] |
||
|
[Fn7] |
||||
|
(10) |
|
[Sensitivity] [White Balance] [Drive Mode] [AF Mode] |
[Same Setting as Photo Mode] |
|
Register Functions to the Fn Buttons
-
Select [Fn Button Set].

![]() [
[![]() ]
] ![]() [
[![]() ]
] ![]() [Fn Button Set]
[Fn Button Set] ![]() [Setting in Photo Mode]/[Setting in Video/S&Q Mode]/[Setting in Playback Mode]
[Setting in Photo Mode]/[Setting in Video/S&Q Mode]/[Setting in Playback Mode]
-
Select the button.
Press 
 to select the button and then press .
Selection is also possible by rotating  .
.
 Press [DISP.] to change the page.
-
Find the function to register.
Rotate  to select the sub tab where the function to register is categorized (
 Setting Items ([Fn Button Set]/[Setting in Photo Mode]/[Setting in Video/S&Q Mode]), Setting Items ([Fn Button Set]/[Setting in Playback Mode])) and then press .
You can also select by pressing  to select the sub tab, pressing or rotating
  , and then pressing
  .
.
Switch the [1] to [3] tabs by pressing [Q].
-
Register the function.
Press to select a function and then press .
Selection is also possible by rotating or .
Select items with [>] by selecting the item again.
Depending on the button, some functions cannot be registered.
|
(This may not be displayed depending on the registered function and on the button type.) |
Setting Items ([Fn Button Set]/[Setting in Photo Mode]/[Setting in Video/S&Q Mode])
[1] tab
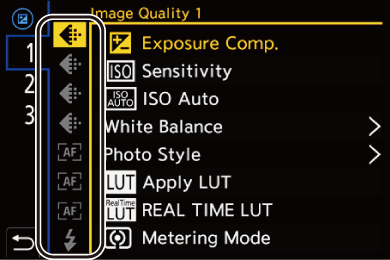
![]() [Image Quality]
[Image Quality]
[Exposure Comp.] (Exposure Compensation)
[Sensitivity] (ISO Sensitivity)
[ISO Auto]
– ISO auto switches between [ON] and [OFF] each time you press the assigned button in the recording screen. (When [OFF], the ISO sensitivity returns to the original one.)
[White Balance] (White Balance (WB))
[Photo Style] ([Photo Style])
[Apply LUT]
– Applies the LUT file that was set in [LUT] with either [REAL TIME LUT] or [MY PHOTO STYLE]. (Adjusting Image Quality)
[REAL TIME LUT] ([REAL TIME LUT])
[Metering Mode] ([Metering Mode])
[Aspect Ratio] ([Aspect Ratio])
[Rec. File Format(Photo)] ([Rec. File Format(Photo)])
[Switch JPEG/HEIF] ([Switch JPEG/HEIF])
[JPEG/HEIF Picture Quality] ([JPEG/HEIF Picture Quality])
[HEIF Format] (HLG Recording (HEIF Format))
[Picture Size] ([Picture Size])
[1 Shot Spot Metering]
– Records with the metering mode set to [![]() ] (Spot metering) once only. ([Metering Mode])
] (Spot metering) once only. ([Metering Mode])
[Long Exposure NR] ([Long Exposure NR])
[Min. Shutter Speed] ([Min. Shutter Speed])
[1 Shot RAW+JPEG]/[1 Shot RAW+HEIF]
– Records a RAW image and a JPEG/HEIF image simultaneously once only. ([Rec. File Format(Photo)])
[Soft Skin Effect] ([Soft Skin Effect])
[i.Dynamic Range] ([i.Dynamic Range])
[Filter Effect] ([Filter Settings])
[One Push AE]
– Adjusts the aperture value and shutter speed to the settings suited for the standard exposure determined by the camera. (Exposure Compensation)
[Touch AE] (Touch AE)
[AWB Lock] ([AWB Lock Setting])
[Exposure Control(Photo Mode)] ([Exposure Control(Photo Mode)])
[Exposure Control(Video Mode)] ([Exposure Control(Video Mode)])
[Synchro Scan(Photo)] ([Synchro Scan(Photo)])
[Synchro Scan(Video)] ([Synchro Scan(Video)])
![]() [Focus/Shutter]
[Focus/Shutter]
[AFS/AFC(Photo)] (Selecting the Focus Mode)
[AFS/AFC(Video)] (Selecting the Focus Mode)
[AF Mode] (Selecting the AF Mode)
[AF Detection Setting] (Automatic Detection)
[Detecting Subject] (Automatic Detection)
[AF Custom Setting(Photo)] ([AF Custom Setting(Photo)])
[AF Custom Setting(Video)] ([AF Custom Setting(Video)])
[Focus Limiter] ([Focus Limiter])
[Focus Limiter Range Set] ([Focus Limiter])
[Focus Frame Color Setting] ([Focus Frame Color Setting])
[Focus Peaking] ([Focus Peaking])
[Focus Peaking Sensitivity] ([Focus Peaking])
[Focus Frame Moving Speed] ([Focus Frame Moving Speed])
[Control Ring Lock] ([Control Ring Lock])
[AE LOCK] (Locking Focus and Exposure (AF/AE Lock))
[AF LOCK] (Locking Focus and Exposure (AF/AE Lock))
[AF/AE LOCK] (Locking Focus and Exposure (AF/AE Lock))
[AF-ON] ([AF ON] button)
[AF-ON : Near Shift]
– AF operates giving priority to close-up subjects. (Using AF)
[AF-ON : Far Shift]
– AF operates giving priority to distant subjects. (Using AF)
[AF-Point Scope] ([AF-Point Scope])
[Focus Area Set]
– Displays the AF area/MF Assist movement screens. (AF Area Operations, Operations on the MF Assist Screen)
[Enlarged Live Display(Video)] ([Enlarged Live Display(Video)])
![]() [Flash]
[Flash]
[Flash Mode] ([Flash Mode])
[Flash Adjust.] ([Flash Adjust.])
[Wireless Flash Setup] (Recording Using a Wireless Flash)
[2] tab
![]() [Others (Photo)]
[Others (Photo)]
[Drive Mode] (Selecting the Drive Mode)
[Drive Mode Setting] (Selecting the Drive Mode)
[Bracketing] (Bracket Recording)
[Focus Stacking] ([Focus Stacking])
[Silent Mode] ([Silent Mode])
[Image Stabilizer] ([Operation Mode])
[Shutter Type] ([Shutter Type])
[Crop Zoom(Photo)] ([Crop Zoom(Photo)])
[Live View Composite] ([Live View Composite])
![]() [Image Format]
[Image Format]
[Rec. File Format(Video)] ([Rec. File Format(Video)])
[Rec Quality] ([Rec Quality])
[Rec Quality (My List)] (Setting or deleting in My List)
[Slow & Quick Setting] (Slow & Quick Video)
![]() [Audio]
[Audio]
[Audio Information] ([Audio Information])
[Sound Rec Level Disp.] ([Sound Rec Level Disp.])
[Mute Sound Input] ([Mute Sound Input])
[Sound Rec Level Adj.] ([Sound Rec Level Adj.])
[Sound Rec Quality] ([Sound Rec Quality])
[Sound Rec Level Limiter] ([Sound Rec Level Limiter])
[4ch Audio Recording] ([4ch Audio Recording], [4ch Audio Recording])
[Hot Shoe Audio Input] (XLR Microphone Adaptor (Optional), Digital Shotgun Microphone (Optional))
![]() [Others (Video)]
[Others (Video)]
[Image Stabilizer] ([Operation Mode])
[E-Stabilization (Video)] ([E-Stabilization (Video)])
[Image Area of Video] ([Image Area of Video])
[Crop Zoom(Video)] ([Crop Zoom(Video)])
[Focus Transition] ([Focus Transition])
[Live Cropping] ([Live Cropping])
[Live Cropping Settings] ([Live Cropping])
![]() [Operation]
[Operation]
[Q.MENU] (Quick Menu)
[Rec / Playback Switch]
– Switches to the playback screen. (Playing Back Pictures, Playing Back Videos)
[Video Record] (Basic Video Operations)
[LVF/Monitor Switch] (Switching Between the Monitor and Viewfinder)
[Operation Lock]
[Zoom Settings] ([Zoom Settings])
[Dial Operation Switch] (Temporarily Change Dial Operation)
![]() [Monitor / Display]
[Monitor / Display]
[Preview] (Preview Mode)
[Preview Aperture Effect]
– The aperture effect can be previewed while the Fn button is being pressed. (Preview Mode)
[Constant Preview] ([Constant Preview])
[Level Gauge] ([Level Gauge])
[Histogram] ([Histogram])
[Luminance Spot Meter] ([Luminance Spot Meter])
[Frame Marker] ([Frame Marker])
[Photo Grid Line] ([Photo Grid Line])
[Live View Boost] ([Live View Boost])
[Monochrome Live View] ([Monochrome Live View])
[Night Mode] ([Night Mode])
[LVF/Monitor Disp. Set]
– Switches the displayed monitor or viewfinder display style. ([LVF/Monitor Disp. Set])
[Zebra Pattern] ([Zebra Pattern])
[LUT View Assist (Monitor)] ([LUT View Assist (Monitor)])
[LUT View Assist (App)] ([LUT View Assist (App)])
[LUT Select(LUT View Assist)] ([Log View Assist])
[3] tab
![]() [Monitor / Display]
[Monitor / Display]
[HLG View Assist (Monitor)] ([HLG View Assist])
[Sheer Overlay] ([Sheer Overlay])
[Waveform Monitor] ([Waveform Monitor])
![]() [Lens / Others]
[Lens / Others]
[Control Ring Focus Control(MF)] ([Control Ring Focus Control(MF)])
![]() [IN/OUT]
[IN/OUT]
[Wi-Fi] (Wi-Fi/Bluetooth Connections and Settings)
![]() [Setting]
[Setting]
[Save to Custom Mode] (Registering Instant Customization)
![]() [Others]
[Others]
[No Setting]
– Set when not using as an Fn button.
[Off (Disable Press and Hold)]
– The button does not work as an Fn button. The function registering screen is not displayed when you press and hold (2 seconds) the Fn button.
[Same Setting as Photo Mode]
– Linked to the menus set in [Setting in Photo Mode]. (Only in [Setting in Video/S&Q Mode])
[Restore to Default]
– Restore the default settings for the Fn button. (Fn Button Default Settings)
Setting Items ([Fn Button Set]/[Setting in Playback Mode])
[1] tab
![]() [Playback Mode]
[Playback Mode]
[Magnify from AF Point] ([Magnify from AF Point])
[LUT View Assist (Monitor)] ([LUT View Assist (Monitor)])
[HLG View Assist (Monitor)] ([HLG View Assist (Monitor)])
![]() [Process Image]
[Process Image]
[RAW Processing] ([RAW Processing])
[HEIF to JPEG Conversion] ([HEIF to JPEG Conversion])
![]() [Add/Delete Info.]
[Add/Delete Info.]
[Delete Single] (Deleting Images)
[Protect] ([Protect])
[Rating 1] ([Rating])
[Rating2] ([Rating])
[Rating3] ([Rating])
[Rating4] ([Rating])
[Rating5] ([Rating])
![]() [Operation]
[Operation]
[Rec / Playback Switch]
– Switches to the recording screen. (Basic Picture Operations, Basic Video Operations)
[LVF/Monitor Switch] (Switching Between the Monitor and Viewfinder)
[Video Record] (Basic Video Operations)
![]() [Monitor / Display]
[Monitor / Display]
[Night Mode] ([Night Mode])
![]() [IN/OUT]
[IN/OUT]
[Sound Monitoring Channel(Play)] ([Sound Monitoring Channel(Play)])
[Wi-Fi] (Wi-Fi/Bluetooth Connections and Settings)
[Send Image (Smartphone)] (Sending Images on the Camera to a Smartphone with Simple Operations)
![]() [Others]
[Others]
[No Setting]
– Set when not using as an Fn button.
[Off (Disable Press and Hold)]
– The button does not work as an Fn button. The function registering screen is not displayed when you press and hold (2 seconds) the Fn button.
[Restore to Default]
– Restore the default settings for the Fn button. (Fn Button Default Settings)
Use the Fn Buttons
You can use the functions assigned with each of the settings when you press the Fn buttons.
In [![]() ] mode: Functions assigned in [Setting in Photo Mode]
] mode: Functions assigned in [Setting in Photo Mode]
In [![]() ]/[S&Q] mode: Functions assigned in [Setting in Video/S&Q Mode]
]/[S&Q] mode: Functions assigned in [Setting in Video/S&Q Mode]
During playback: Functions assigned in [Setting in Playback Mode]
-
Press the Fn button.
-
Select a setting item.
Press to select a setting item and then press .
Selection is also possible by rotating or .
Display and selection methods of a setting item differ depending on the menu item.
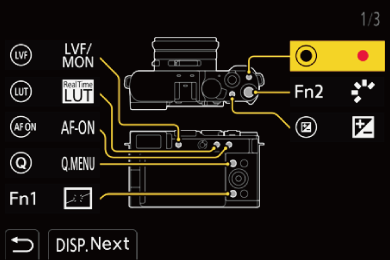
Use [Fn3] to [Fn7] (Touch Icons)
During recording, you can use the Fn buttons within the Touch Tab.
|
|
-
Touch [
 ].
].
-
Touch one of [Fn3] to [Fn7].