Compatible with Frame.io Camera to Cloud
By connecting the camera to the internet via Wi-Fi, you can upload still images and proxy videos directly to the Frame.io platform.
-
This does not guarantee all of the functions of “Frame.io Camera to Cloud”.
Connecting with Frame.io

 [
[![]() ]
]  [
[![]() ]
]  [Frame.io]
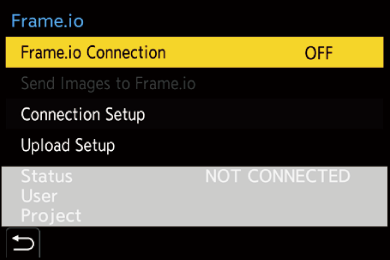
  [Frame.io Connection]
  Select [ON]

 Perform [Wi-Fi Connection Setting] and [Pairing(Frame.io)] when connecting for the first time.
[Wi-Fi Connection Setting]
Select [New connection] and connect via Wi-Fi to the access point.
[Pairing(Frame.io)]
A pairing code is displayed on the camera.
Log into Frame.io from a PC, etc., and enter the pairing code in the device registration screen.
 This can also be set by selecting [Frame.io Connection]
  [SET]
[SET]  [Pairing(Frame.io)].
 You can view the [Status] in relation to Frame.io in the [Frame.io] menu screen.
– [NOT CONNECTED]: Connection with Frame.io not started
– [CONNECTING]: Currently trying to connect with Frame.io (incomplete)
– [CONNECTED]: Connection with Frame.io completed
– [CONNECTED(PAUSED)]: Camera connection has been paused on the Frame.io site
 The user name ([User]) and project name ([Project]) are displayed on the camera when the connection is completed.
|
– [Auto Transfer] – [USB] – Tethered recording
– [Bluetooth Function] – [Wi-Fi Function] – Tethered recording – [Video Repair] – [Stop Motion Animation] – [Sheer Overlay]
– [Tracking] |
 Changing the Wi-Fi Connection Destination
Change the access point, etc., while connected to Frame.io.

 [
[![]() ]
]  [
[![]() ]
]  [Frame.io]
  [Connection Setup]
  Select [Wi-Fi Connection Setting]
 Press [DISP.] to reselect the connection destination.
 Disconnecting from Frame.io

 [
[![]() ]
]  [
[![]() ]
]  [Frame.io]
  [Frame.io Connection]
  Select [OFF]
 The upload queue is not cleared even if you break the connection (Wi-Fi) with Frame.io.
 Unpairing (Frame.io)

 [
[![]() ]
]  [
[![]() ]
]  [Frame.io]
  [Frame.io Connection]
  [SET]
[SET]  Select [Delete]
 This deletes the information for pairing with Frame.io and breaks the connection (Wi-Fi) with Frame.io.
 The upload queue is cleared.
[Send Images to Frame.io]
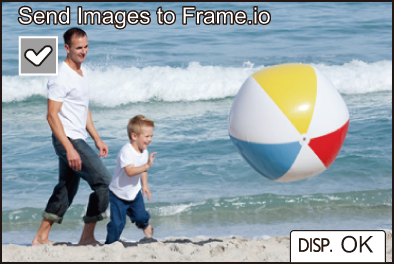
When [Frame.io Connection] is set to [ON], the images to upload can be reserved manually.

 [
[![]() ]
]  [
[![]() ]
]  [Frame.io]
  Select [Send Images to Frame.io]
 You also can display the screen for selecting images by pressing the Fn button which has been assigned [Send Images to Frame.io].
 The images filtered by [Upload File Format] in [Upload Setup] are displayed.

 Press
Press 
 to select the images and press
  to add check marks.
 Images are added to the end of the upload queue when you press [DISP.].
 During playback, images reserved for transfer are indicated with [
![]() ] and images already transfered are indicated with [
] and images already transfered are indicated with [![]() ].
].
[Upload Setup]
Make settings related to uploading of images.

 [
[![]() ]
]  [
[![]() ]
]  [Frame.io]
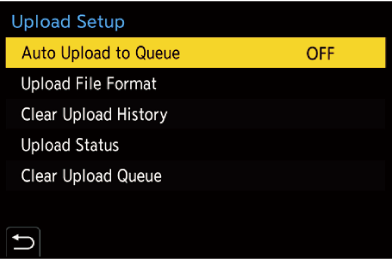
  Select [Upload Setup]

[Auto Upload to Queue]
When set to [ON], images are added to the Frame.io upload queue as they are recorded.
[Upload File Format]
Select the format of the files to be automatically uploaded.
With [Send Images to Frame.io], you can filter the file types to display when making image selections.
You can upload proxy videos and pictures (JPEG/RAW).
[Clear Upload History]
Removes the icon indicating an image is uploaded from images that have been uploaded.
[Upload Status]
You can see the projects that are connected and the number of files remaining to be uploaded, etc.
Press [DISP.] to see even more detailed information.
[Clear Upload Queue]
Clears the upload queue for Frame.io.
Removes the icon indicating an image is in the queue for uploading from images that are in the queue for uploading.
 Images that are removed from the upload queue are not uploaded to Frame.io.
 Notes About the Upload Queue (Transfer Reservation List)
When the camera has been connected to Frame.io, the images in the upload queue are uploaded to Frame.io.
 If there are images remaining in the upload queue, uploading is continued even if the camera on/off switch is set to [OFF]. The power is turned off when uploading is completed. If [Exit] is selected to turn off the power, uploading is resumed when the camera is next turned on.
 Uploading is canceled when the connection with Frame.io is broken and then is resumed when the connection is reestablished.
 The upload queue is cleared in the following cases:
– [Clear Upload Queue] is executed
– Pairing with Frame.io is canceled
 Do not remove the battery while the camera is still turned on. The upload queue will not be kept properly.
|
– [Time Lapse Video] – Extracting a Picture – [Video Divide] – Deleting Images – [RAW Processing] |
