[Setup] Menu
 [Setup] menu ([Monitor / Display])
[Setup] menu ([Card/File])
|
|

[Card Format]
|
[Card Slot 1] / [Card Slot 2] |
|
Formats the card (initialization). Format the cards with the camera before use.
Save a backup of necessary data before formatting the card.
|
 When a card is formatted, all of the data stored in the card is erased and cannot be restored.
[Double Card Slot Function]
|
[Recording Method] |
|
|
This sets the way recording to the card slots 1 and 2 is performed.
[Destination Card Slot]: [ Relays recording to the card in the other card slot after the first card runs out of free space.
[JPEG Destination]/[RAW Destination]/[Video Destination] Notes about relay recording
– [Loop Recording (video)] Notes about Backup Recording
If the card Speed Class or capacity is insufficient when video recording, recording to both cards stops.
– [Loop Recording (video)]
– SD/SDHC memory cards and SDXC memory cards |
|
[Folder / File Settings]
|
[Select Folder] / [Create a New Folder] / [File Name Setting] |
|
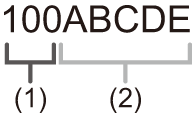
Set the folder and file name where to save the images. Folder name
File name
[Select Folder]: Selects a folder for storing images.
[Create a New Folder]: Creates a new folder with an incremented folder number.
[OK]: Increments the folder number without changing the 5-character user-defined segment ((2) above). [Change]: Changes the 5-character user-defined segment ((2) above). This will also increment the folder number. |
|
[File Name Setting] [Folder Number Link]: Uses the 3-character user-defined segment ((4) above) to set the folder number ((1) above). [User Setting]: Changes the 3-character user-defined segment ((4) above).
Available characters: alphabetic characters (upper-case), numerals, [ _ ]
If you change the storage folder, a number continuing on from the last file number will be assigned.
– The number of files in the current folder reaches 1000. – The file number reaches 9999.
We recommend backing up your data and formatting the card.
|

[File Number Reset]
|
[Card Slot 1] / [Card Slot 2] |
|
Refresh the folder number within the DCIM folder and reset the file number to 0001.
We recommend backing up your data and formatting the card.
|
[Copyright Information]
|
[Artist] |
[ON] / |
|
[Copyright Holder] |
[ON] / |
|
[Display Copyright Info.] |
|
|
Records the names of the artist and the copyright holder in the image Exif data.
How to enter characters (
|
|
[Setup] menu ([Monitor / Display])
|
|
[Power Save Mode]
|
[Sleep Mode] |
[10MIN.] / |
|
[Sleep Mode(Wi-Fi)] |
|
|
[Auto LVF/Monitor Off] |
|
|
[Power Save LVF Shooting] |
[Time to Sleep] |
|
[Method of Activation] |
|
|
This is a function to automatically turn the camera to sleep (power save) status or turn off the viewfinder/monitor if no operation is performed for a set time. |
|
[Thermal Management]
|
[Recording Max Temperature] |
[HIGH] / |
|
This sets the temperature during video recording at which the camera automatically stops recording. When set to [HIGH], recording continues even if the camera temperature rises. [Recording Max Temperature] [HIGH]: Sets the temperature at which recording is stopped due to the camera temperature rising to a higher temperature.
Use a tripod, etc., because recording with a handheld camera for long periods can cause low temperature burns. [STANDARD]: Recording stops when the camera temperature rises.
|
|
[Monitor Frame Rate]
|
[30fps] / |
|
Sets the display speed for live view on the monitor when recording pictures. [30fps]: Reduces the power consumption for a longer operating time. [60fps]: Enables smooth display of movements.
– HDMI output |
[LVF Frame Rate]
|
|
|
Sets the display speed for live view on the viewfinder when recording pictures. [60fps]: Reduces the power consumption for a longer operating time. [120fps]: Enables smooth display of movements.
– HDMI output – While connected to Wi-Fi |
[Monitor Settings]/[Viewfinder]
|
[Brightness] / [Contrast] / [Saturation] / [Red Tint] / [Blue Tint] |
|
This adjusts the brightness, coloring, and red or blue tints of the monitor/viewfinder.
|


 or
or  to confirm the setting.
[Monitor Backlight]/[LVF Luminance]
|
|
|
Adjusts monitor/viewfinder luminance. [AUTO]: The brightness is adjusted automatically depending on how bright it is around the camera.
|
[Eye Sensor]
|
[Sensitivity] |
|
|
This will set the sensitivity of the eye sensor. |
|
|
[LVF/Monitor Switch] |
|
|
This will set the method for switching between the viewfinder and monitor.
|
|
[Level Gauge Adjust.]
|
[Adjust.] |
|
Hold the camera in a horizontal position, and press |
|
[Level Gauge Value Reset] |
|
Restores the default level gauge setting. |
[Setup] menu ([IN/OUT])
|
|
[Beep]
|
[Beep Volume] |
[ |
|
[AF Beep Volume] |
[ |
|
[AF Beep Tone] |
|
|
[E-Shutter Vol] |
[ |
|
[E-Shutter Tone] |
|
|
Sets the beep sounds, AF beep, and electronic shutter sounds. |
|
[Headphone Volume]
|
[0] to [LEVEL15] ( |
|
Adjusts the volume when headphones are connected. (
|
[Sound Monitoring Channel(Play)]
|
|
|
During video playback, this selects the audio channel output to the speaker on the camera or the headphones. For information about output audio ( [COMBINED WITH REC]: Outputs audio with the same settings as [Sound Monitoring Channel] in the [Video] ([Audio]) menu.
|
[Wi-Fi]
|
[Wi-Fi Function] ( |
|
[Wi-Fi Setup] ( |
[Bluetooth]
|
[Bluetooth] ( |
|
[Send Image (Smartphone)] ( |
|
[Remote Wakeup] ( |
|
[Returning from Sleep Mode] ( |
|
[Auto Transfer] ( |
|
[Location Logging] ( |
|
[Auto Clock Set] ( |
|
[Wi-Fi network settings] |
|
[Wi-Fi network settings]: Registers the Wi-Fi access point. Wireless access points used to connect the camera to Wi-Fi networks will be registered automatically. |
[USB]
|
[USB Mode] |
|
|
This sets the communication method to be used when the USB connection cable is connected. [ [ [ |
|
|
[USB Power Supply] |
|
|
Provides power from the USB connection cable.
|
|
[Battery Use Priority]
|
[BODY] / |
|
Selects which battery to use first when the batteries are installed in both the camera and the Battery Grip. |
[HDMI Connection]
|
[Output Resolution(Playback)] |
|
|
Sets the HDMI output resolution for playback. [AUTO]: Outputs with a resolution suited to the connected external device.
(Please also refer to the operating instructions for the external device.)
|
|
|
[LUT View Assist (HDMI)] |
[ON] / |
|
Images with LUT (Look-Up Table) file applied are output when you play back videos recorded with [Photo Style] set to [V-Log].
|
|
|
[HLG View Assist (HDMI)] |
|
|
At recording or playback of HLG video, this converts their color gamut and brightness for display.
|
|
|
[VIERA Link (CEC)] |
[ON] / |
|
You can use the device remote control to operate the camera when it is connected to a VIERA Link compatible device using an HDMI cable. |
|
|
[Background Color(Playback)] |
[ |
|
Sets the color of the bands displayed on the top and bottom or the left and right of images output on an external device.
|
|
|
[Photo Luminance Level] |
[0-255] / |
|
Sets the level of luminance when outputting pictures to external devices. |
|
[Network Connection Light]
|
|
|
This will turn on the network connection light. |
[Setup] menu ([Setting])
[Save to Custom Mode]
|
[C1] / [C2] / [C3-1] to [C3-10] |
|
You can register the currently set information of the camera. |
[Load Custom Mode]
|
[C1] / [C2] / [C3-1] to [C3-10] |
|
Calls up registered Custom mode settings to the selected recording mode and overwrites the current settings with these. |
[Custom Mode Settings]
|
[Limit No. of Custom Mode] |
|
[Edit Title] |
|
[How to Reload Custom Mode] |
|
[Select Loading Details] |
|
Sets the ease of use of Custom mode. |
[Save/Restore Camera Setting]
|
[Save] / [Load] / [Delete] / [Keep Settings While Format] |
|
Saves the camera’s settings information to the card. Saved settings information can be loaded to the camera, letting you set the same settings on multiple cameras. [Save]: Saves the camera’s settings information to the card.
[OK]: Saves using the file name on the screen. [Change the file name]: Changes the file name and saves the file.
[Load]: Loads the settings information on the card and copies it to the camera. [Delete]: Deletes settings information on the card. [Keep Settings While Format]: When formatting the card, formats the card while keeping camera settings information stored on the card.
|
[Reset]
|
Returns the camera to its default settings. ( |
[Setup] menu ([Others])
[Clock Set]
|
Sets the date and time. |
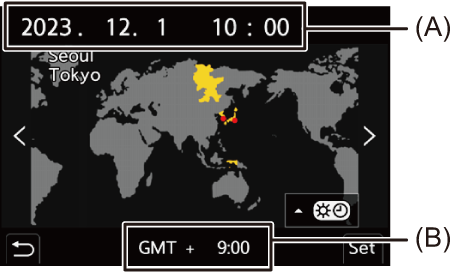
[Time Zone]
|
Sets the time zone. Press
(A) Current time (B) Time difference from GMT (Greenwich Mean Time)
To return to the normal time, press |
[System Frequency]
|
[59.94Hz (NTSC)] / [50.00Hz (PAL)] / [24.00Hz (CINEMA)]
|
|
This changes the system frequency of videos that are recorded and played back with the camera. |
[Pixel Refresh]
|
This optimizes the image sensor and image processing.
|
[Sensor Cleaning]
|
Dust reduction to blow off the debris and dust that have affixed to the front of the image sensor is performed.
|
[Language]
|
This set the language displayed on the screen.
|
[Firmware Version]
|
[Firmware Update] / [Software info] |
|
You can check the firmware versions of the camera and lens. In addition, you can update the firmware, and display information about the camera software. [Firmware Update]: Updates firmware.
[Software info]: Displays information about the camera software.
|
[Approved Regulations]
|
Displays the certification number for radio regulations.
|