Description of Parts

Main unit
 The illustrations in this document show the handle unit (
![]() supplied,
supplied, ![]() optional) removed.
optional) removed.
![]() does not support the handle unit.
does not support the handle unit.
-
Lens hood (
 Attaching the lens hood)
-
Lens cover switching lever (
Opening and closing the lens cover)
Opens/closes the lens cover.
-
Focus ring (
Focusing (manual focus))
When the <FOCUS A/M/ > button is pressed to set to manual focus mode ([MF]) you can focus manually.
-
Rear ring (
Iris, AE level (exposure compensation), Adjusting the zoom position)
You can manually perform zoom operations, adjust the iris (the lens stop), and adjust the AE level (exposure compensation).
You can switch the function to be adjusted by setting with the menu, pressing the USER button assigned to [REAR RING], or touching the USER button icon.
-
<ND FILTER> switch (
Brightness adjustment)
Selects the ND filter to suit the illumination of the subject.
<1/64>:
Reduces the amount of light entering the MOS sensor to 1/64.
<1/16>:
Reduces the amount of light entering the MOS sensor to 1/16.
<1/4>:
Reduces the amount of light entering the MOS sensor to 1/4.
<CLR>:
Does not use the ND filter.
-
<FOCUS A/M/
> button (Focusing (manual focus))
Select the focus function.
[AF] and [MF] switch each time you press the button. The focal point goes to infinity after you press and hold the button, and then the manual focus mode is engaged.
[AF]:
Changes to the auto focus mode. The auto focus mode adjusts the focus automatically.
[MF]:
Changes to the manual focus mode. Control the focus ring manually to adjust the focus.
-
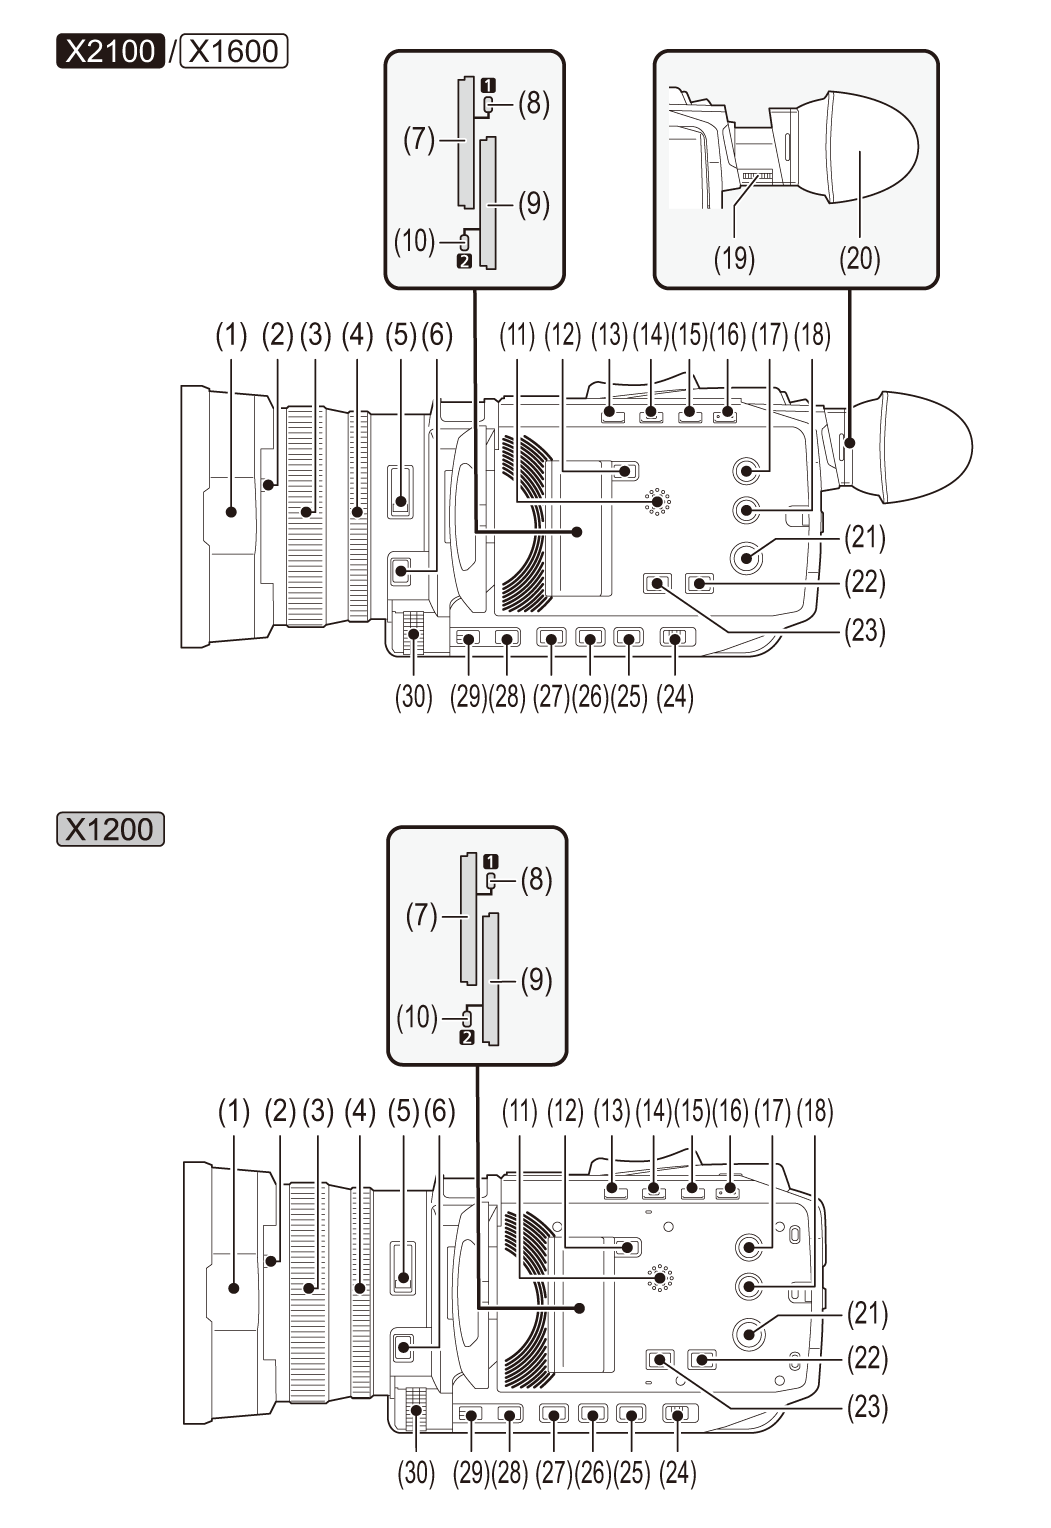
Card slot 1 (
Inserting/removing the memory card)
A slot for the memory card.
-
Card 1 access lamp (
Status of the card access lamp and memory card)
Indicates the access status for recording and playback of the memory card inserted in card slot 1.
-
Card slot 2 (
Inserting/removing the memory card)
A slot for the memory card.
-
Card 2 access lamp (
Status of the card access lamp and memory card)
Indicates the access status for recording and playback of the memory card inserted in card slot 2.
-
Built-in speaker
Outputs audio during playback.
Audio is not output from the built-in speaker when headphones are connected to the headphone terminal.
-
<SLOT SEL> button
Selects the card slot to record to or play back from.
-
<USER1> button (
Assigning functions to the USER buttons, Level gauge)
Used as a USER button (USER1).
[LEVEL GAUGE] is allocated at the time of purchase.
Switches display/hide of level gauge.
-
<USER2> button (
Assigning functions to the USER buttons, Applications for the USER button)
Used as a USER button (USER2).
[BACKLIGHT] is allocated at the time of purchase.
Switches enable/disable of the auto iris control function for backlight compensation.
-
(For the
 /
/ )
)
<O.I.S.>/<USER3> button (Assigning functions to the USER buttons, Optical image stabilizer function)
Switches enable/disable of the optical image stabilizer function.
This is also used as the USER button (USER3).
(For the ![]() )
)
<FACE DET.>/<USER3> button (Assigning functions to the USER buttons, Face detection/tracking AE&AF function)
Switches enable/disable of the face detection/tracking AE&AF function.
This is also used as the USER button (USER3).
-
(For the
/)
<VF>/<USER4> button (Assigning functions to the USER buttons)
(For the ![]() )
)
Switches the operation of [VIDEO OUT/LCD/VF] menu ![]() [VIDEO OUT SEL]
[VIDEO OUT SEL] ![]() [VF] when the [VIDEO OUT/LCD/VF] menu
[VF] when the [VIDEO OUT/LCD/VF] menu ![]() [VIDEO OUT SEL]
[VIDEO OUT SEL] ![]() [SDI + HDMI OUTPUT] is [ON]. (To set how to turn on/off the LCD monitor and viewfinder)
[SDI + HDMI OUTPUT] is [ON]. (To set how to turn on/off the LCD monitor and viewfinder)
Switches the viewfinder on/off when [SDI + HDMI OUTPUT] is [OFF].
This is also used as the USER button (USER4).
(For the ![]() )
)
Switches the viewfinder on/off.
This is also used as the USER button (USER4).
(For the ![]() )
)
<LCD B. LIGHT>/<USER4> button (Assigning functions to the USER buttons, Adjusting the backlight luminance)
Switches the luminance of the backlight of the LCD monitor
This is also used as the USER button (USER4).
-
<THUMBNAIL> button (
Thumbnail operation)
Press the button to switch between the camera image screen and the thumbnail screen.
-
<DISP/MODE CHK> button (
Mode check display)
Switches display/hide of information other than the time counter, time stamp, zebra pattern, and marker.
Press and hold the button to display information about the settings of the various shooting functions and information such as a list of the functions assigned to the USER button. Each press of the button switches the information page in order.
-
(For the
/)
Diopter adjustment dial (Adjusting and setting the viewfinder [X2100]/[X1600])
Adjusts the diopter scale so that the viewfinder screen can be viewed clearly.
-
(For the
/)
Eye cup
(Attaching the eye cup [X2100]/[X1600])
-
Power button (
Turning the unit on/off)
Press the button to switch the power on/off.
-
<WHITE BAL> button (
Adjusting the white and black balance)
Selects the method for adjustment of the white balance.
Each time you press the button, the white balance switches in the order “Preset”, [Ach], [Bch].
“Preset”:
Adjusts the white balance to the preset value. Each time you either press the USER button assigned to [AWB] or touch the USER button icon, the setting changes in the order [P 3200K], [P 5600K], “VAR” (screen display example: [V 3200K]).
[Ach]/[Bch]:
Selects when using the stored value for the adjustment of the white balance.
-
<AE LEVEL>/<USER6> button (
Assigning functions to the USER buttons, AE level (exposure compensation))
Switches enable/disable of the AE level function.
Set the target value of the AE level in the [SCENE FILE] menu ![]() [AE LEVEL EFFECT].
[AE LEVEL EFFECT].
This is also used as the USER button (USER6).
-
<AUTO/MANU> switch (
About auto mode/manual mode)
Selects the method to adjust the focus, gain, iris, white balance, and shutter speed at shooting.
<AUTO>:
Adjusts automatically. (Auto mode)
<MANU>:
Adjusts manually. (Manual mode)
-
<SHUTTER> button (
Setting the shutter speed)
Switches the shutter mode.
-
<GAIN> button (
Gain)
Selects the method for adjusting screen brightness.
-
<IRIS> button (
Iris)
Selects the method for adjustment of the lens stop.
-
<MENU> button (
Basic operation of the menu)
Displays the menu. Pressing the <MENU> button while the menu is displayed closes the menu.
Press the button while the thumbnail screen is displayed to display the operation screen of the thumbnail menu, and clips can be deleted.
-
<EXIT> button
Returns to one level higher when the menu is displayed. Pressing the <EXIT> button without confirming the setting value will not reflect the change in the setting.
-
Multidial (
Multi manual function)
Moves, selects, and sets the menu while the menu is displayed.
Use the multidial to also operate thumbnails, select the multi manual function and select/set the various operation icons.

-
Fan inlet
Fan inlet for cooling fan. Do not block this while the unit is being used.
-
(For the
/)
Wireless LAN Transmitter
-
Lens hood release button (
Attaching the lens hood)
-
<MIC> terminal (
Attaching an external microphone to the <MIC> terminal, Using the built-in microphone/external microphone (stereo mini jack))
Connect an external microphone (stereo mini jack).
-
<REMOTE> terminal
Connects the remote control unit (commercially-available) to control some functions remotely.
-
USB terminal (
Connection function via the USB terminal, Network connection)
Connect to a PC with a USB cable to enable data transfers.
(For the ![]() )
)
You can connect to a network with USB tethering by using a USB cable to connect this unit to an iPhone/iPad or Android device.
When the unit and a USB ethernet adaptor (commercially available) are connected, connection to the network is possible via a LAN terminal.

-
Grip belt (
Adjusting the grip belt)
-
Lens cover (
Opening and closing the lens cover)
-
Fan outlet
Fan outlet for cooling fan. Do not block this while the unit is being used.
-
Lens

-
Built-in microphone (
Using the built-in microphone/external microphone (stereo mini jack))
This is the built-in stereo microphone <L>/<R>.
-
Accessory shoe (on the main unit)
Attach a video light, etc.
-
Zoom lever (on the grip) (
Adjusting the zoom position, Adjusting the volume during playback)
Adjusts the zoom of an image.
<T>:
Zooms in the image.
<W>:
Zooms out the image.
Adjust the volume when playing back clips.
-
(For the
/)
Handle unit mounting section (Attaching the handle unit [X2100]/[X1600])
-
<USER5> button (
Assigning functions to the USER buttons, Check videos recorded)
Used as a USER button (USER5).
[REC CHECK] is set at the time of purchase.
Automatically plays back the last approximately 3 seconds of the previously shot clip.

-
Status indicator (
Turning the unit on/off)
Illuminates when power is on.
-
Battery release lever (
Attaching and removing the battery)
Used when removing the battery from the main unit.
-
Battery mounting section (
Attaching and removing the battery)
Attaches a battery.
-
(For the
/)
Viewfinder (Using the viewfinder)
-
REC button (on the grip) (
Shooting)
Starts or stops the recording.
It is possible to directly record from the thumbnail mode.
-
(For the
)
<SDI OUT> terminal (TV/monitor)
A terminal to output SDI signal by connecting a monitor, etc.
-
<HDMI> terminal (
TV/monitor)
A terminal to output video signal by connecting a monitor, etc.
-
Headphones terminal
Connects audio monitoring headphones.
-
DC IN terminal (
Charging the battery)
Connects the supplied/commercially available AC adaptor and supplies an external power.
-
Charging lamp (
Charging the battery)
Illuminates when the battery is charging.
-
Tripod mounting holes (
Attaching a tripod)
Attach the tripod. (bottom)
Mounting hole size
– 1/4-20 UNC (screw length 5.5 mm (0.22  ) or shorter)
Attaching a tripod with a screw length of 5.5 mm (0.22 ) or more may damage the unit.
-
LCD monitor (
Using the LCD monitor)
Handle unit [X2100]/[X1600]
![]() uses the supplied accessory.
uses the supplied accessory.
![]() uses the optional VW-HU1.
uses the optional VW-HU1.
![]() does not support the handle unit.
does not support the handle unit.

(A) With a microphone holder attached
-
Handle
-
Microphone holder mounting section (
Attaching the external microphone)
Attaches the supplied microphone holder with the microphone holder mounting screws.
-
Microphone holder (
Attaching the external microphone)
Secures the external microphone in place.
-
Buckle (
Attaching the external microphone)
Used to open and close the microphone holder.
-
<INPUT 1> terminal (XLR, 3-pin) (
Attaching the external microphone, Audio input)
Connects an audio equipment or an external microphone.
-
<INPUT 2> terminal (XLR, 3-pin) (
Attaching the external microphone, Audio input)
Connects an audio equipment or an external microphone.
-
Microphone cable clamp (
Attaching the external microphone)
Fixes the external microphone cable.
-
<INPUT1> switch (
Using audio equipment/external microphone (XLR, 3-pin) [X2100]/[X1600])
Switches audio input signals connected to the <INPUT 1> terminal.
<LINE>:
Select when audio equipment is connected by the line input.
<MIC>:
Select when the external microphone is connected.
<+48V>:
Select when the external microphone is connected and the microphone needs a power supply.
-
CH1 SELECT switch (
Audio input)
Selects the audio to be recorded on audio channel 1.
<INT/MIC (L)>:
Records left audio from the built-in microphone or <MIC> terminal.
<INPUT1>:
Records input signals from the <INPUT 1> terminal.
-
CH2 SELECT switch (
Audio input)
Selects the audio to be recorded on audio channel 2.
<INT/MIC (R)>:
Records right audio from the built-in microphone or <MIC> terminal.
<INPUT1>:
Records input signals from the <INPUT 1> terminal.
<INPUT2>:
Records input signals from the <INPUT 2> terminal.
-
<INPUT2> switch (
Using audio equipment/external microphone (XLR, 3-pin) [X2100]/[X1600])
Switches audio input signals connected to the <INPUT 2> terminal.
<LINE>:
Select when audio equipment is connected by the line input.
<MIC>:
Select when the external microphone is connected.
<+48V>:
Select when the external microphone is connected and the microphone needs a power supply.
-
<AUDIO LEVEL CH2> dial (
Adjusting the audio recording level)
Adjust the recording level of audio channel 2.
-
<CH2> switch (
Adjusting the audio recording level)
Selects how the recording level for audio channel 2 is adjusted.
<AUTO>:
Adjusted automatically.
<MANU>:
Adjusted manually with the <AUDIO LEVEL CH2> dial.
-
<CH1> switch (
Adjusting the audio recording level)
Selects how the recording level for audio channel 1 is adjusted.
<AUTO>:
Adjusted automatically.
<MANU>:
Adjusted manually with the <AUDIO LEVEL CH1> dial.
-
<AUDIO LEVEL CH1> dial (
Adjusting the audio recording level)
Adjust the recording level of audio channel 1.
-
Handle unit mounting screw (
Attaching the handle unit [X2100]/[X1600])
Secures the handle unit to the main unit.

-
Light cover
Keep the Light cover out of reach of children to prevent swallowing.
-
Built-in LED light (
Using the built-in LED light [X2100]/[X1600])
-
Tally lamp (
Tally lamp [X2100]/[X1600])
Illuminates when the recording is started. Flashes when the battery level becomes low.
Whether or not to illuminate the lamp can be set in the menu.
-
Accessory shoe (on the handle)
Attach a video light, etc.
-
<LIGHT> switch (
Using the built-in LED light [X2100]/[X1600])
Switches the built-in LED light on/off.
-
Hold lever
Disables the REC button (on the handle) when switched to <HOLD>.
-
REC button (on the handle) (
Shooting)
Starts or stops the recording.
-
Accessory mounting hole
Accessories can be attached.
Mounting hole size
– 1/4-20 UNC (screw length 5.5 mm (0.22 ) or shorter)
-
Zoom lever (on the handle) (
Adjusting the zoom position)
Adjust the zoom of an image.
<T>: Zooms in the image.
<W>: Zooms out the image.
The zoom speed is controlled with this lever in a way different from the way it is controlled with the zoom lever (on the grip).
-
Light dimmer dial (
Using the built-in LED light [X2100]/[X1600])
Adjusts the brightness of the built-in LED light.
Turn to <+> to brighten, turn to <-> to dim.