Support for “LUMIX Tether” Wired LAN Connections
 [Tether(USB ethernet adaptor)] Has Been Added
Using “LUMIX Tether” with a Wired LAN Connection
Support for Remote Control of Multiple Cameras
![]()
![]()
![]()
![]()
![]()
![]()
![]()
![]()
Connect the camera and a PC with a LAN cable, then use the “LUMIX Tether” camera control software to control your camera remotely.
|
|
[Tether(USB ethernet adaptor)] Has Been Added
This enables connection to “LUMIX Tether” with a wired LAN connection.

![]() [
[![]() ]
] ![]() [
[![]() ]
] ![]() [USB]
[USB] ![]() Select [Tether(USB ethernet adaptor)]
Select [Tether(USB ethernet adaptor)]
Settings: [ON]/[OFF]
|
When set to [ON], power is supplied from the battery of this camera to the connected device, so the battery will be consumed faster.
– [Wi-Fi Function] ([LAN / Wi-Fi]) – [Bluetooth] |
Using “LUMIX Tether” with a Wired LAN Connection
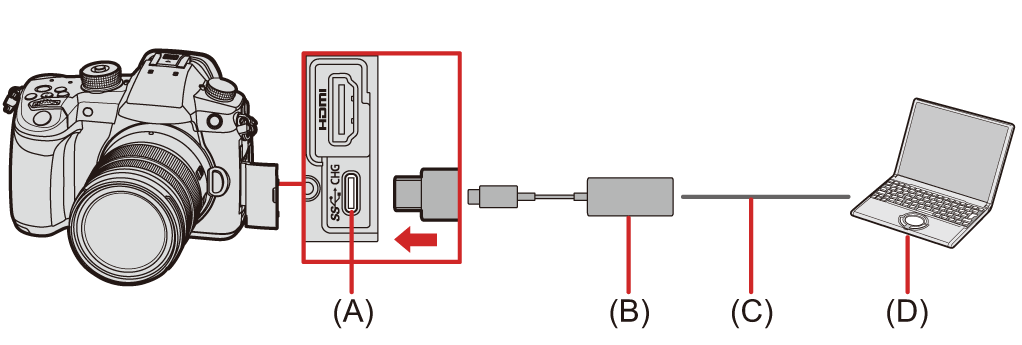
(A) USB port
(B) USB ethernet adaptor (commercially available)
(C) LAN cable
(D) A PC on which “LUMIX Tether” is installed
-
Set the camera as a DHCP server.
![]() [
[![]() ]
] ![]() [
[![]() ]
] ![]() [LAN / Wi-Fi]
[LAN / Wi-Fi] ![]() [LAN / Wi-Fi Setup]
[LAN / Wi-Fi Setup] ![]() [IP Address Setting (LAN)]
[IP Address Setting (LAN)] ![]() [DHCP Server]
[DHCP Server]
 If you have modified settings in [IP Address Setting (LAN)], turn the camera off and on again.
-
Set to wired LAN tethering connection.
![]() [
[![]() ]
] ![]() [
[![]() ]
] ![]() [USB]
[USB] ![]() [Tether(USB ethernet adaptor)]
[Tether(USB ethernet adaptor)] ![]() [ON]
[ON]
-
Connect the commercially available USB ethernet adaptor to the camera, then use a LAN cable to connect the camera and the PC.
-
Use “LUMIX Tether” to remotely control the camera.
(Initial connection) Set the password to be used to connect from “LUMIX Tether” to the camera. (Between 8 and 31 characters)
[![]() ] is displayed on the top right of the camera’s screen.
] is displayed on the top right of the camera’s screen.
Support for Remote Control of Multiple Cameras
A number of cameras can be remotely controlled using “LUMIX Tether”.
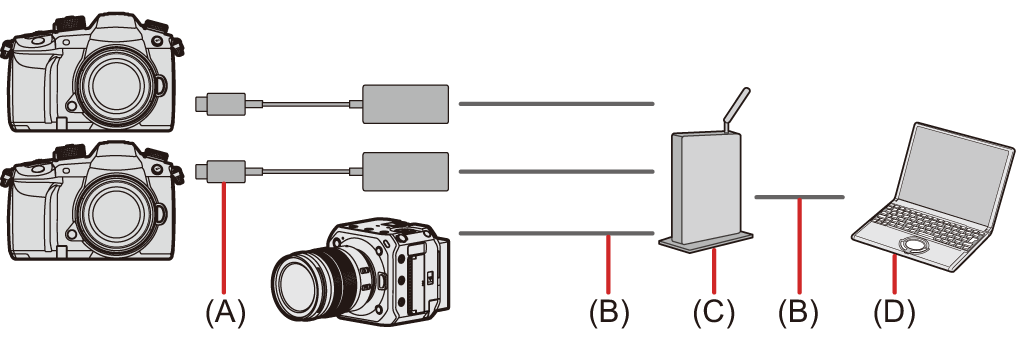
(A) USB ethernet adaptor (commercially available)
(B) LAN cable
(C) Router (or hub)
(D) A PC on which “LUMIX Tether” is installed
For example: When there is a DHCP server in the LAN, and the camera is to be connected as a DHCP client
-
Set the camera as a DHCP client (default setting).
![]() [
[![]() ]
] ![]() [
[![]() ]
] ![]() [LAN / Wi-Fi]
[LAN / Wi-Fi] ![]() [LAN / Wi-Fi Setup]
[LAN / Wi-Fi Setup] ![]() [IP Address Setting (LAN)]
[IP Address Setting (LAN)] ![]() [DHCP Client]
[DHCP Client]
If there is no DHCP server in the LAN, it is also possible to make the connection by setting one camera as [DHCP Server], and the remainder as [DHCP Client].
If you have modified settings in [IP Address Setting (LAN)], turn the camera off and on again.
-
Do the operations in “Using “LUMIX Tether” with a Wired LAN Connection” from Step 2.
Connect the cameras, PC, and router (hub) according to the above diagram.
You can operate “LUMIX Tether” and remotely control all connected cameras as a group, or select any individual camera to control remotely.
|
[ |