HDMI Devices (HDMI Output)
![]()
![]()
![]()
![]()
![]()
![]()
![]()
![]()
You can record while outputting the camera images to an external monitor or external recorder connected with an HDMI cable.
 HDMI output control differs between during recording and during playback.
For HDMI output settings during playback ( [HDMI Connection])
Getting started:
 Turn off the camera and the external monitor/external recorder.
-
Connect the camera and an external monitor or external recorder with a commercially available HDMI cable.
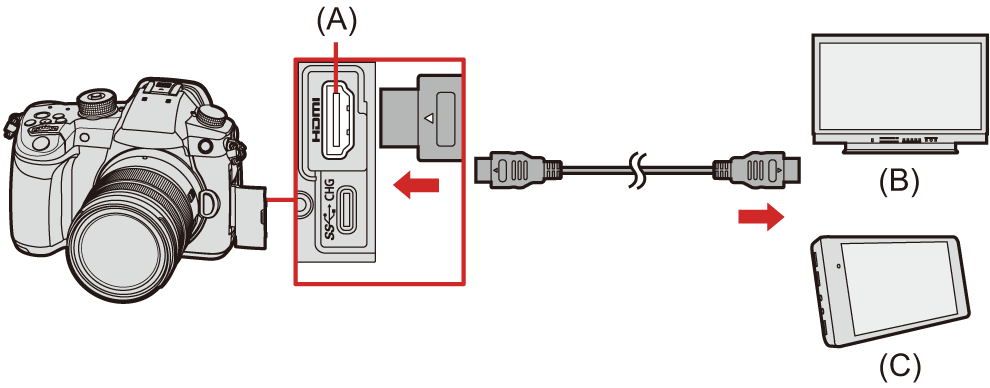
(A) [HDMI] socket (Type A)
(B) External monitor
(C) External recorder
 Check the direction of the terminals and plug in/out straight holding onto the plug.
(Inserting at an angle can deform the terminal and cause malfunction.)
 Do not connect the cable to the wrong terminals. This may cause a malfunction.
|
|
Attaching the Cable Holder
Use of the supplied cable holder prevents detachment of the cable and damage to the terminals.
 Put the camera on a stable surface to perform this task.
Example: Attaching to an HDMI cable
-
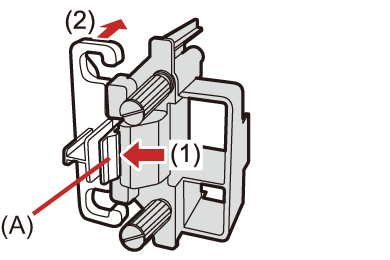
While pushing (A) (1), slide the clamp portion of the cable holder to remove it (2).
-
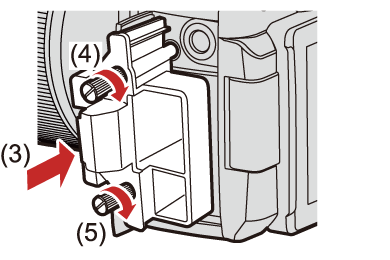
After placing the camera on a stable surface, loosely mount the cable holder to the mount on the camera (3), and secure the cable holder by rotating the screws in the direction of the arrows (4), (5).
-
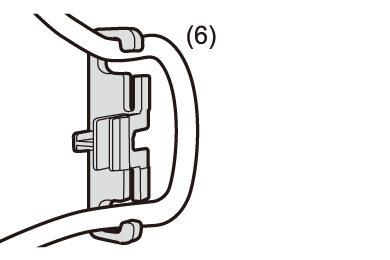
Attach the HDMI cable to the clamp portion (6).
-
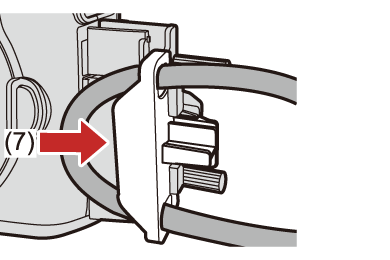
Slide the clamp portion to attach it to the cable holder (7).
-
Connect the HDMI cable to the [HDMI] socket (8).
 You can also connect the HDMI cable and USB connection cable at the same time when the cable holder is attached.
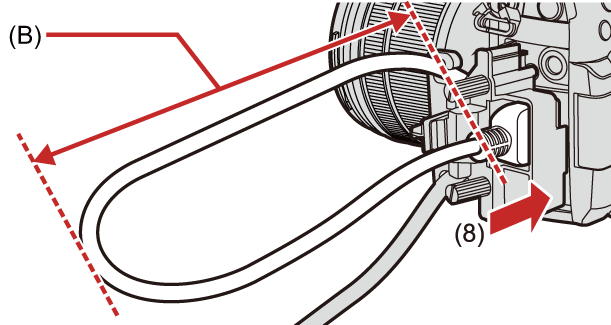
(B) Leave some slack so that this section has a length of at least 10 cm (0.33 feet).
Removing the cable holder
To remove the cable holder, follow the steps for attaching it in the reverse order.
|
|
Images Output via HDMI
The images output via HDMI differ depending on the recording mode.
 [
[![]() ] Mode
] Mode
Aspect ratio, resolution, and frame rate output is according to the [Rec Quality] settings in the [Video] ([Image Format]) menu. Resolution and frame rate can be down-converted for output according to the application.
YUV 4:2:2 is used for YUV and bit value output.
|
Recording to card |
HDMI output |
|
4:2:2 10-bit |
4:2:2 10-bit |
|
4:2:0 10-bit |
4:2:2 10-bit |
|
4:2:0 8-bit |
4:2:2 8-bit |
Resolution, frame rate
 Resolution and frame rate output according to the following menu combinations:
– [Rec Quality] in the [Video] ([Image Format]) menu.
– [Down Convert] in [HDMI Rec Output] of the [Custom] ([IN/OUT]) menu.
 6K/4K Anamorphic (4:3) video is output with a 4K or FHD resolution.
 For details (
 Image Quality When Outputting via HDMI)
|
|
 [iA]/[P]/[A]/[S]/[M] Mode
 Output is the same as [
![]() ] mode during video recording.
] mode during video recording.
 During recording standby, it is output according to the setting of [Aspect Ratio] in the [Photo] ([Image Quality]) menu.
– When set to any [Aspect Ratio] other than 16:9, bands are added to the left and right of the image for output.
– Resolution, frame rate, YUV, and bit value output matches the connected device.
 Notice Regarding HDMI Output
 It may take some time for the output method to change.
 When you use the HDMI output during recording, the image may be displayed with a time lag.
 Beep sounds, AF beep, and electronic shutter sounds are muted during HDMI output.
 When you check the image and audio from the TV connected to the camera, the microphone of the camera may pick up the sound from the speakers of the TV, producing an abnormal sound (audio feedback).
If this occurs, move the camera away from the TV or lower the volume on the TV.
 Certain setting screens are not output via HDMI.
 There is no output via HDMI while you are recording with the following functions:
– [6K/4K PHOTO]/[Post-Focus]
 If the temperature of the camera rises, [
![]() ] may be displayed, recording may stop, and some functions may become unavailable temporarily. Wait until the camera cools down.
] may be displayed, recording may stop, and some functions may become unavailable temporarily. Wait until the camera cools down.

