Charging the Battery
 Inserting a Battery into the Camera for Charging
Using the Camera While Supplying It with Power (Supplying Power/Charging)
Notifications Regarding Charging/Power Supply
You can charge the battery either using the supplied charger, or in the camera body.
You can also turn on the camera and supply power from an electrical outlet.
 The battery that can be used with the camera is DMW-BLK22/DMW-BLF19. (As of May 2021)
– You can also use DMW-BLF19 (optional), but since it has a smaller battery capacity than DMW-BLK22 (supplied/optional), it is recommended to use DMW-BLK22 (supplied/optional).
|
|
Charging with the Charger
Charging time: Approx. 230 min
Use the supplied charger and AC adaptor.
The indicated charging time is for when the battery has been discharged completely.
The charging time may vary depending on how the battery has been used.
The charging time for the battery in hot/cold environments or a battery that has not been used for a long time may be longer than normal.
|
|

-
Connect the charger and the AC adaptor with the USB connection cable.
Check the direction of the terminals and plug in/out straight holding onto the plug.
(Inserting at an angle can deform the terminal and cause malfunction.)
-
Connect the AC adaptor to an electrical outlet.
-
Insert the battery.
The [CHARGE] light (A) blinks and charging begins.
|
This may cause malfunction.
This may cause malfunction. |
 [CHARGE] Light Indications
|
Charging status |
0 % to 49 % |
50 % to 79 % |
80 % to 99 % |
100 % |
|
[CHARGE] light |
|
|
|
|


(A) Blinking
(B) On
(C) Off
When the battery is inserted while the charger is not connected to the power source, the charging lights turn on for a certain period to allow you to confirm the battery level.
|
– The temperature of the battery or surroundings is either too high or too low. Try charging at an ambient temperature between 10 °C and 30 °C (50 – The terminals of the charger or the battery are dirty. Remove the connection to the power source, and wipe with a dry cloth. |

Battery Insertion
Always use genuine Panasonic batteries (DMW-BLK22/DMW-BLF19).
– DMW-BLF19 (optional) has a smaller battery capacity than DMW-BLK22.
If you use other batteries, we cannot guarantee the quality of this product.
|
|

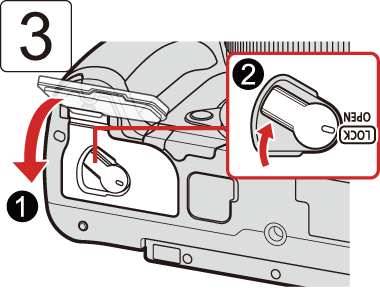
Check that the lever (A) is holding the battery in place.
Removing the Battery

-
Set the camera on/off switch to [OFF].
-
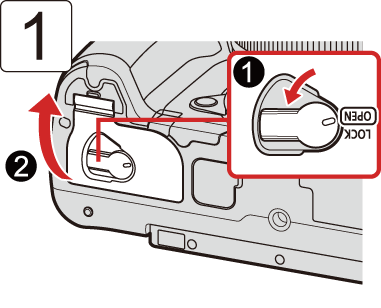
Open the battery door.
Check that the card access light turned off and then open the battery door. ( Card Access Indications)
-
Push the lever (A) in the direction of the arrow and then remove the battery.
|
(The battery will drain if left inserted in the camera for a long period of time.)
The camera also becomes warm during use. This is not a malfunction.
|
Inserting a Battery into the Camera for Charging
Charging time: Approx. 220 min
Using the camera body and the supplied AC adaptor.
The indicated charging time is for when the battery has been discharged completely.
The charging time may vary depending on how the battery has been used.
The charging time for the battery in hot/cold environments or a battery that has not been used for a long time may be longer than normal.
|
|

-
Set the camera on/off switch to [OFF].
-
Insert the battery into the camera.
-
Connect the camera USB port and the AC adaptor using the USB connection cable.
Check the direction of the terminals and plug in/out straight holding onto the plug.
(Inserting at an angle can deform the terminal and cause malfunction.)
-
Connect the AC adaptor to an electrical outlet.
The charging light (A) blinks red and charging begins.
Charging light Indications
(A) Charging light (red)
On: Charging in progress
Off: Charging complete
Flashing: Charging error
|
In that case, charging may take a while.
This may cause malfunction.
This may cause malfunction.
– The temperature of the battery or surroundings is either too high or too low. Try charging at an ambient temperature between 10 °C and 30 °C (50 – The terminals of the battery are dirty. Remove the battery and wipe off the dirt with a dry cloth.
When the camera will not be used for a long time, remove the power plug from the electrical outlet in order to save power. |
Power Supply
When a battery is inserted in the camera then charged with the AC adaptor (supplied), and the camera is turned on, you can record while supplying power.
[![]() ] is displayed in the screen while power is being supplied.
] is displayed in the screen while power is being supplied.
|
|
Using the Camera While Supplying It with Power (Supplying Power/Charging)
Since this camera and the items supplied with the battery charger (DMW-BTC15: optional) are compatible with USB PD (USB Power Delivery), you can charge while the camera is being supplied with power.
Connect the USB connection cable, AC adapter and AC mains lead of the battery charger (DMW-BTC15: optional) to the camera.
Charging time: Approx. 170 min
Use the camera body and the AC adaptor supplied with the battery charger (DMW-BTC15: optional). The camera is turned off.
The indicated charging time is for when the battery has been discharged completely.
The charging time may vary depending on how the battery has been used.
The charging time for the battery in hot/cold environments or a battery that has not been used for a long time may be longer than normal.

(A) USB connection cable
(B) AC adaptor
(C) AC mains lead
Insert the battery into the camera.
Connect using the USB connection cable of the battery charger (DMW-BTC15: optional).
When the camera is on, charging will take longer than when the camera is off.
|
|
Notifications Regarding Charging/Power Supply
Power Indications
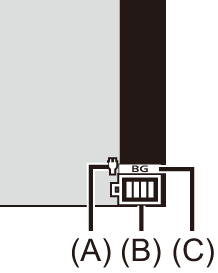
(A) USB connection cable supplying power
(B) Battery indication
(C) Using the battery in the Battery Grip
|
|
75 % or higher |
|
|
50 % to 74 % |
|
|
25 % to 49 % |
|
|
24 % or below |
|
Blinking in red |
Low battery (The status indicator also blinks.)
|
The battery level indicated on the screen is approximate.
|
There is a possibility that other battery packs may lead to fire or explosion. Please be advised that we are not liable for any accident or failure occurring as a result of use of a counterfeit battery pack.
Otherwise, a fire and/or electric shocks may be caused by short-circuiting or the resulting heat generated.
This may cause a malfunction.
(Since characteristic swelling may occur.)
Reconnect the power plug.
Try not to use that battery. |
[Power Save Mode]
This is a function to automatically turn the camera to sleep (power save) status or turn off the viewfinder/monitor if no operation is performed for a set time. Reduces battery consumption.

![]() [
[![]() ]
] ![]() [
[![]() ]
] ![]() Select [Power Save Mode]
Select [Power Save Mode]
|
[Sleep Mode] |
Sets the amount of time until the camera is put to sleep.
|
|
|
[Sleep Mode(Wi-Fi)] |
Sets the camera to sleep 15 minutes after being disconnected from Wi-Fi.
|
|
|
[Auto LVF/Monitor Off] |
Sets the amount of time it takes for the viewfinder/monitor to turn off. (The camera is not turned off.) |
|
|
[Power Save LVF Shooting] |
Puts the camera to sleep when the recording screen is being displayed on the monitor when automatic viewfinder/monitor switching is active. |
|
|
[Time to Sleep] |
Sets the amount of time until the camera is put to sleep. |
|
|
[Method of Activation] |
Sets the screen where the camera is put to sleep. [Only Control Panel]: Puts the camera to sleep only when the control panel ( [While Recording Standby]: Puts the camera to sleep from any screen during recording standby. |
|
To recover from [Sleep Mode], [Sleep Mode(Wi-Fi)], or [Power Save LVF Shooting], perform one of the following operations:
– Press the shutter button halfway.
– Set the camera on/off switch to [OFF] and then [ON] again.
To recover from [Auto LVF/Monitor Off], press any button.
|
– While connected to a PC or printer – During video recording/video playback – When recording with [6K/4K Pre-Burst] – During a [Time Lapse Shot] – When recording with [Stop Motion Animation] (when [Auto Shooting] is set) – When recording with [Multiple Exposure] – When recording with [Focus Transition] – During a [Slide Show] – During HDMI output for recording |