- 11. Menu Guide
- [Custom] menu
- [Custom] menu ([Monitor / Display])
[Custom] menu ([Monitor / Display])
|
|
|
[ON] / |
|
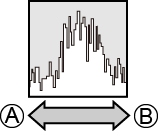
This displays the histogram. Turning this [ON] displays the histogram transition screen. Press A histogram is a graph that displays brightness along the horizontal axis, and the number of pixels at each brightness level on the vertical axis. By looking at the distribution of the graph, you can determine the current exposure.
When the recorded image and the histogram do not match each other under the following conditions, the histogram is displayed in orange: –During exposure compensation –When the correct exposure is not achieved, such as in low light situations. The histogram is an approximation in the recording mode. |
|
|
|
Displays the focal length on the recording screen during zoom control. |
|
|
|
Displays the level gauge which is useful in correcting camera tilt.
Even after correcting the tilt, there may still be an error of approx. ±1°. When the camera is tilted significantly upwards or downwards, the level gauge may not be displayed correctly. You can adjust the level gauge and reset the adjusted values in [Level Gauge Adjust.] in the [Setup] ([Monitor / Display]) menu. ([Level Gauge Adjust.]) |
|
[ON] / |
|
Specify any spot on the subject to measure the luminance over a small area. ([Luminance Spot Meter]) |
[Framing Outline]
|
[ON] / |
|
Displays the outline for the live view. |
[Display Information]
|
[Display Info in Rec Mode] |
|
|
[Display Info in Playback] |
|
|
Switches the information display of the recording screen and playback screen. (Switching the Display Information) |
|
[V-Log L View Assist]
|
[Read LUT File] |
|
|
[LUT Select] |
|
|
[LUT View Assist (HDMI)] |
[ON] / |
|
[LUT View Assist (SDI)] |
[ON] / |
|
You can output images with LUT data applied via HDMI/SDI. ([V-Log L View Assist]) |
|
[HLG View Assist]
|
[HDMI] |
|
|
[SDI] |
[MODE1] / |
|
At recording or playback of HLG video, this outputs images with converted color gamut and brightness over HDMI/SDI. ([HLG View Assist]) |
|
[Anamorphic Desqueeze Display]
|
[ |
|
This displays the de-squeezed images suited to the magnification of the anamorphic lens. ([Anamorphic Desqueeze Display]) |
|
[ON] / |
|
The center of the recording screen will be displayed as [+]. |
[Frame Marker]
|
[ON] / |
|
|
[SET] |
[Frame Aspect] |
|
[Frame Color] |
|
|
[Frame Mask] |
|
|
A frame with the set aspect ratio is displayed on the recording screen. ([Frame Marker]) |
|
[Zebra Pattern]
|
[ZEBRA1] / [ZEBRA2] / [ZEBRA1+2] / |
|
|
[SET] |
[Zebra 1] |
|
[Zebra 2] |
|
|
Parts that are brighter than the benchmark value are displayed with stripes. ([Zebra Pattern]) |
|
[Color Bars]
|
[SMPTE] / [EBU] / [ARIB] |
|
The color bars are displayed on the recording screen. (Color bars / Test Tone) |
|
[ON] / |
|
A red frame is displayed on the recording screen that indicates that video is being recorded. |
 : Default settings
 to set the position.


