Connecting a Microphone
 Attaching a Microphone
-
Open the microphone holder.
 Open buckle (1), and detach fitting (2) from hook (3).

-
Attach the external microphone to the microphone holder, then close the buckle to secure the external microphone.
Attach the fitting (1) to the hook (2) and close the buckle (3) in the direction indicated by the arrow.

|
|
Connecting an XLR Microphone
|
|
-
Insert the microphone cable plug into the XLR terminal of the unit.

-
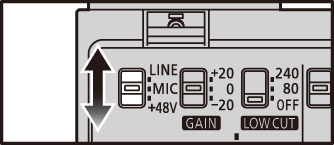
Set the LINE/MIC/
 48V switch (INPUT1/INPUT2) to match the connected device.
|
|
[LINE] |
External audio devices (such as mixers) |
|
|
[MIC] |
Dynamic microphone or microphone with built-in battery |
|
|
[ |
Microphone that supports |
When set to [48V], connecting a device that does not support 48V power supply may cause damage to the connected device. Check the device before connecting.
If noise from the unconnected terminal is bothering, set the LINE/MIC/48V switch to [LINE].
-
Set the channels to record with the SELECT switch. (
 Setting the Recording Channels)
-
Set the input gain with the GAIN switch (INPUT1/INPUT2). (
Setting Input Gain)
-
Set the recording level with the AUDIO LEVEL dial (INPUT1/INPUT2/INPUT3). (
Setting the Recording Level)
Use a shielded XLR microphone cable with a XLR (3 pin) terminal.
When using a stereo microphone that has 2 XLR (3 pin) plugs, connect the Lch to the XLR terminal (INPUT1) and the Rch to the XLR terminal (INPUT2).
The microphone cable can be attached to the unit’s cable holder.

The orientation of the cable holder can be changed. Remove the cable holder and attach it in a different orientation.

A commercially available XLR microphone or microphone holder can be attached to the unit’s accessory shoe.

Remove the microphone cable
Press the release lever, and hold the plug to remove it.
