Recording with Time Lapse Shot
![]()
![]()
![]()
![]()
![]()
![]()
![]()
![]()
![]()
Pictures are taken automatically at a set recording interval.
This feature is ideal for keeping track of changes over time in subjects such as animals and plants.
The pictures taken will be saved as a set of group images that can also be combined into a video. ( Group Images)
|
|
-
Press [
![Icon_[DriveMode]](../../img/DC-S9/Icon_[DriveMode].png) ] (
] ( ).
).

-
Press

 to select [Time Lapse/Animation] and press
  .
.
 You can also select by rotating
  .
.

-
Set [Mode] to [Time Lapse Shot].
This can also be set in [Time Lapse/Animation] in the [Photo] menu.
-
Set the recording settings.
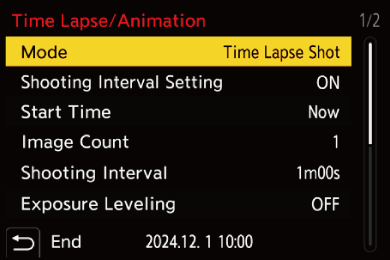
[Mode]
Switches between Time Lapse Shot and Stop Motion Animation.
[Shooting Interval Setting]
[ON]: Sets the interval before the next recording takes place.
[OFF]: Takes pictures without leaving recording intervals.
[Start Time]
[Now]: Starts recording when the shutter button is pressed fully.
[After 2 Seconds]: Starts recording 2 seconds after the shutter button is pressed fully.
[Start Time Set]: Starts recording at the set time.
[Image Count]/[Shooting Interval]
Sets the number of pictures and the recording interval to be taken.
The number of pictures and the recording interval to be taken can be automatically calculated and set. (Setting Assistant for Time Lapse Shot Recording)
 [Shooting Interval] is not available when [Shooting Interval Setting] is set to [OFF].
[Exposure Leveling]
Adjusts the exposure automatically to prevent large changes in brightness between adjacent frames.
[Create New Folder At Rec]
[Create a New Folder]: When set to [ON], a new folder is created each time that Time Lapse Shot recording is started.
[File Number Reset]: When set to [ON], the file number is reset each time a new folder is created.
-
Close the menu.
Press the shutter button halfway.
-
Start recording.
Press the shutter button fully.
When [Start Time Set] is set, the camera will enter into sleep status until the start time is reached.
During recording standby, the camera enters into sleep status when no operation is performed for a certain period of time.
The recording will stop automatically.
-
Create a video. (
Time Lapse Shot/Stop Motion Animation Videos)
After the recording has stopped, select [Yes] on the confirmation screen to proceed to create a video.
Even if you select [No], you can still create a video with [Time Lapse Video] in the [Playback] ([Process Image]) menu. ([Time Lapse Video])
 Setting Assistant for Time Lapse Shot Recording
When [DISP.] is pressed in the [Image Count]/[Shooting Interval] setting screen, [Image Count] and [Shooting Interval] can be set by automatically calculating them from the frame rate, time, and recording duration of the video to be created.
-
Press
to select the item and then press  .
.

[Production Frame Rate]
Sets the frame rate of videos to be created.
It can be set in the range between 1 fps and 99 fps.
[Video Length]
Sets the playback time of videos to be created.
It can be set in the range between 00m01s and 99m59s.
[Time Lapse Shooting Duration]
Sets the Time Lapse Shot duration.
It can be set in the range between 00h00m01s and 99h59m59s.
-
Press [DISP.] to confirm.
The settings are reflected when you select [Yes].
|
Decimal places are rounded down if the number is not evenly divisible.
|
Operations during Time Lapse Shot Recording
Pressing the shutter button halfway during sleep status will turn on the camera.
You can perform the following operations by pressing [Q] during Time Lapse Shot recording.
[Continue]
Returns to the recording. (Only during recording)
[Pause]
Pauses the recording. (Only during recording)
[Resume]
Resumes the recording. (Only while paused)
You can also press the shutter button to resume.
[End]
Stops the Time Lapse Shot recording.
|
Furthermore, it may not end at the end time displayed on the screen.
– When the charge on the battery runs out – When you set the camera on/off switch to [OFF] You can set the camera on/off switch to [OFF] and replace the battery or card. Set the camera on/off switch to [ON] and then press the shutter button fully to resume recording. (Note that the images recorded after replacing the card will be saved as a separate set of group images.)
|