- 12. Remote Operations
- Connecting to a Smartphone
- Connecting to a Smartphone (Wired LAN connection)
Connecting to a Smartphone (Wired LAN connection)
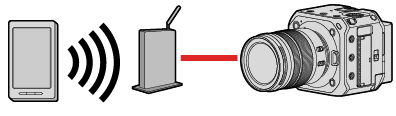
Connect the camera to the smartphone by connecting it to a wireless access point to which the smartphone is connected with a LAN cable.
Preparation:
Connect a smartphone to a wireless access point.
1Set the camera to a DHCP client.
[MENU/SET] ![]() [
[ ]
] ![]() [
[ ]
] ![]() [LAN / Wi-Fi]
[LAN / Wi-Fi] ![]() [LAN / Wi-Fi Setup]
[LAN / Wi-Fi Setup] ![]() [IP Address Setting (LAN)]
[IP Address Setting (LAN)] ![]() [DHCP Client]
[DHCP Client]
If you changed the setting of [IP Address Setting (LAN)], turn the camera off and then on again.
2Set the camera to a wired LAN connection setting.
[MENU/SET] ![]() []
[] ![]() []
[] ![]() [LAN / Wi-Fi]
[LAN / Wi-Fi] ![]() [LAN / Wi-Fi Function]
[LAN / Wi-Fi Function] ![]() [New Connection]
[New Connection] ![]() [Control With Smartphone]
[Control With Smartphone] ![]() [LAN]
[LAN]
3Insert a LAN cable to the camera’s [LAN] terminal and connect it to the wireless access point.
4On the smartphone, start up “LUMIX Sync”.
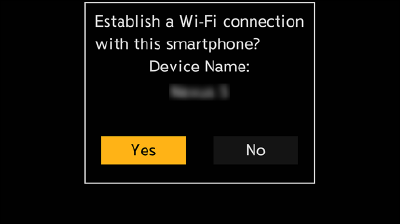
5(At the first connection)
Confirm the device name displayed on the screen of the output destination and then select [Yes].
Terminating the Wired LAN Connection
To end the connection between the camera and smartphone, follow the steps below.
 Set the camera to recording mode.
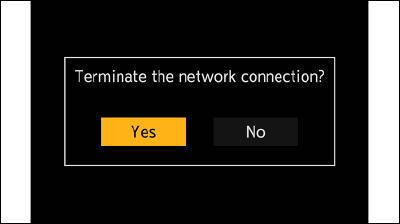
 Terminate the wired LAN connection.
[MENU/SET] ![]() []
[] ![]() []
[] ![]() [LAN / Wi-Fi]
[LAN / Wi-Fi] ![]() [LAN / Wi-Fi Function]
[LAN / Wi-Fi Function] ![]() [Yes]
[Yes]
You can also perform the same operation by pressing the Fn button assigned with [LAN / Wi-Fi]. (Fn Button Assigned with [LAN / Wi-Fi])
 On the smartphone, close the “LUMIX Sync”.