Network settings
 Direct connection via wireless LAN ([DIRECT])
Connection via wireless LAN to a wireless access point ([INFRA(SELECT)]/[INFRA(MANUAL)])
Confirming the network environment
Terminating the network connection
Direct connection via wireless LAN ([DIRECT])
The following describes the settings for direct connection of the unit to an iPhone/iPad or Android device via wireless LAN.
(Connection example)

(A) Device with wireless LAN
 Setting procedure
The unit may restart if necessary when the setting is changed.
-
Select the [NETWORK] menu
 [DEVICE SEL] [WLAN].
-
Select the [NETWORK] menu
[WLAN PROPERTY] [TYPE] [DIRECT].
-
Select the [NETWORK] menu
[WLAN IPv4 SETTING] [DHCP] [SERVER].
When the DHCP server function of this unit is not to be used, select [OFF].
-
In the [NETWORK] menu
[WLAN PROPERTY] and [WLAN IPv4 SETTING], set each item as necessary.
 Set [ENCRYPT KEY] and change from the password set at the time of purchase. (Enter a character string between 8 and 63 characters long, or a 64-digit hexadecimal number)
For details about the setting items ( Setting items for [WLAN PROPERTY] and [WLAN IPv4 SETTING] when set to [DIRECT]).
-
Select the SSID of the unit from the SSID list in the iPhone/iPad or Android terminal, and enter the password (encryption key).
Display the wireless access point list screen in wireless LAN setting, and select SSID of the unit.
Factory setting: The model number of the unit you are using is set. (For example: [HC-X2100], etc.)
When the password confirmation screen appears, enter the set password (encryption key). ([ENCRYPT KEY])
For details, refer to the operating instruction of the iPhone/iPad or Android terminal.
-
Close the menu or return to the level of the [NETWORK] menu.
-
Check the network connection.
Once connected,  is displayed on the screen of the unit.
Setting items for [WLAN PROPERTY] and [WLAN IPv4 SETTING] when set to [DIRECT]
|
[WLAN PROPERTY] |
[SSID] |
Network name of the unit (SSID) (Factory setting: The model number of the unit you are using is set. (For example: [HC-X2100], etc.)) |
|
[CHANNEL] |
Channel used (Factory setting: [AUTO]) |
|
|
[ENCRYPTION] |
[WPA2™], [WPA3™], [WPA3™/WPA2™] (Factory setting: [WPA3™/WPA2™]) |
|
|
[ENCRYPT KEY] |
WPA2/WPA3 encryption key Set a password.
– [WPA2™]: a string of 8 to 63 characters or a hexadecimal number with 64 digits – [WPA3™]: a string of 8 to 64 characters – [WPA3™/WPA2™]: a string of 8 to 63 characters |
|
|
[WLAN IPv4 SETTING] |
[DHCP] |
Setting the DHCP function
(Factory setting: [OFF]) |
|
[IP ADDRESS] |
IP address of the unit (Factory setting: [192.168.0.1]) |
|
|
[SUBNET MASK] |
Subnet mask (Factory setting: [255.255.255.0]) |
When [DIRECT] is set, the following menu settings are automatically set and cannot be changed:
– [WLAN IPv4 SETTING] ![]() [DEFAULT GATEWAY]
[DEFAULT GATEWAY]
– [WLAN IPv4 SETTING] ![]() [PRIMARY DNS]
[PRIMARY DNS]
– [WLAN IPv4 SETTING] ![]() [SECONDARY DNS]
[SECONDARY DNS]
|
|
Connection via wireless LAN to a wireless access point ([INFRA(SELECT)]/[INFRA(MANUAL)])
The following describes the settings for connecting the unit to a wireless access point via wireless LAN.
(Connection example)
![]() : Wireless LAN connection
: Wireless LAN connection
![]() : Wired LAN connection
: Wired LAN connection
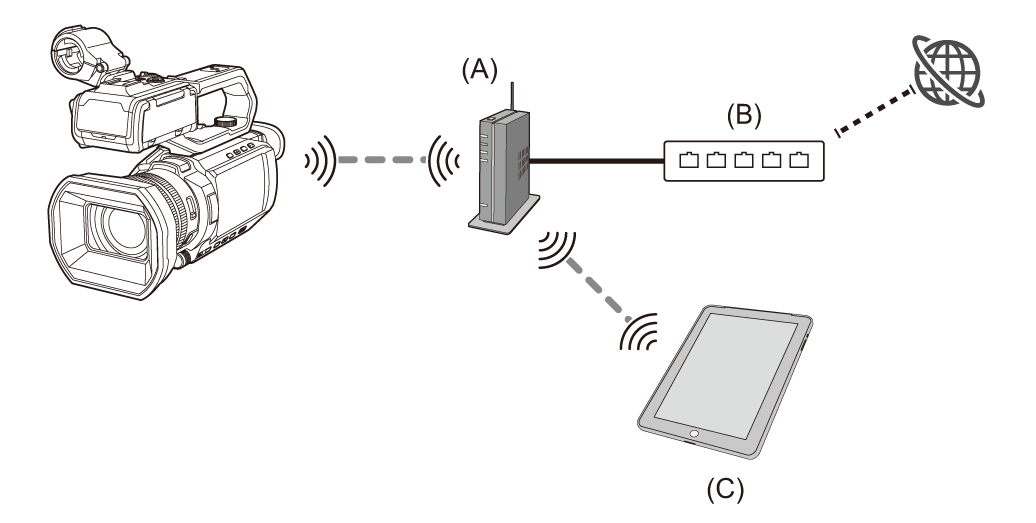
(A) Wireless access point
(B) Wired router
(C) Device with wireless LAN
It is also possible to connect a computer to the wireless access point via wireless LAN.
It is also possible to connect a computer to the wired router via wired LAN.
Setting procedure ([INFRA(SELECT)])
Select the SSID of the wireless access point and connect to the network.
-
Select the [NETWORK] menu
[DEVICE SEL] [WLAN].
-
Select the [NETWORK] menu
[WLAN PROPERTY] [TYPE] [INFRA(SELECT)].
-
Select the [NETWORK] menu
[WLAN IPv4 SETTING] [DHCP] [CLIENT].
When the wireless access point DHCP function is not to be used, select [OFF].
-
Select the [NETWORK] menu
[WLAN PROPERTY] and [WLAN IPv4 SETTING] and set each item as required.
For details about the setting items (Setting items for [WLAN PROPERTY] and [WLAN IPv4 SETTING] when set to either [INFRA(SELECT)] or [INFRA(MANUAL)]).
-
Select the SSID of the wireless access point found with [NETWORK] menu
[WLAN PROPERTY] [SSID].
-
Enter the password in the [ENCRYPT KEY] settings screen and select [Enter].
-
Close the menu or return to the level of the [NETWORK] menu.
-
Check the network connection.
Once connected, is displayed on the screen of the unit.
Setting procedure ([INFRA(MANUAL)])
Manually enter the SSID of the wireless access point and connect to the network.
-
Select the [NETWORK] menu
[DEVICE SEL] [WLAN].
-
Select the [NETWORK] menu
[WLAN PROPERTY] [TYPE] [INFRA(MANUAL)].
-
Select the [NETWORK] menu
[WLAN PROPERTY] and [WLAN IPv4 SETTING] and set each item as required.
For details about the setting items (Setting items for [WLAN PROPERTY] and [WLAN IPv4 SETTING] when set to either [INFRA(SELECT)] or [INFRA(MANUAL)]).
-
In [NETWORK] menu
[WLAN PROPERTY] [SSID], enter the SSID of the wireless access point being connected to.
-
Enter the password in the [ENCRYPT KEY] settings screen and select [Enter].
-
Close the menu or return to the level of the [NETWORK] menu.
-
Check the network connection.
Once connected, is displayed on the screen of the unit.
Setting items for [WLAN PROPERTY] and [WLAN IPv4 SETTING] when set to either [INFRA(SELECT)] or [INFRA(MANUAL)]
|
[WLAN PROPERTY] |
[ENCRYPTION] |
[WPA2™], [WPA3™], [WPA3™/WPA2™] (Factory setting: [WPA3™/WPA2™]) |
|
[ENCRYPT KEY] |
WPA2/WPA3 encryption key |
|
|
[WLAN IPv4 SETTING] |
[DHCP] |
Setting the DHCP function
(Factory setting: [OFF]) |
|
[IP ADDRESS] |
IP address of the unit (Factory setting: [192.168.0.1]) |
|
|
[SUBNET MASK] |
Subnet mask (Factory setting: [255.255.255.0]) |
|
|
[DEFAULT GATEWAY] |
Default gateway (Factory setting: [192.168.0.254]) |
|
|
[PRIMARY DNS] |
Primary DNS server setting (Factory setting: [0.0.0.0]) |
|
|
[SECONDARY DNS] |
Secondary DNS server setting (Factory setting: [0.0.0.0]) |
|
For details of the network status, confirm by selecting the [NETWORK] menu
For details, contact the network administrator.
However, DNS cannot be disabled when [DHCP] is set to [CLIENT].
|
Wired LAN settings [X2100]
These are the settings when using a wired LAN.
A USB ethernet adaptor (commercially available) that supports USB Type-C is required.
(Connection example)
![]() : Wireless LAN connection
: Wireless LAN connection
![]() : Wired LAN connection
: Wired LAN connection
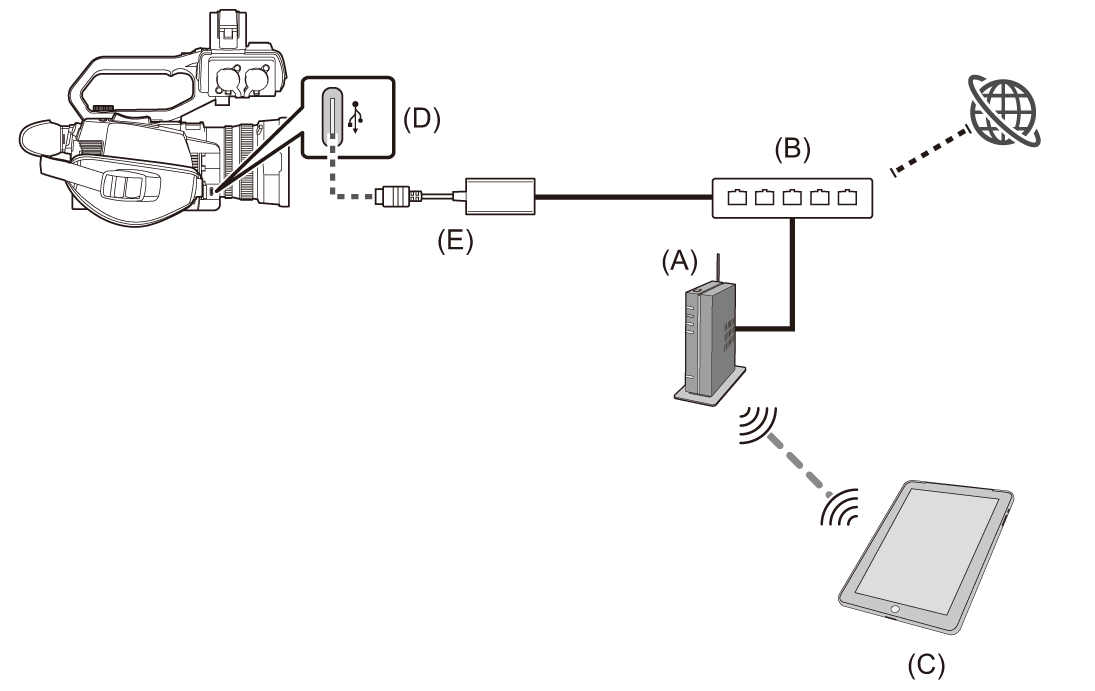
(A) Wireless access point
(B) Wired router
(C) Device with wireless LAN
(D) USB terminal
(E) USB ethernet adaptor (commercially-available)
It is also possible to connect a computer to the wireless access point via wireless LAN.
It is also possible to connect a computer to the wired router via wired LAN.
Setting procedure
-
Connect a USB ethernet adaptor (commercially available) to the USB terminal on this unit.
-
Connect a LAN cable (commercially available) to the USB ethernet adaptor (commercially available) and the wired LAN compatible device.
-
Select the [NETWORK] menu
[DEVICE SEL] [USB-LAN].
-
In [NETWORK] menu
[USB-LAN IPv4 SETTING], set each item as required.
For details about the setting items (Setting items for [USB-LAN IPv4 SETTING] when set to [USB-LAN])
-
Close the menu or return to the level of the [NETWORK] menu.
-
Configure the settings of the wired LAN on your device such as a computer.
For more information, refer to the operating instructions or help for the connection device.
Setting items for [USB-LAN IPv4 SETTING] when set to [USB-LAN]
|
[USB-LAN IPv4 SETTING] |
[DHCP] |
Setting the DHCP function
(Factory setting: [OFF]) |
|
[IP ADDRESS] |
IP address of the unit (Factory setting: [192.168.0.1]) |
|
|
[SUBNET MASK] |
Subnet mask (Factory setting: [255.255.255.0]) |
|
|
[DEFAULT GATEWAY] |
Default gateway (Factory setting: [192.168.0.254]) |
|
|
[PRIMARY DNS] |
Primary DNS server setting (Factory setting: [0.0.0.0]) |
|
|
[SECONDARY DNS] |
Secondary DNS server setting (Factory setting: [0.0.0.0]) |
|
For details, contact the network administrator.
However, DNS cannot be disabled when [DHCP] is set to [CLIENT].
|
USB tethering setting [X2100]
These are the settings when using USB tethering.
What is USB tethering?
USB tethering is a function that enables sharing of the Internet connection of a mobile device (smartphone, tablet, etc.) that is connected with a USB cable with a camera.
(Connection example)
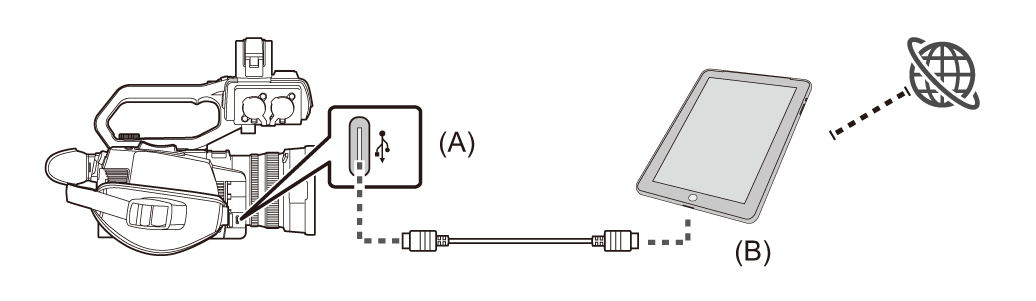
(A) USB terminal
(B) USB tethering device
Setting procedure
-
Connect a USB cable (commercially available) to the USB terminal on this unit and the terminal to be used for USB tethering (iPhone/iPad or Android terminal).
Push the cable in firmly all the way.
-
Select the [NETWORK] menu
[DEVICE SEL] [USB TETHERING].
-
Enable USB tethering (Internet sharing) in the setting screen for network on the USB tethering device connected to the camera.
Allow access of the connected device if an alert to confirm permission is displayed on the USB tethering device. Connection will not be complete until permission is given.
-
Close the menu or return to the level of the [NETWORK] menu.
-
Check the network connection.
Once connected,  is displayed on the screen of the unit.
|
|
Confirming the network status
The network status of the unit can be checked by performing the following operation.
-
Select the [NETWORK] menu
[INFORMATION] [STATUS].
Confirming the network environment
-
Select the [NETWORK] menu
[UTILITY] [NET CHECKER].
-
Touch the [
 ]/[
]/[ ] as necessary to confirm the results.
|
|
 ].
].Saving the check results
Check results can be saved to a SD card as necessary.
-
Select [SAVE] when the check results are displayed.
A confirmation screen is displayed.
-
Select [SET].
The file is saved.
|
¥PRIVATE¥MEIGROUP¥PAVCN¥SBG¥P2SD¥netchk.txt |
Terminating the network connection
-
Select the [NETWORK] menu
[DEVICE SEL] [OFF].