Remote operation function
Some of the functions can be remotely operated by connecting the unit with iPhone/iPad or Android terminal with the HC ROP app installed.
Step 1: Making network settings to suit the connection method
When using ![]() , you can use wired LAN and USB tethering.
, you can use wired LAN and USB tethering.
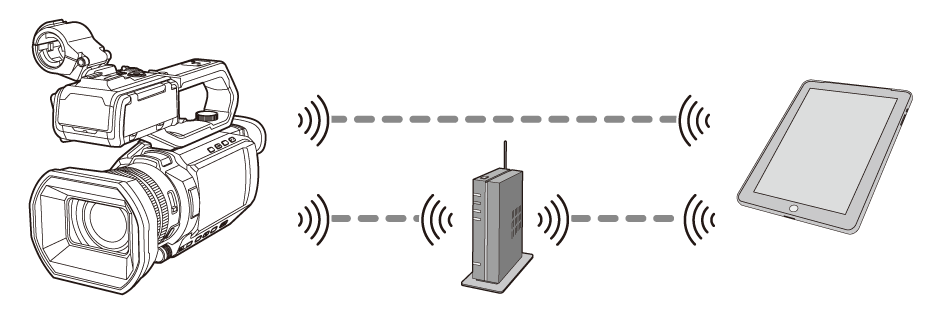
 Direct connection via wireless LAN ([DIRECT])
Connection via wireless LAN to a wireless access point ([INFRA(SELECT)]/[INFRA(MANUAL)])

-
Use the network of the connected device (iPhone/iPad/Android). The following menu settings are not required on this unit:
– [WLAN PROPERTY]
– [WLAN IPv4 SETTING]
|
Connect this unit and the iPhone/iPad or Android device to the same wireless access point. Refer to the operating instructions for your device for instructions on how to connect the wireless access point and iPhone/iPad or Android device. |
Step 2: Setting the user account and password for entry into the HC ROP app.
-
Select the [NETWORK] menu
 [IP REMOTE] [USER ACCOUNT].
-
Enter the user account name and select [Enter].
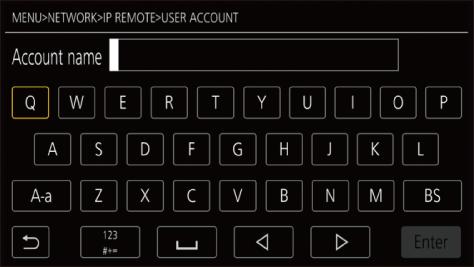
Enter the user account name with 31 characters or less.
-
Enter the password and select [Enter].
Enter a password between 8 characters and 15 characters.
 To enter a character
Operation is the same as entering with a keyboard.
|
Icon |
Description of operation |
|
[A-a] |
Switches between upper case and lower case. (Displayed during the text entry mode) |
|
[@-#] |
Switches the type of the symbols. (Displayed during the symbol entry mode) |
|
[ |
Returns to the previous screen. Entered character is not reflected. |
|
|
Switches the character to symbol/number. |
|
|
Enters space (blank). |
|
[BS] |
Deletes the character. Previous character is deleted when the cursor position is empty. |
|
|
Moves the cursor to right or left. |
|
[Enter] |
Completes the character entry. |


 /
/
Step 3: Enabling the IP remote function
-
Select the [NETWORK] menu
[IP REMOTE] [ENABLE/DISABLE] [ENABLE].
Step 4: Setting the standby port number
Depending on the environment, set the port number for standby if required.
-
Set the port number in the [NETWORK] menu
[IP REMOTE] [HC ROP PORT].
|
|
Step 5: Installing the HC ROP app
For iPhone/iPad
Download the HC ROP app from the App Store.
For Android terminal
Download the HC ROP app from the Google Play Store.
|
|
Step 6: Connecting to the unit using the HC ROP app
-
Make the Wi-Fi settings on the iPhone/iPad or Android device on which the HC ROP app is installed.
-
When connected with “Direct connection via wireless LAN [DIRECT]”
In the Wi-Fi settings screen of the iPhone/iPad or Android device, select the SSID for this unit that was set in [NETWORK] menu ![]() [WLAN PROPERTY]
[WLAN PROPERTY] ![]() [SSID]. (Display example: “HC-X2100”)
[SSID]. (Display example: “HC-X2100”)
After selecting the SSID, enter the Wi-Fi password that was set in [NETWORK] menu ![]() [WLAN PROPERTY]
[WLAN PROPERTY] ![]() [ENCRYPT KEY].
[ENCRYPT KEY].
-
When connected with “Connection via wireless LAN to a wireless access point ([INFRA(SELECT)]/[INFRA(MANUAL)])”
In the Wi-Fi settings screen on the iPhone/iPad or Android device, connect to the wireless access point that is connected via a network with this unit.
-
When connected with “Wired LAN”
In the Wi-Fi settings screen on the iPhone/iPad or Android device, connect to the wireless access point that is connected via a network through a wired router with this unit.
-
When connected with “USB tethering”
Set USB tethering to ON on the iPhone/iPad or Android device.
-
Open the HC ROP app on the iPhone/iPad or Android device and connect to this unit.
You will need to enter the IP address, port number, user ID, and password. Refer to Steps 2 to 4.
You can view the IP address in [NETWORK] menu ![]() [INFORMATION]
[INFORMATION] ![]() [STATUS].
[STATUS].
|
|
Operation while the HC ROP app is connected
Operation of the unit that is connected
The <THUMBNAIL> button cannot be used.
Recording and playback operation while connected
Recording can be operated by either the unit or the HC ROP app.
Playback operation is not possible.
|
|
To check or delete a user account
-
Select the [NETWORK] menu
[IP REMOTE] [ACCOUNT LIST].
The list of registered user accounts is displayed.
Proceed to Step 4 to only check user accounts.
-
Select the user account to be deleted.
-
When the confirmation message is displayed, select [SET].
-
Select [
 ] and end the operation.