Basic operation of the menu
The setting of the unit can be changed with the menu in accordance to the shooting scene or recording contents.
Set data is written and saved in the main unit memory.
There are 2 methods of operation: a method to operate with the multidial, or a method to touch the LCD monitor.

Configuration of the menu
[THUMBNAIL] menu:
Performs confirmation or deleting of the recording clip.
This menu can be set when the thumbnail screen is displayed.
[CAMERA] menu:
Sets the basic functions of the camera.
This menu cannot be set when the thumbnail screen is displayed.
[SCENE FILE] menu:
Sets the setting regarding scene file.
This menu sets the detailed image quality adjustment of the camera video. Also, selection of the scene file, writing the scene file data to the main unit memory, and loading from the main unit memory can be performed.
This menu cannot be set when the thumbnail screen is displayed.
[AUDIO] menu:
Sets the input/output function of audio.
[VIDEO OUT/LCD/VF] menu:
Configures the settings for the external output, the information to display in the LCD monitor or viewfinder and the output format.
[RECORDING] menu:
Sets the various items in the recording function.
[NETWORK] menu:
Sets the setting regarding the network function.
[SYSTEM] menu:
Configures the settings regarding the recording format of video and audio.
[OTHERS] menu:
Configures the settings for writing/loading/initializing user files to the internal memory, and the basic unit settings.
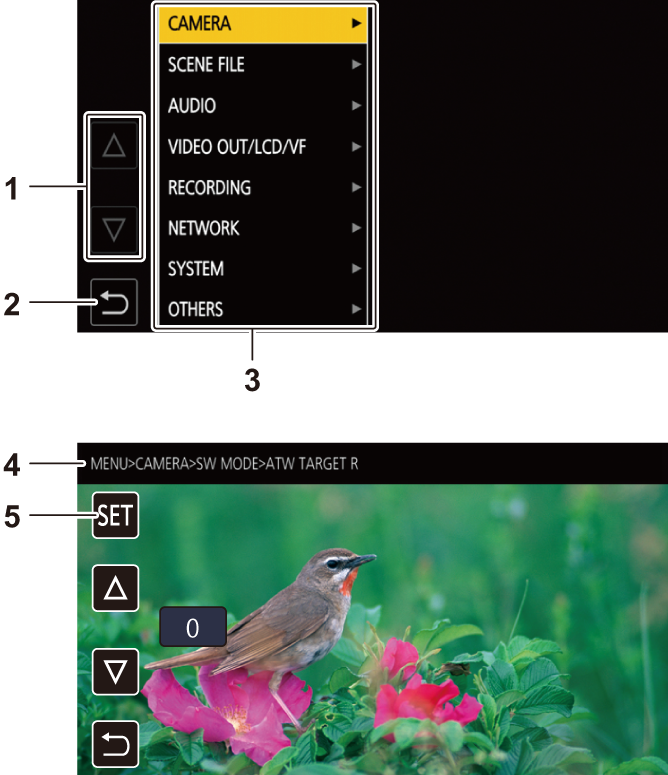
Displaying the menu
Displays the menu, and select the menu or item to set.
-
Press the <MENU> button.
The menu is displayed.
-
[
 ]/[
]/[ ]
]
Switches the page or changes the value when selected.
These button icons are not available if they cannot be changed.
-
[
 ]
]
Returns to one level higher from the current menu when selected.
-
Menu
Moves to one level lower from the current menu, or to the setting screen when selected.
-
Level display
Displays the path of the menu to the currently displayed screen.
-
[SET]
Confirms the set value when selected.
|
|
Operating the menu
Various settings are possible from the menu.
There are 2 methods of operation: a method to operate with the multidial, or a method to touch the LCD monitor.
 When operating with the multidial
Operate the multidial on the main unit by turning it in vertical direction or pushing it.
-
Press the <MENU> button.
The menu is displayed.
-
Select the menu to set.
-
Turn the multidial to move the cursor to the menu to set.
-
Press the multidial.
The lower level menu is displayed.
 The confirmation screen is displayed depending on the menu.
Perform the similar operation if there is next level.
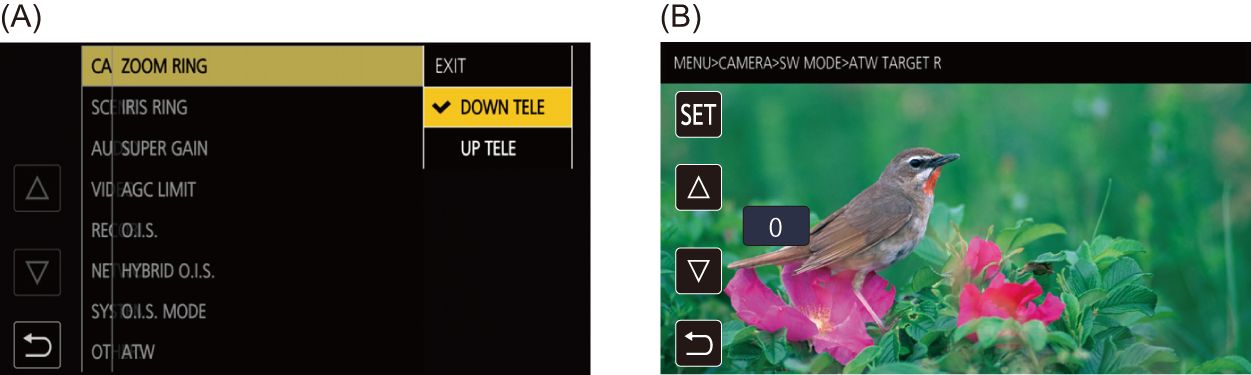
In some menus, a screen to set the numeric value is displayed in the camera image screen. (B)
In some menus, a message is displayed if a menu cannot be executed.
Press the <EXIT> button to return to one level higher.
-
Select the item to set.
-
Turn the multidial to move the cursor to the item to set.
-
Press the multidial.
A check mark is displayed at the left of the set item. (A)
Press the <EXIT> button to return to one level higher.
-
Press the <MENU> button to close the menu.
Depending on the operating item, it will automatically return to the previous screen.
|
|
When operating by touching the LCD monitor
Operate by touching the LCD monitor.
-
Press the <MENU> button.
The menu is displayed.
-
Select the menu to set.
The lower level menu is displayed.
The confirmation screen is displayed depending on the menu.
Perform the similar operation if there is next level.
In some menus, a screen to set the numeric value is displayed in the camera image screen. (B)
To change the numeric value, touch []/[] and change the setting value.
In some menus, a message is displayed if a menu cannot be executed.
Touch []/[] to switch the pages.
The button icons cannot be touched if there are no more pages.
To return to one level higher, touch [].
-
Select the item to set.
Touch the item to set. A check mark is displayed at the left of the set item. (A)
To return to one level higher, touch [].
-
Exit from the menu by touching [
], or pressing the <MENU> button.
Depending on the operating item, it will automatically return to the previous screen.
|
|
Initializing the menu
The menu can be returned to the factory setting condition.
-
Select the [OTHERS] menu
 [MENU INITIALIZE].
-
Select [SET] when the confirmation message is displayed.
The setting value of the menu is returned to the factory setting.