Power supply
A battery or the supplied AC adaptor can be used as the power supply for the unit.
 The unit is compatible to following batteries. (As of August 2022)
– AG-VBR59 (supplied/optional, supports quick charging)
– AG-VBR89/AG-VBR118 (optional, supports quick charging)
Use the supplied AC adaptor. Do not use the AC adaptor of another device.
The supplied AC cable is dedicated for this unit. Do not use with any other device. Also, do not use AC cable from other device on this unit.
|
It has been found that counterfeit battery packs which look very similar to the genuine product are made available to purchase in some markets. Some of these battery packs are not adequately protected with internal protection to meet the requirements of appropriate safety standards. There is a possibility that these battery packs may lead to fire or explosion. Please be advised that we are not liable for any accident or failure occurring as a result of use of a counterfeit battery pack. To ensure that safe products are used we would recommend that a genuine Panasonic battery pack is used. |
 Attaching and removing the battery
Standard charging time and recordable time
Charging the battery
The battery is not charged at the time of purchase. Use only after charging sufficiently.
It is recommended that you have one extra battery.
It is recommended to perform charging of the battery in a location with ambient temperature of 10 °C to 30 °C (50 °F to 86 °F) (same for the battery temperature).
 About the Battery Charger
This unit can charge two battery packs simultaneously and supports quick charging batteries.
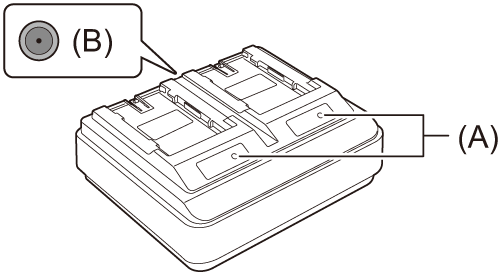
(A) CHARGE indicators <CHARGE1/CHARGE2>
Indicate the charge status as follows.
|
Indicator |
Charge status |
|
Lit green |
Quick charging is in progress. |
|
Lit orange |
Normal charging is in progress. |
|
Blinking orange |
Charging has stopped due to an error. |
|
Off |
Charging is complete, or a battery pack is not inserted. |
(B) DC IN 12 V connector <![]() >
>
Connects to the DC plug of the AC adaptor.
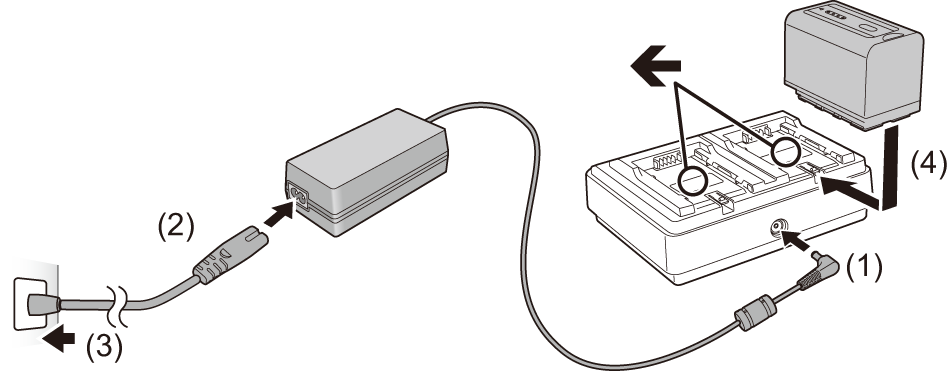
Charging the battery
-
Connect the DC plug of the AC adaptor to the DC IN 12 V connector of battery charger.
-
Connect the AC mains lead to the AC adaptor.
Perform step (2) first, and then step (3). Insert the AC mains lead all the way in until it stops.
-
Insert the battery into the battery charger.
Slide the battery horizontally into the battery charger along the “![]() ” mark.
” mark.
The corresponding CHARGE indicator lights and charging starts.
The CHARGE indicator turns off when charging is complete. Slide the battery to remove it.
|
Also, depending on the charging status of the battery, the indicator on the battery that is mounted on the <CHARGE2> side may turn off.
|
Attaching and removing the battery
-
Install the battery by inserting it in the direction shown in the figure.
Insert the battery until it clicks and locks.
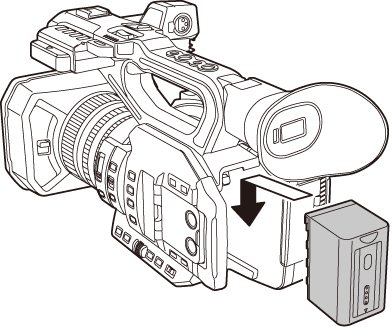
Removing the battery
Make sure that the power switch is set to <OFF> and the status indicator is turned off, and then remove by holding onto it taking care not to drop. ( Turning the unit on/off)
While pressing the battery release button (A), remove the battery.

Standard charging time and recordable time
|
Battery parts number |
[FREQUENCY] |
Continuous recordable time |
|
|
|
|
||
|
AG-VBR59 (supplied/optional) |
[59.94Hz] |
Approx. 3 h 50 min |
Approx. 4 h 25 min |
|
[50.00Hz] |
Approx. 4 h |
Approx. 4 h 40 min |
|
|
AG-VBR89 (optional) |
[59.94Hz] |
Approx. 5 h 45 min |
Approx. 6 h 35 min |
|
[50.00Hz] |
Approx. 6 h |
Approx. 7 h |
|
|
AG-VBR118 (optional) |
[59.94Hz] |
Approx. 7 h 40 min |
Approx. 8 h 50 min |
|
[50.00Hz] |
Approx. 8 h 5 min |
Approx. 9 h 20 min |
|
“h” is an abbreviation for hour and “min” for minute.
The charging time is the time when the operating ambient temperature is 25 °C (77 °F) and operating relative humidity is 60 %. At other temperature and humidity the charging time may take longer.
Continuous recordable time is the time when the unit is used fulfilling all of the following conditions. If you use the unit in other conditions, continuous recordable time will shorten.
– When set to the factory default menu settings ([FILE FORMAT] is [MOV] and [REC FORMAT] is [2160-59.94p/HEVC LongGOP 200M]/[2160-50.00p/HEVC LongGOP 200M])
– When the LCD monitor is used and cable is not connected to the external input/output terminal
The charging time is the time to charge when the charging capacity of the battery is used up. The charging time or the continuous recordable time differs depending on the use condition such as high or low temperature.
|
|
Checking the remaining battery level
The remaining battery level can be checked with the power status display on the LCD monitor or the indicator on the supplied battery.
Checking the remaining battery level with the LCD monitor
The battery status display will change as 
![]()

![]()

![]()

![]()

![]()
 while the remaining battery level gets lower. It will flash in red when the remaining battery level is zero.
|
|
Checking the remaining battery level with the battery
The remaining battery level can be checked with the indicator display by pressing the <CHECK> button on the battery when it is not charging.
– The remaining battery level is a rough indication.
– The indicator will not illuminate even if the <CHECK> button is pressed when the remaining battery level is zero. Charge the battery.
The progress of the charging is notified by the flashing position of the indicator while the battery is charging.
Once the charging is completed, the indicator turns off.
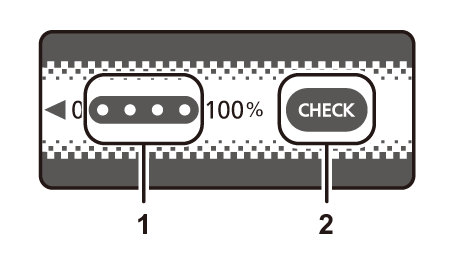
-
Indicator
-
<CHECK> button
Display of the indicator
The color and illuminate/flashing status of the indicator indicated by the icon in the table are as follows.
–  : Flashing in green
–  : Illuminated in green
–  : Off
: Off
|
Indicator display |
Remaining battery level/charging progress |
|
|
When checking the remaining battery level |
Charging |
|
|
|
|
0 % to 25 % |
|
|
|
25 % to 50 % |
|
|
|
50 % to 75 % |
|
|
|
75 % to 100 % |


Display of the indicator is a rough indication. If the battery is attached to the unit or the battery charger, check the remaining level on the device the battery is attached to. The remaining level may differ from the one displayed with the indicator on the battery.
Connecting to the AC outlet
It is possible to use this unit with power supplied from the AC outlet by turning on the unit with the AC adaptor connected.
-
Connect the AC cable to the AC adaptor and the AC outlet.
Insert the plugs as far as they will go.
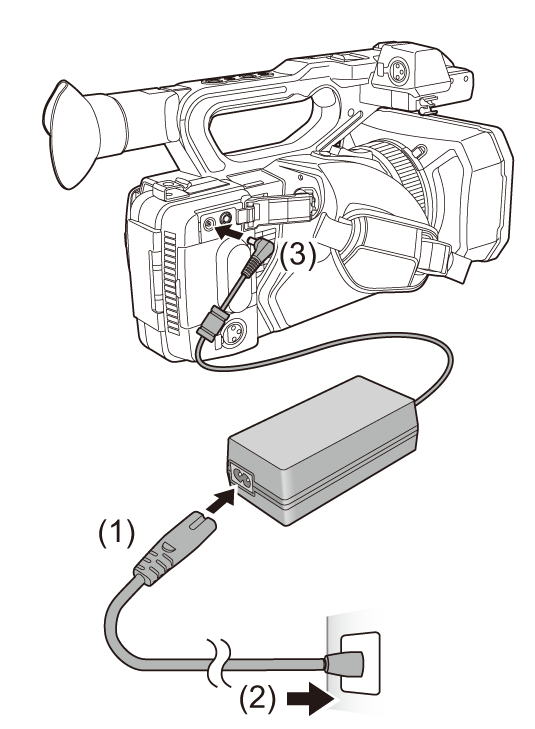
-
Connect the AC adaptor to the <DC IN 12V> terminal.
|
|