[LUT Library]
![]()
![]()
![]()
![]()
![]()
![]()
![]()
![]()
Register LUT files to the camera to use with Photo Style and LUT View Assist.
Using the “Panasonic LUMIX Lab” smartphone app, you can register LUT files on the smartphone in the [LUT Library] on the camera. ( LUT Library Operations)
|
– The “.vlt” format, which meets the requirements specified in the “VARICAM 3DLUT REFERENCE MANUAL Rev.1.0” – The “.cube” format
(Use alphanumeric characters for the file name) FAT32 (SD memory card/SDHC memory card): Up to 8 characters (excluding extension). exFAT (SDXC memory card): Up to 255 characters (including extension).
|
-
Insert a card on which a LUT file is saved into the camera.
-
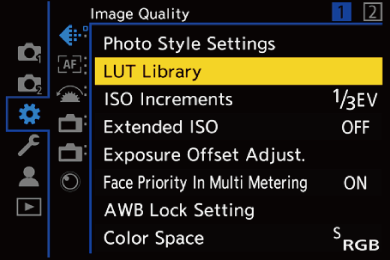
Select [LUT Library].


![]() [
[![]() ]
] ![]() [
[![]() ]
] ![]() [LUT Library]
[LUT Library]
-
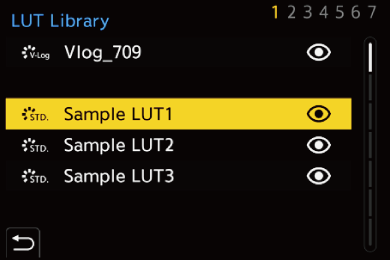
Select the registration destination.
Press 
 to select, and then press .
If you select a registered item, the LUT file will be registered by overwriting.
-
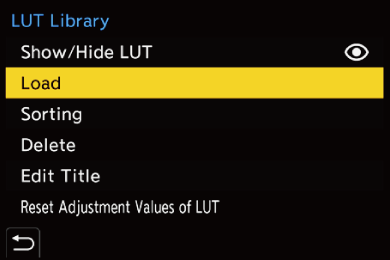
Select [Load].
Press to select, and then press .
When you select [Show/Hide LUT], you can set whether to show LUT files in the LUT selection screen.
You can change the display order of LUT files by selecting [Sorting].
The registered LUT file is deleted when you select [Delete].
You can change the registered name of LUT files by selecting [Edit Title].
When you select [Reset Adjustment Values of LUT], the image quality adjustment values changed on the camera are reset.
-
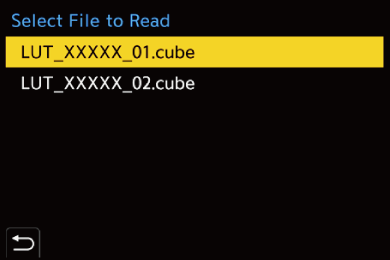
Select the LUT file to load.
Press to select, and then press .
|
It is also not possible to hide [Vlog_709] with [Show/Hide LUT].
|
Base Photo Style of LUT files
With Real Time LUT, the Photo Style information (base Photo Style) set in the LUT file is recognized to determine the Photo Style.
You can add the base Photo Style information to the LUT files (“.cube” format only) you create yourself. Open the LUT file with a text editor and insert the Photo Style information under the title line.
 You can also add information about image quality adjustments to the LUT file.
If there is a feature for selecting the character code in the text editor, select UTF-8.
For example: LUT file (“.cube” format)
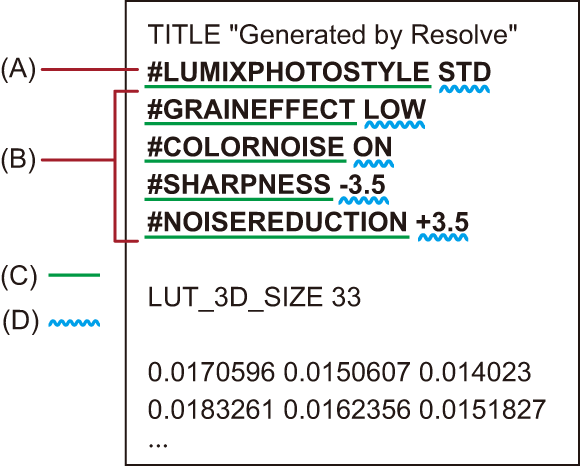
(A) Photo Style information
(B) Image quality adjustment information
(C) Identifier tag
(D) Setting value
A half-width space is required between the identifier tag and the setting value.
If the Photo Style information is absent or if it is not set correctly, [V-Log] is used as the base Photo Style. (However, when [HEIF Format] is set to [HDR(HLG)], the base Photo Style will become [Standard(HLG)].)
Image quality adjustment information cannot be loaded if there is no Photo Style information.
List of Photo Style Information
#LUMIXPHOTOSTYLE STD: [Standard]
#LUMIXPHOTOSTYLE STDHLG: [Standard(HLG)]
#LUMIXPHOTOSTYLE VIVD: [Vivid]
#LUMIXPHOTOSTYLE NAT: [Natural]
#LUMIXPHOTOSTYLE LCLAS: [L.Classic]
#LUMIXPHOTOSTYLE LCLASN: [L.ClassicNeo]
#LUMIXPHOTOSTYLE LCLASG: [L.ClassicGold]
#LUMIXPHOTOSTYLE FLAT: [Flat]
#LUMIXPHOTOSTYLE LAND: [Landscape]
#LUMIXPHOTOSTYLE PORT: [Portrait]
#LUMIXPHOTOSTYLE MONO: [Monochrome]
#LUMIXPHOTOSTYLE MONOHLG: [Monochrome(HLG)]
#LUMIXPHOTOSTYLE LMONO: [L.Monochrome]
#LUMIXPHOTOSTYLE LMONOD: [L.Monochrome D]
#LUMIXPHOTOSTYLE LMONOS: [L.Monochrome S]
#LUMIXPHOTOSTYLE LEICAMONO: [LEICA Monochrome]
#LUMIXPHOTOSTYLE CNEA2: [Cinelike A2]
#LUMIXPHOTOSTYLE CNED2: [Cinelike D2]
#LUMIXPHOTOSTYLE CNEV2: [Cinelike V2]
#LUMIXPHOTOSTYLE 709L: [Like709]
#LUMIXPHOTOSTYLE VLOG: [V-Log]
#LUMIXPHOTOSTYLE HLG: [HLG]
The image quality adjustment information and setting values that can be set
Below describes the identifier tags and setting values you can add to image quality adjustment information.
The setting values that can be included are ones that are recognizable by both the camera and LUMIX Lab, and these are detected when the LUT file is loaded.
When a LUT file with LUMIX Lab setting values included is loaded onto the camera, the setting values of the camera are loaded according to the chart below.
(A) Base Photo Style is other than [V-Log]
(B) Base Photo Style is [V-Log]
[Color Noise] is not applied if the base Photo Style is the following:
– [Monochrome]/[Monochrome(HLG)]/[L.Monochrome]/[L.Monochrome D]/[L.Monochrome S]/[LEICA Monochrome]