- 5. Recording settings
- Focus / Zoom
- Selecting the AF Mode
Select the focusing method to match the position and number of subjects.
1Select [AF Mode].
[MENU/SET] ![]() [
[ ]
] ![]() [
[ ]
] ![]() [AF Mode]
[AF Mode]

2Select the AF mode.
Rotate ![]() .
.

![]() [Human Detect AF] /
[Human Detect AF] / ![]() [Human/Animal Detect AF] ([Human Detect AF]/[Human/Animal Detect AF])
[Human/Animal Detect AF] ([Human Detect AF]/[Human/Animal Detect AF])
![]() [Tracking] ([Tracking])
[Tracking] ([Tracking])
![]() [225-Area] ([225-Area])
[225-Area] ([225-Area])
![]() [Zone (Oval)] ([Zone (Oval)])
[Zone (Oval)] ([Zone (Oval)])
![]() [1-Area] /
[1-Area] / ![]() [1-Area(Human Detection)] /
[1-Area(Human Detection)] / ![]() [1-Area(Human/Animal Detect)] ([1-Area])
[1-Area(Human/Animal Detect)] ([1-Area])
3Confirm your selection.
Press [MENU/SET].
[Human Detect AF]/[Human/Animal Detect AF]
The camera detects a person’s face, eyes, and body (entire body, upper half of the body, or head) and adjusts the focus. With animal detection enabled, the camera will also detect animals, such as birds, canines (including wolves), and felines (including lions).
When the camera detects a person’s face ( /
/  ) or body or an animal’s body (
 )*1, an AF area is displayed.
*1When the animal detection is enabled.

|
Yellow |
AF area to be brought into focus. The camera selects this automatically. |
|
White |
Displayed when multiple subjects are detected. |
Eye detection works only for the eyes inside the yellow frame .
Enable / Disable Animal Detection
 Display the AF mode selection screen.
[MENU/SET] ![]() []
[] ![]() []
[] ![]() [AF Mode]
[AF Mode]
 Select [
![]() ] and then press
] and then press  .
.
This enables animal detection, and the icon changes to [![]() ].
].
Press again to disable animal detection.
Move and Change the Size of the Yellow AF Area
You can move the yellow AF area to the position of the white AF area and replace the white AF area with the yellow AF area. If moving to a position outside an AF area, then the [![]() ] AF area will be set.
] AF area will be set.
Display the AF mode selection screen.
[MENU/SET] ![]() []
[] ![]() []
[] ![]() [AF Mode]
[AF Mode]
Select [![]() ] / [
] / [![]() ] and then press
] and then press  .
.
 Press
Press  to move the position of the AF area.
 Rotate
 ![]() to change the size of the AF area.
to change the size of the AF area.
The first press of [Fn1] returns the AF area position to the center. The second press returns the size of the AF area to the default.
 Press [MENU/SET].
On the recording screen, press [MENU/SET] to cancel the AF area setting.
The AF area follows the movement of the subject, maintaining focusing.
Start tracking.
Aim the AF area over the subject, and press [Fn1].
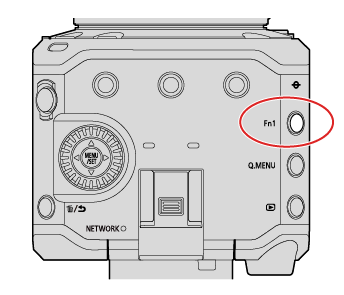
![]()
To release AF Tracking → Press [Fn1] again.
Move the Position of the AF Area
Display the AF mode selection screen.
[MENU/SET] ![]() []
[] ![]() []
[] ![]() [AF Mode]
[AF Mode]
Select [![]() ] and then press .
] and then press .
Press to move the position of the AF area.
To return the position back to the center, press [Fn1].
Press [MENU/SET].
The camera selects the most optimal AF area to focus from 225 areas.

Within the 225 AF areas, a central oval zone can be focused.
Move and Change the Size of the AF Area
Display the AF mode selection screen.
[MENU/SET] ![]() []
[] ![]() []
[] ![]() [AF Mode]
[AF Mode]
Select [![]() ] and then press .
] and then press .
Press to move the position of the AF area.

Rotate ![]() to change the size of the AF area.
to change the size of the AF area.
The first press of [Fn1] returns the AF area position to the center. The second press returns the size of the AF area to the default.
Press [MENU/SET].
Specify the point to be brought into focus.

Switching of Automatic Detection
Automatic detection is now available in the [1-Area] AF modes.
When a part of a human or animal enters the [1-Area] AF area, the automatic detection AF area is indicated in yellow. Eye detection works when a person’s face is inside the AF area.
Display the AF mode selection screen.
[MENU/SET] ![]() []
[] ![]() []
[] ![]() [AF Mode]
[AF Mode]
Select [![]() ] and then press .
] and then press .
Each press of switches automatic detection.

Automatic detection: OFF (![]() )
)
[Human Detect AF]: ON (![]() )
)
[Human/Animal Detect AF]: ON (![]() )
)
Only 1 human or animal can be automatically detected in the AF area.
Move and Change the Size of the AF Area
Display the AF mode selection screen.
[MENU/SET] ![]() []
[] ![]() []
[] ![]() [AF Mode]
[AF Mode]
Select [![]() ] / [
] / [![]() ] / [
] / [![]() ] and then press .
] and then press .
Press to move the position of the AF area.
Rotate ![]() to change the size of the AF area.
to change the size of the AF area.
The first press of [Fn1] returns the AF area position to the center. The second press returns the size of the AF area to the default.

Press [MENU/SET].