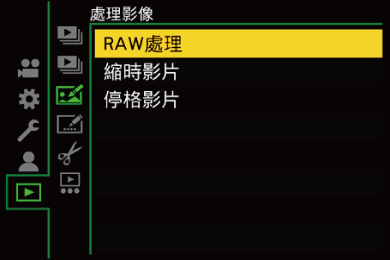
[RAW處理]
處理相機上以RAW格式拍攝的圖片,並另存為JPEG格式。
-
選擇[RAW處理]。


![]() [
[![]() ]
] ![]() [
[![]() ]
] ![]() [RAW處理]
[RAW處理]
-
選擇RAW影像。
按
 選擇影像,然後按或
 。
。
 選擇群組影像時,按
 ,然後選擇群組中的影像。
再次按會返回到標準選擇畫面。
拍攝時的設定會反映在顯示影像上。
-
選擇設定項目。
按 選擇項目,然後按或。
-
改變設定。
轉動 、
、 或
或 。
。
可以經由拉開/捏攏畫面來放大/縮小影像。
-
確認設定。
按或。
將重新顯示步驟3的畫面。
要設定其他項目,請重複步驟3至5。
-
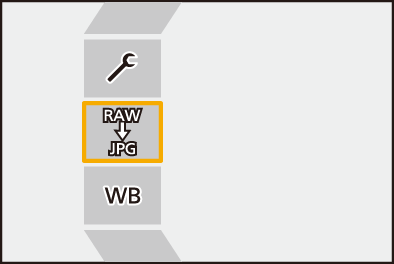
儲存影像。
按選擇[開始處理],然後按或。
 設定項目([RAW處理])
[開始處理]
儲存影像。
![]() [白平衡]
[白平衡]
選擇並調整白平衡。
選擇帶[![]() ]的項目,可以以拍攝時的相同設定處理。
]的項目,可以以拍攝時的相同設定處理。
如果在[白平衡]選擇畫面中按,將顯示白平衡調整畫面。( 調整白平衡)
如果在選擇[![]() ]至[
]至[![]() ]時按,將顯示色溫設定畫面。(色溫設定)
]時按,將顯示色溫設定畫面。(色溫設定)
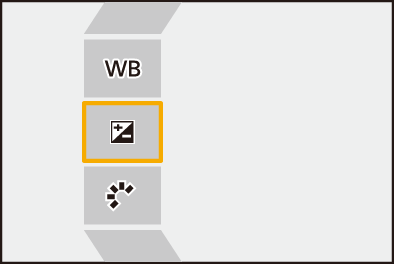
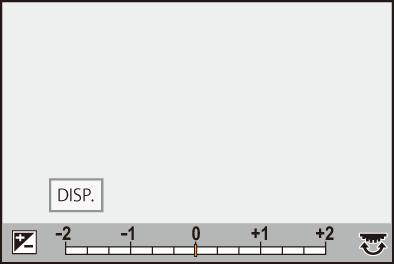
![]() [亮度校正]
[亮度校正]
校正亮度。
[亮度校正]效果與拍攝時曝光補償的效果不同。
![]() [照片樣式]([照片樣式])
[照片樣式]([照片樣式])
選擇照片樣式。
如果在選擇[Like709]時按[Q],將顯示膝點設定畫面。(在控制過曝(膝點)下拍攝)
無法為[V-Log]拍攝的影像選擇照片樣式。無法為不是用[V-Log]拍攝的影像選擇[V-Log]。
無法為[劇院級動態範圍2]或[劇院級影片2]拍攝的影像選擇[劇院級動態範圍2]或[劇院級影片2]以外的照片樣式。無法為不是用[劇院級動態範圍2]或[劇院級影片2]照片樣式拍攝的影像選擇[劇院級動態範圍2]或[劇院級影片2]。
無法選擇[實時LUT]。對於用[實時LUT]拍攝的影像,照片樣式固定為[V-Log]。
![]() [智能動態範圍]
[智能動態範圍]
選擇[智能動態範圍]的設定。
![]() [對比度]
[對比度]
調整對比度。
![]() [突出顯示]
[突出顯示]
調整亮部的亮度。
![]() [陰影]
[陰影]
調整暗部的亮度。
![]() [飽和度]/[色調]
[飽和度]/[色調]
調整飽和度或色調。
![]() [色澤]
[色澤]
調整色相。
![]() [濾鏡效果]
[濾鏡效果]
選擇濾鏡效果。
![]() [顆粒效果]
[顆粒效果]
選擇顆粒效果設定。
![]() [色噪]
[色噪]
新增顏色至顆粒效果。
![]() [降噪]
[降噪]
設定降噪。
![]() [清晰度]
[清晰度]
調整清晰度。
![]() [LUT]
[LUT]
選擇[LUT影像庫]中登錄的LUT檔案。([LUT影像庫])
[更多設定]
[恢復原始影像]:返回拍攝時的設定。
[色彩空間]:從[sRGB]或[AdobeRGB]中選擇色彩空間設定。([色彩空間])
[圖片尺寸]:選擇要儲存影像的大小。
[目的地卡槽]:您可選擇要儲存使用RAW處理影像的卡槽。選擇[AUTO]時,儲存至與要處理的RAW格式影像相同的卡槽。
可調整的項目視所選的[照片樣式]而異。
|
|
|
|
|
|
|
|
|
|
|
|
|
|
|
|
|
|
|
|
|
|
|
|
|
|
|
|
|
|
|
|
|
|
|
|
|
|
|
|
|
|
|
|
|
|
|
|
|
|
|
|
|
|
|
|
|
([飽和度]) |
|
|
|
|
|
|
([色調]) |
|
|
|
|
|
|
|
|
|
|
|
|
|
|
|
|
|
|
|
|
|
|
|
|
|
|
|
|
|
|
|
|
|
|
|
|
|
|
|
|
|
|
|
|
|
|
|
|
|
|
|
|
|
|


-
[顆粒效果]為[低]、[標準]或[高]其中之一的情況下即可設定。
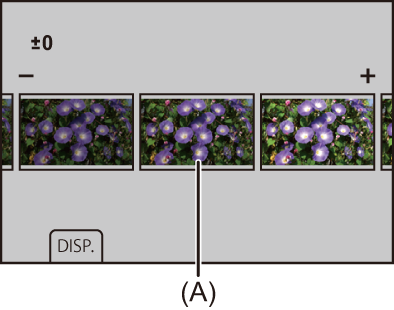
顯示比對畫面
可以一邊變更設定,同時並排顯示套用設定值的影像以查看效果。
-
在步驟4畫面中按[DISP.]。
使用目前設定(A)的影像顯示在中央。
觸控使用目前設定的影像以放大影像。
觸控[![]() ]返回到原來的顯示。
]返回到原來的顯示。
選擇[降噪]或[清晰度]時無法顯示比對畫面。
-
轉動
、或變更設定。
-
按
或確認設定。
|
(不過,以高解析度模式拍攝的RAW影像會以[3:2]的[XL]尺寸進行拍攝)
– HDMI輸出 |